Months of preparation, one of those few opportunities, and the
judgment of a split second are what makes some pilots an ace, while
others think back on what they could have done. Colonel Gregory 'Pappy' Boyington, USMC
Like many of my fellow F-15E sim pilots, I love the challenge of
going head-to-head against other "human" sim pilots over the Internet
using Jane's Combat.Net. However, I've found that many people come to
Combat.Net to fly, but few if any arrive with any idea of what they
want to do once they get there and are disappointed at the outcome(s).
This article
will attempt to give new sim pilots and some older ones some food for
thought on planning for their initial Combat.Net missions. The basis
for this article is simple. With some evaluation of your skill level
and a little planning: what you want to work on, what scenarios will
fit the phase of training you are in, and what options you have.. and a
little cooperation from your fellow sim pilots, combat.net can be a
rewarding learning environment.
The first question you need to ask yourself is, "What do I
want to work on?" The skill set that goes into making a fighter pilot
or even a sim fighter pilot is varied and the curriculum is long. A
person going through fighter-lead-in- training just doesn't arrive at
the squadron one-day and hop in the jet the next for a little 4v4 fun.
They are trained according to a standard syabullus, which uses a
stepping stone approach for advancement. Complete one mission or one
block successfully, then you get to advance to the next.
Why then
shouldn't sim pilots take the same approach to their training when
flying against other sim pilots? You've loaded up F-15E, read the book,
seen Combat.Net advertised and you hop on the Internet to the site.
Register and there you are. All those callsigns are people just waiting
for you to kill! Well- not so fast. They probably have been flying for
a while and are just waiting for an easy kill - you!
So let's
back up. What do you want to accomplish? First, you probably want to
just get into the system and fly to see what it is like, what options
are available, how long it takes to sync up, etc. This is called local
orientation and it's the first stop fighter pilots make when they start
their course work. Normally it's a 2 ship with the trainee as # 2. This
can be accomplished on Combat.net as well. Hopefully, you have a friend
you know that can meet you there. If not, that's ok too.
To start, go to Jane's Combat.Net and select casual flight. Why
casual? Because it's for beginners and that's you. Log-in and the pilot
screen appears. Here you will find the central meeting place for
everyone wishing to meet and fight but who want to use less than expert
setting.
Type in what you like to do in the chat box and enter then
click the # 2 position button on one of the 2 person missions. If you
have a friend, they can select position # 1. Have the flight lead
select fly and off you go. The next screen you see will be the scenario
screen. This is where the host selects the parameters of the mission.
The host (#1) will select time of day, weather, weapons,
regen, and position (so everyone sees where everyone is on the tactical
map). Once this is selected, the accept button is clicked and the
mission parameters are sent to other players. You can either accept or
cancel at his point. Select accept and you will see a map appear with
your position # on a colored base. You will also see it in the upper
right corner of the screen.
Below is a text box. Click it on and you can chat with the
other person. To move your position # on the map, just click and drag
it to where you wish it positioned (either on the ground at a base or
in the air). Call ready (type it in) then select fly. You'll see a
loading screen with the version # on it (current version is 1.17) and
then you'll appear on the runway or in the air at the position you put
your #. If on the runway, hopefully # 1 is lined up in front of you. If
not, let him taxi around you and take-off.
Run your engine up to full burner (count to 10) and release
brakes and you are off. This is called 10 second spacing and is
standard for single ship take-off. Airborne - bring your gear and flaps
up. Do a systems check as you close on # 1. Cycle through radar modes
and lock on to # 1. Test your missiles and tone for sidewinders. Close
up and stabilize either right or left of # 1 at 1000' (this will give
you some room to maneuver).
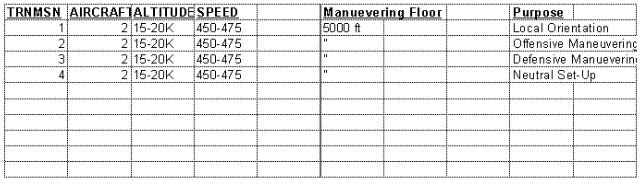
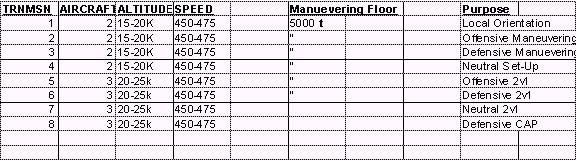
Each one of the following scenarios would normally count as a
syllabus mission in a fighter pilot upgrade program. Except for local
orientation, the maneuvering floor is 5,000 feet over the flat area. No
maneuvering over the high terrain should take place until later
missions. Call Knock-It-Off when one or both reach the floor and set-up
again.
TRNMSN 1: Go to in-trail about a mile. Let # 1 lead you around
the area and look at the sites. Combat.Net area offers a varied play
area which is basically an arid land region with vast flats in the
south, mountains in the north, east and west, and a large body of water
in the north off the coast. There are numerous towns, cities, bridges,
towers; etc scattered throughout the area. Many roads run across the
area and through the mountains. Airbases are also scattered about.
Start at medium altitude and work your way down low. Use the
A/G radar to pick out features and then fly over them. You will want to
become familiar with these, as they will come in handy in later
missions when you drop ordnance on targets.
You can spend as much or as little time as you like doing this. In
addition, you can "ring" the jet out and get a feel for the systems,
calibrate your MK 1 eyeballs to what other jets look like on
Combat.Net, etc. Take time to check out the various TACAN channels and
waypoints which are loaded and see where they lead.
This in itself is a full mission and one which normally would be ended
by a RTB (return to base) for pattern work and a full stop. You can do
this as practice now or you can set up for a fight. If you land, your
fuel isn't replaced or aircraft re-armed. Let's set up for some air
combat maneuvers (ACM).
TRNMSN 2: Basic setup is as follows with you as the # 2. #
2 calls ready. # 1 calls fights on and maneuvers (probably a level turn
with best G available). # 2 maneuvers as soon as # 1 is seen as
turning. The objective is for # 2 to stay offensive and employ rear
quarter (AIM-9P) missiles and/or gun as appropriate. Objective for # 1
is to survive, go neutral, and/or gain the offensive. Repeat as
necessary until # 2 can maintain offensive position consistently
through the fight and kill # 1.
TRNMSN 2: This is the reverse of scenario one. # 2 is now the
defensive fighter with # 1 the attacker. Set-up is the same with 1 and
2 switching initial positions and calls. Objective of # 2 is to 1)
survive; 2) go neutral, and 3) gain the offensive and kill # 1 if able
or else to separate. Again repeat as necessary until # 2 can
consistently survive and gain the offensive.
TRNMSN 3: This is a neutral fight. You can start either by doing
a basic intercept from 20-30 miles apart or you can start together. The
neutral scenario is one where both pilots fight their best to gain the
advantage, having started from a neutral position.
Each
one of these training scenarios gives the practicing pilot different
skills needed to survive in a close in fight. Once they are mastered,
you will be able to enter the fight or extract yourself from one with
greater confidence. Additionally, they are the basics from which you
can learn to employ and win in a multi-bogey environment, which we will
talk about in part 2.
If you notice, I did not talk about now to maneuver your jet once the
fight starts. There are numerous articles and books, which explain the
basic maneuvers, speeds, angles, etc., which are used to position
yourself for the kill. To read about maneuvering and fighter combat in
general, try these articles/books:
1. "How to Live and Die in the Virtual Sky" by Dan Crenshaw (Go to Training Index).
2. "Jane's Expert Flight Manual for F-15E" pgs. 4.72-4.84
3. "Fighter Combat" by Robert Shaw (I consider this the bible of fighter combat-a must read)
Ten Rules for Air to Air Combat
· Wait until you see the whites of his eyes.
Fire short bursts of 1 to 2 seconds and only when your sights are definitely 'ON.'
·
Whilst shooting think of nothing else; brace the whole of the body;
have both hands on the stick; concentrate on your ring sight.
· Always keep a sharp lookout. "Keep your finger out"!
· Height gives you the initiative.
· Always turn and face the attack.
· Make your decisions promptly. It is better to act quickly even though your tactics are not the best.
· Never fly straight and level for more than 30 seconds in the combat area.
· When diving to attack always leave a proportion of your formation above to act as top guard.
· INITIATIVE, AGGRESSION, AIR DISCIPLINE, and TEAMWORK are words that MEAN something in Air Fighting.
· Go in quickly - Punch Hard - Get out!
Flight Lieutenant Adolphus G. 'Sailor' Malan, RSAAF, W.W.II.
Training Syllabus Work Sheet
Click for full chart.
Warren "Big Red" Hudson is a former USAF officer. During his 17 year
career, he served as a fighter controller, instructor, evaluator, AWACS
Mission Commander, and USAF Aggressor @ Nellis AFB.
Warren has over 200 hours of backseat fighter time in USAF/Canadian
T-33, F-4, CF-18, F-15, F-5/AT-38, and F-16. Additionally, he has over
1000 hours as an E-3 AWACS Mission Commander and over 6,000 recorded
tactical engagements as a fighter controller.
Of all my accomplishments achieved during the war, I am proudest of the fact that I never lost a wingman. Colonel Erich "Bubi" Hartmann, GAF, aka "Karaya One," worlds leading ace, 352 victories in W.W. II.
In Part 1 of Air Combat Maneuver (ACM) Training
we discovered how to get on Jane's Combat.net and then discussed
several missions a new sim pilot could use as a step toward
understanding ACM and being successful in combat. This second part
covers training missions as part of an element (a 2-ship).
By now we'll assume you have completed the first four missions
in the training syllabus outlined in Part 1. These missions were/are
designed to get you familiar with the area you are flying in, the
aircraft you are flying, and initial combat maneuvering against a
single opponent using established guidelines. Successful accomplishment
of 1v1 ACM builds experience in maneuvering against a bandit and either
killing, escaping, or remaining neutral with the single bandit till he
gives up and "bugs out" or makes a mistake.
While 1v1 ACM builds confidence and experience for the
fighter pilot, rarely will you enter a fight as a "single ship."
Universally, western fighter tactics are built upon the employment of a
2-ship as the standard fighting element. All other formations and even
tactical training use this 2-ship element as the basis for employment.
While there may be occasions that a "single ship" is used, (air defense
against bombers or possibly cruise missile defense), it is a rarity and
not the preferred way to employ fighter assets.
To understand 2-ship employment you must first know and be able to fly
basic 2-ship formations. The formation you fly is determined first by
where you are (point in time) during the fight. We will cover three
basic formations used by the 2-ship element during ACM training.
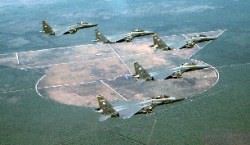
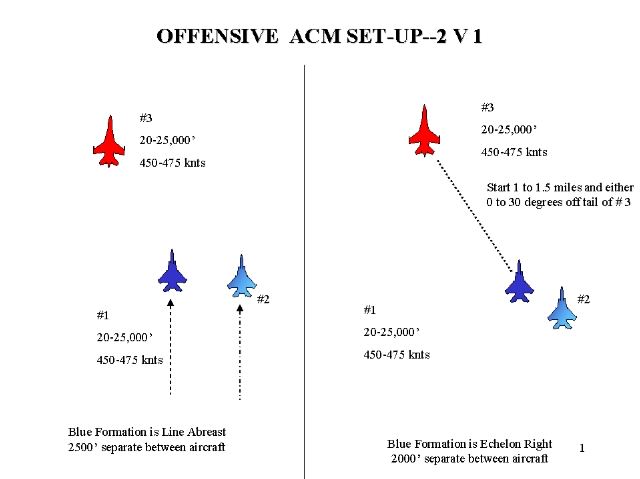
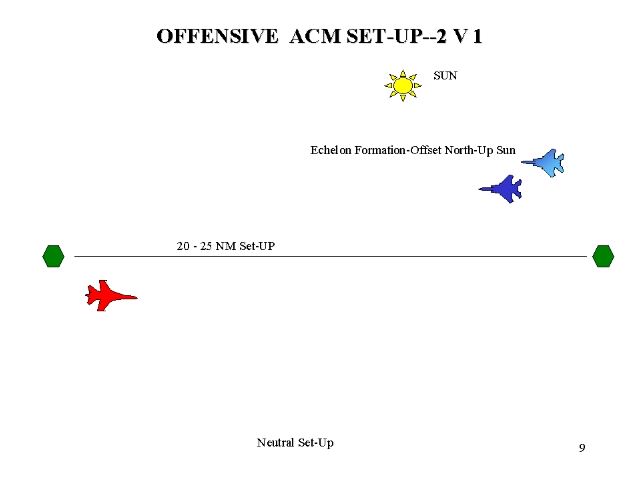
Offensive ACM Set-up: 2v1
2 Ship Formations
There are three basic formations you can use as a 2-ship element to
begin the fight. The first and most offensive of these is the echelon
formation. Echelon is a highly offensive and maneuverable formation
with the #2 fighter positioned 35-45 degrees angle off #1's tail. #2 is
separated from #1 by 2000-2500 feet horizontally and either stacked
high or low in altitude.
The altitude stack is dependent upon whether the bandit is high or low.
Stack high if the bandit is low and low if it is high. This allows #2
to look through # 1 to visually acquire the target.
The trail formation can be used at night or in poor weather, or when
you wish to simply gain additional horizontal separation from #1. In
trail formation #2 is 1-2 nautical miles back and either level or
stacked. Caution must be exercised when using this formation since if
#1 becomes engaged it leaves him fighting as a single ship for a longer
period of time until you can arrive on the scene.
Finally, the line abreast formation can be used as either an
offensive or defensive formation. Offensively, the line abreast offers
both aircraft the room to use their on-board radars to effectively
sanitize the area as they ingress into the area. Additionally, whoever
sees the bandit can now easily take the lead and become the engaged
fighter with the other providing support.
Defensively, line abreast offers the "best" defensive formation for
neutralizing a bandit attack from the rear or for exiting the area. It
offers excellent visual checks of the 6 o'clock area of each fighter
and can be used with RWR to tell who the bandit is attacking.
In addition to practicing ACM with a 2-ship element, 2v1 training
allows the training pilot to practice "comm" or communications with the
leader. Effective maneuvering and effective communications are two key
elements to a successful ACM engagement.
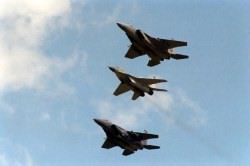
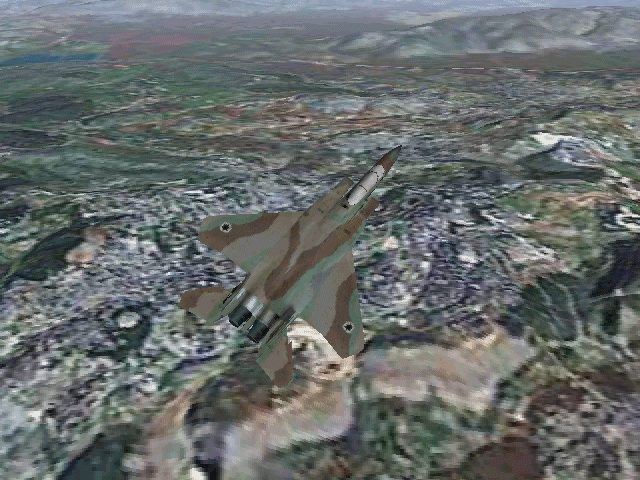
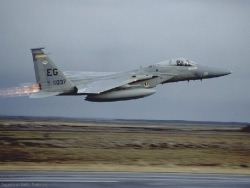
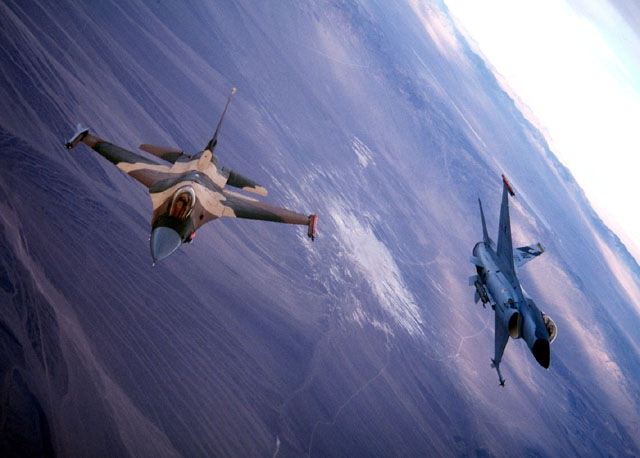
IAF F15
A good fighter pilot, like a good boxer, should have a knockout
punch... you will find one attack you prefer to all others. Work on it
till you can do it to perfection then use it whenever possible---Captain Reade Tilly, USAAF
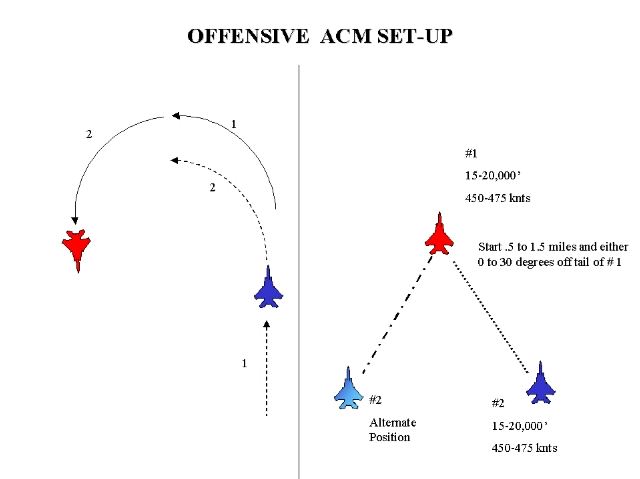
TRNMSN 5. -2v1 Offensive ACM
This mission is designed to practice 2v1 ACM against a single
cooperative bandit. We use the word "cooperative" because the bandit is
limited to a single move or series of scripted moves in order that the
necessary training be provided. As the training pilot progresses, the
missions become harder and the bandit becomes "uncooperative" and is
free to maneuver at will and fly his best fighter. This mission starts
out with the 2-ship .5 to 1.5 NM in trail and 0 to 30 degrees angle off
the bandit's tail.
All aircraft are between 20-25000 feet and between 450-475 knots.
Everyone calls ready and #1 calls "fights-on" on the common radio
frequency. At "fights on," the bandit executes a defensive turn away
from and level with the attacking fighters.
At this point the fight becomes a regular ACM engagement as you learned
in TRNMSN's 2-4 with two notable exceptions: 1) You must know where the
bandit is and where your leader is at all times, and 2) You must
communicate your intentions to and your understanding of what #1 is
doing. A typical flow of communications might be:
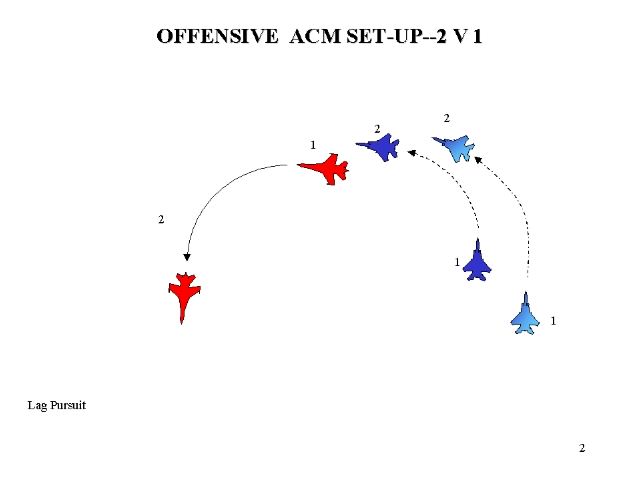
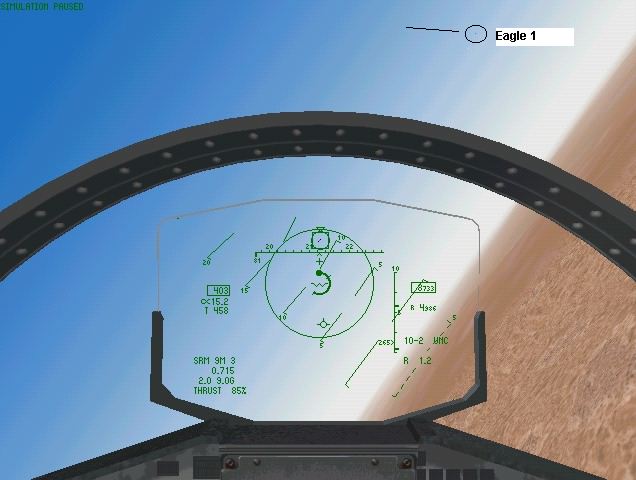
Lag Pursuit. Click any image for larger.
Eagle 1: Eagle flight ready
Rhino (bandit): ready
Eagle 1: Fights On
Pause to see the bandit maneuver
Eagle 1: Eagle 1 is tally single bandit left turn through NW, 20,000' engaged
Eagle 2: Eagle 2 tally-supporting
Notice that Eagle 1 is doing most of the talking. Why? He is the lead,
saw the bandit first, and called "Engaged." Eagle 2's job is now to
support #1 and help kill the bandit through maneuvering to an offensive
position and/or watching to make sure no other bandit sneaks up and
kills both of them (sneaky gomers wouldn't do that--would they?)
At this point one of three options exists. #2 can turn with
#1' #2 can extend and gain maneuvering room in order to enter the fight
at a better advantage. #2 can cut across the turn circle and try and
bracket the bandit. Each option has its own merits.
Lag Pursuit.
Option One
By turning with #1, #2 maintains good mutual support and tally
on the bandit. As #1 continues to turn with the bandit, #2 can slide to
the outside and try for a firing solution. However, it may take some
time for this to develop. If the bandit reverses his turn, this helps
out the firing solution and both #1 and #2 should be presented a shot.
If the bandit continues, #1 should be able to achieve a shot or have #2
engage.
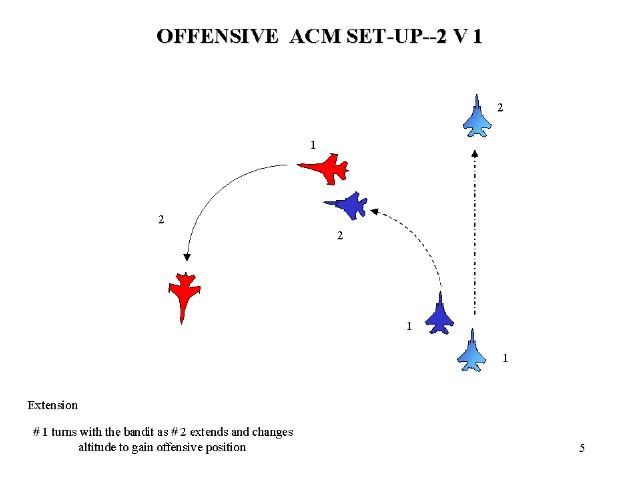
Extension.
Option Two
#2 extends as #1 turns with the bandit. #2
uses the extension as a means to build separation and enter the fight
from a favorable angle. Additionally, it is hoped the bandit will lose
sight of #2 and #2 will have an un-observed entry on the bandit. The
bandit is presented with a catch-22. Whichever way he turns, a fighter
is in position to engage him.
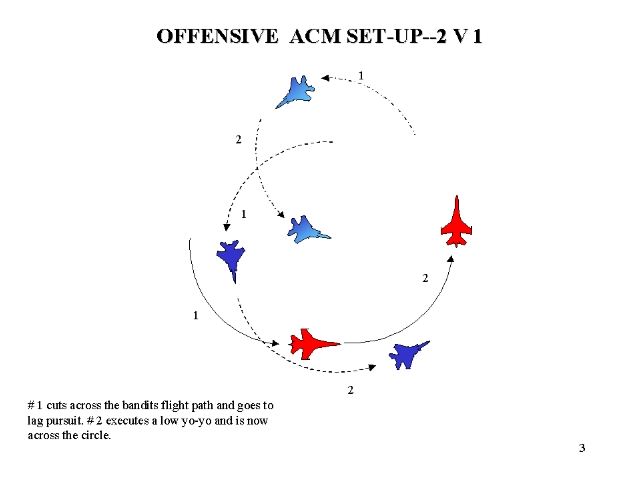
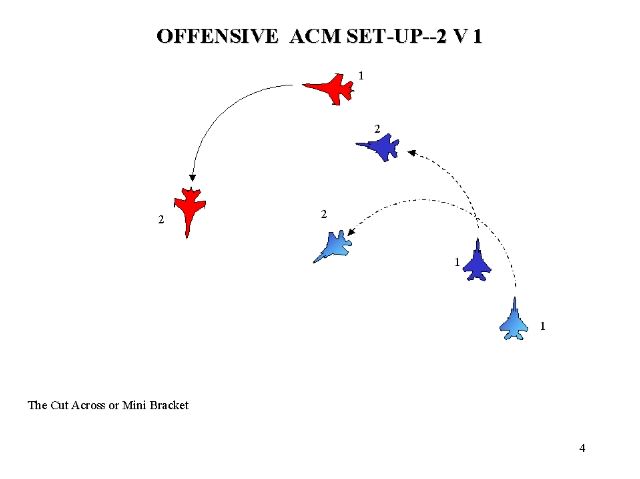
Option Three
#2 cuts across the circle at the initial turn. This in effect
puts the bandit in a mini-bracket and again whichever way he turns, a
fighter is in position to engage him.
Mini Bracket.
Again, comm is essential to the element. Let's continue with an example of typical comm while engaged.
Eagle 1: Eagle 1's bandit is continuing through west-Eagle 2 extend north
Eagle 2: Roger--Eagle 2 extending north
Eagle 1 has given the command for Eagle 2 to extend North and work an entry from that direction.
Eagle 1: Eagle 1 is pushing the bandit
through south-no shot (pushing means to drive the bandits' direction of
flight using offensive maneuvers)
Eagle 2: Eagle 2 is tally-visual entering from the north
Eagle 1: Eagle 1 copy
Eagle 2: Eagle 2 is engaged offensive-Eagle 1 come off
Eagle 1: Eagle 1 is off-supporting
Eagle 2: Eagle 2-Fox 2-Kill-off south
Eagle 1: Eagle 1 is visual-joined.
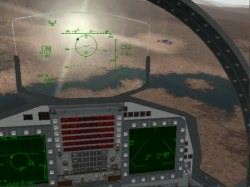
Janes F15 HUD
Simple but effective comm and a bandit kill!
TRNMSN5 should be practiced using different formations,
different ranges to the bandit, and different maneuvering options until
the training pilot is proficient.
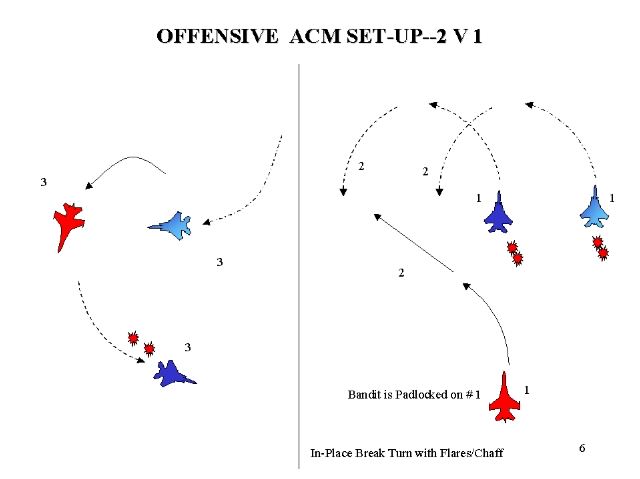
TRNMSN 6-1v2 Defensive ACM
This mission is the reverse of MSN 5. Its purpose is to
practice defensive maneuvers and communication against a cooperative
attacker. In this scenario, the attacker is briefed in one of three
options to use against the element.
Option 1 is to stay on the initial target throughout the
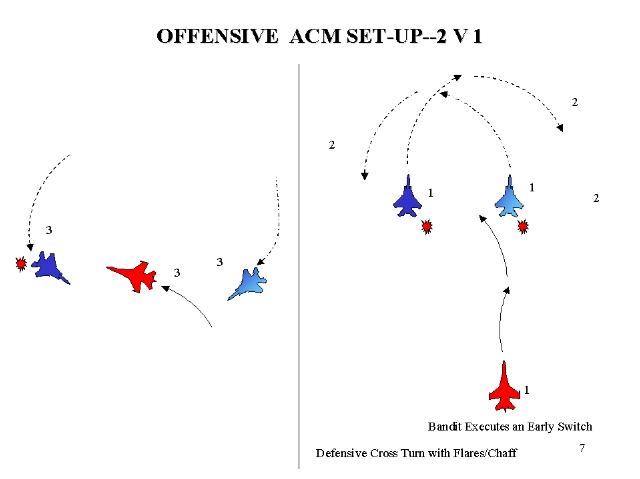
fight. Option 2 is to perform an early switch, to initially attack one
target but quickly switch to the other fighter and then stick with that
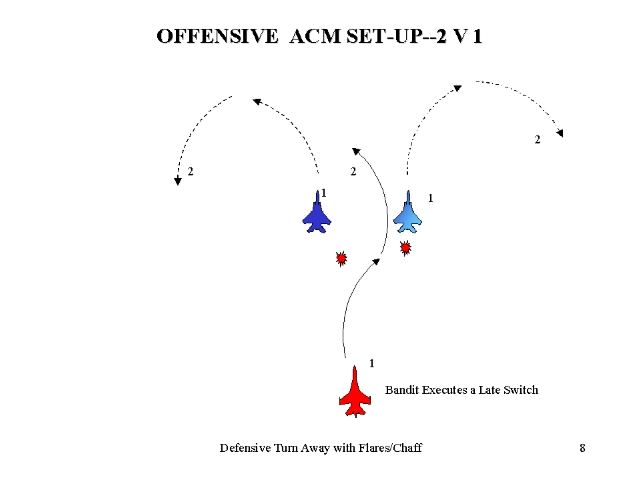
target. Option 3 is to perform a late switch. This option again
involves initially targeting one fighter to get him to turn and then
coming off that bandit and switching to the other fighter. The element
can perform 1 of 3 defensive maneuvers to counter the initial attack.
The key, however, is to first detect the attack and this is
why the line abreast formation is the "best" choice for a formation.
TRNMSN 6 begins with the same set-up parameters as TRNMSN 5 except the
bandit is the attacker.
Bandit Padlocked on #1.
Initial Defensive Moves
Once the attack is detected (either through visual, RWR, or
missile trail/gunshot) the element can perform one of three moves. The
element can perform an in-place turn.
This forces the attacker to choose one target (if he hasn't). This
fighter becomes the defensive fighter and the other fighter can
maneuver for a shot.
The free fighter is able to reverse the initial turn and gain offensive
position on the bandit. Essentially, you have created a sandwich with
the bandit sandwiched between #1 and #2. #1, however, is in a
precarious position and #2 must act quickly.
The cross turn is used to make the bandit choose a target and
free up the other fighter. It may also help to confuse the bandit and
make him hesitate on which target to attack. More importantly, it can
place the untargeted fighter in a better offensive position quicker.
Finally, the turn away is just the opposite of the
cross turn and is used to build even more separation and turning room
for the un-targeted fighter. Typical defensive comm would sound like
this:
Upon detection of attack call for a break.
Eagle 1: Eagles break left-bandit deep 6 attacking (flares and chaff automatic at the break call)
Execute the break into the bandit when able to cause an overshoot
Eagle 1: Eagle 1 is Tally single bandit left turn (altitude, speed, etc)-he 's on me
Eagle 2: Eagle 2 is tally-visual-engaged
Eagle 1: Eagle 1s bandit passing left continuing to turn through west
Eagle 2: Tally engaged-Fox 2-Kill-Off north
Eagle 1: Eagle 1 is visual-joined
It can be that quick!
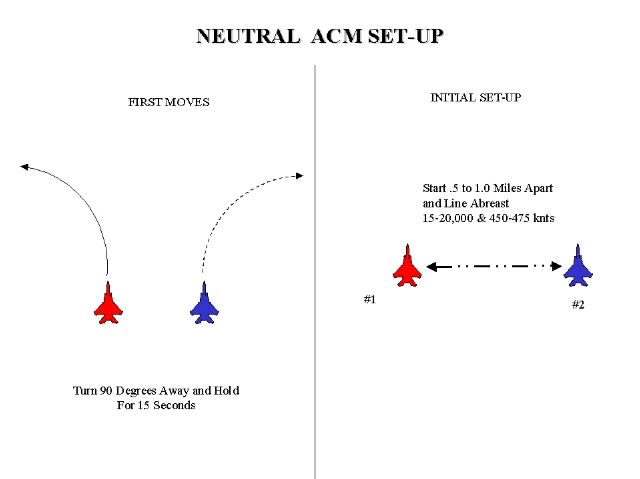
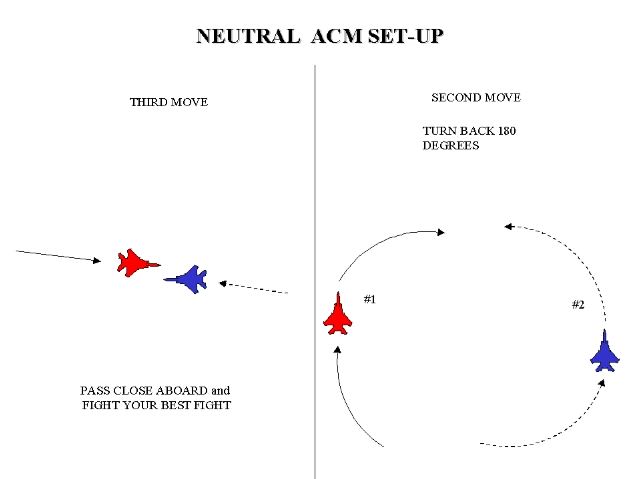
TRNMSN 7-2v1 Neutral
This mission starts from a BVR (beyond visual range) set-up and
concludes with a visual engagement using the entry maneuvers practiced
in the previous missions. Start with an initial set-up of 20-25NM and
at a pre-determined CAP (Combat Air Patrol) point. Altitude and speeds
remain the same for the Initial CAP. Eagle 1 calls "ready" and "fights
on" at which time the bandit is cleared down track. The element leaves
the CAP once the target is detected and maneuvers for offset. The
offset serves two purposes.
First it gives you maneuvering room to turn. Second, it takes you off
the bandits radar search area or at least to the edge of it. A change
in altitude is also advisable at this time.
When using the offset, strive to be higher than the bandit (potential
energy) and offset so that the element is coming out of the sun during
the attack. Do not, however, cross the bandits nose just to gain the up
sun position. The bandit can maneuver once he has tally on the element
passing his 3/9 line (wings) or the element calls a shot. From this
point it is standard element maneuvering. Repeat as necessary until
proficient and use different formations.
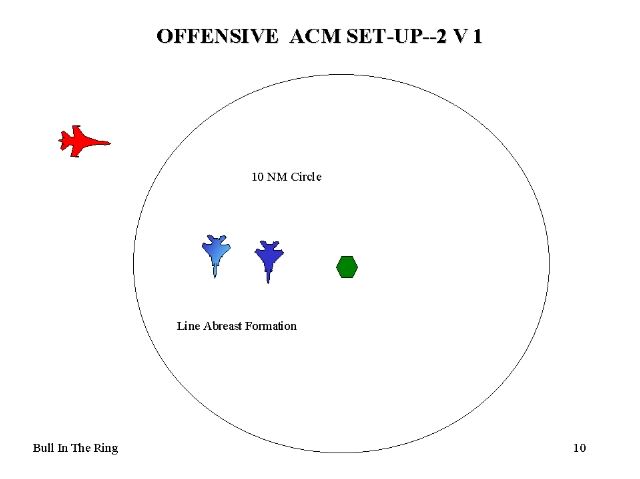
TRNMSN 8-1v2 Defensive ACM
This mission differs from the
previous missions in that now the bandit will attack using different
altitudes and coming from different cardinal directions. This mission
is also known as the "bull in the ring."
Establish a CAP point in the area. The element must stay
within 10NM of the point at all times. Element set-up is line abreast,
20-25,000 feet, and 450-475 knots.
At fights on, the element must defend itself from the single
bandit using good visual lookout and short range radar work. The bandit
can enter the fight from any altitude (not below the floor) and
direction. Call a "terminate" after each attack to allow all players to
set-up again. Repeat as necessary until all attacks are detected and
your response is successful.
Once these training missions are complete, the training pilot is ready to proceed to 2v2 ACM, which will be covered in Part 3.
Bull in the Ring.
Fighting in the air is not a sport. It is scientific murder. Eddie Rickenbacker, "Fighting the flying Circus," 1919
Warren "Big Red" Hudson is a former USAF officer. During his 17 year
career, he served as a fighter controller, instructor, evaluator, AWACS
Mission Commander, and USAF Aggressor @ Nellis AFB.
Warren has over 200 hours of backseat fighter time in USAF/Canadian
T-33, F-4, CF-18, F-15, F-5/AT-38, and F-16. Additionally, he has over
1000 hours as an E-3 AWACS Mission Commander and over 6,000 recorded
tactical engagements as a fighter controller.
Part III
"Nothing is true in tactics."
-Commander Randy 'Duke' Cunningham, USN
"A fighter pilot must be free to propose improvements (in tactics) or he will get himself killed."
-Commander Randy 'Duke' Cunningham, USN
With the successful completion of the first eight training missions associated with ACM Training: Jane's Combat.net Parts 1 and 2,
you are now ready to proceed to 2v2, 4v2 and 4v4 missions to complete
your training and graduate as a "fully qualified" air-to-air sim pilot.
In Parts 1 and 2, we detailed missions which used a stepping stone
approach to lead you from getting familiar with the aircraft and
training area to basic maneuvers against single bandit and finally to
cooperative maneuvering with a wingman against a single bandit. Now it
is time to train against 2 or more uncooperative bandits. Remember that
except on rare occasions western fighter doctrine calls for employing
as a 2 ship or element against opponents.
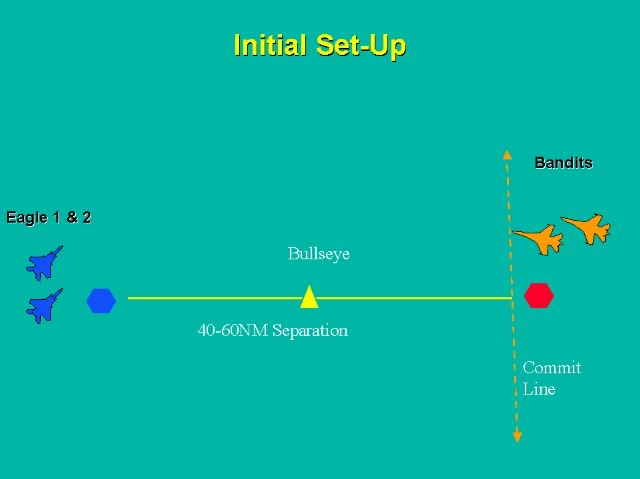
General:
The initial set-up for each mission in this phase should be at least
40nm but not more than 60nm. This gives ample room for the element with
student to maneuver and use their radar to find the bandits.
It also allows time to "see" the desired tactic or presentation on the
radarscope before actually engaging the bandit(s) with missiles. As in
TRNMSN 7 pick two CAP points and establish them in the desired training
area. A technique to use is to make the bandit's CAP point your
"bullseye" point. This will eliminate the need for having additional
waypoints loaded on your MFD.
If you prefer to have separate CAP and bullseye points, put the
bullseye midway between the two CAP points for easy reference (see
figure 2). Each fight starts with a "ready" call from both sides and a
"fights on" call from the blue (training) flight.
At "fights-on", the red (bandit) aircraft are cleared to head down
track. Blue will wait until they detect the bandits on radar and the
bandits meet "commit" criteria. Commit criteria can be anything such as
crossing a certain point, a range between groups, a hostile act, etc.
Commit criteria in these missions will be a heading toward the blue
element and past the red CAP point. All altitudes can be used (Israeli
training method) or you can use a floor of 5,000 feet as in the other
missions.
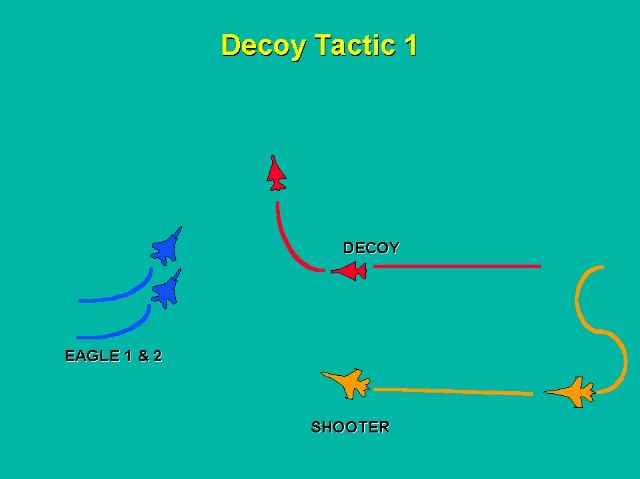
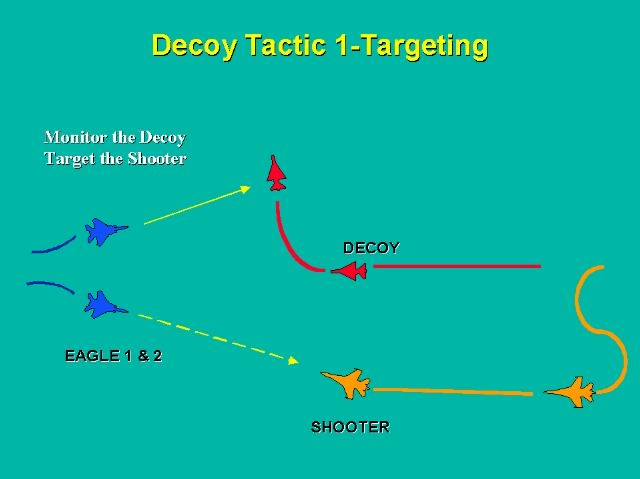
ACM against Decoy Tactics:
Training missions against decoy tactics are designed to teach the
student what decoy tactics are and what they look like in the air and
how to successfully engage the offensive or shooter bandit(s). All
decoy tactics have several common factors:
1.) They normally start out as a single group.
2.) At prescribed ranges, the group breaks into 2 distinct groups separated by X miles.
3.) At X miles, the 1st group will perform or demonstrate some type of
beam or drag maneuver in an attempt to hold your attention while the
trail group (shooter) attempts to engage unseen or at lest fire the
first BVR missile (see figure 4).
The classic mistake made by students is to focus all their attention on
the closest group and to lose track of any trail group. Through good SA
and radar work, however, all groups can be successfully
engaged/destroyed or driven from the area.
"We were too busy fighting to worry about the business of clever tactics." -Harold Balfor, RAF. W.W. I fighter pilot and British under Secretary of State for War
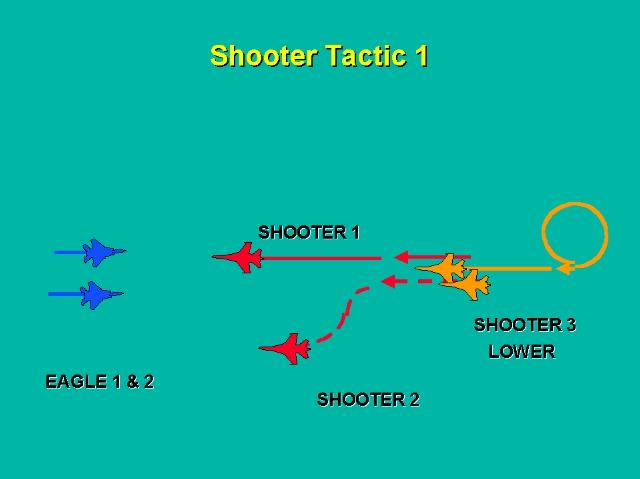
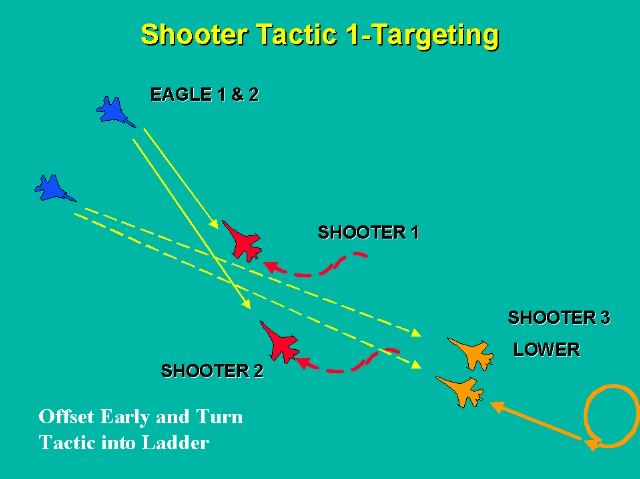
ACM against Shooter Tactics:
Training missions against shooter tactics are designed to teach
the student to recognize the tactics presented involves multiply groups
of bandits all of which are concerned shooters (see figure 5).
Unlike decoy tactics where one group will eventually turn away, shooter
tactics involve all bandit groups firing missiles and trying to get to
the merge to kill your element. Shooter tactics have several common
factors.
1.) Like decoy tactics, they normally start as a single group.
2.) At prescribed ranges, the group breaks into two or more
distinct groups separated by X miles. This range is normally larger
than the one used in decoy tactics.
3.) All groups will maneuver to attempt missile firing. Again, the classic mistake is not finding and targeting all groups.
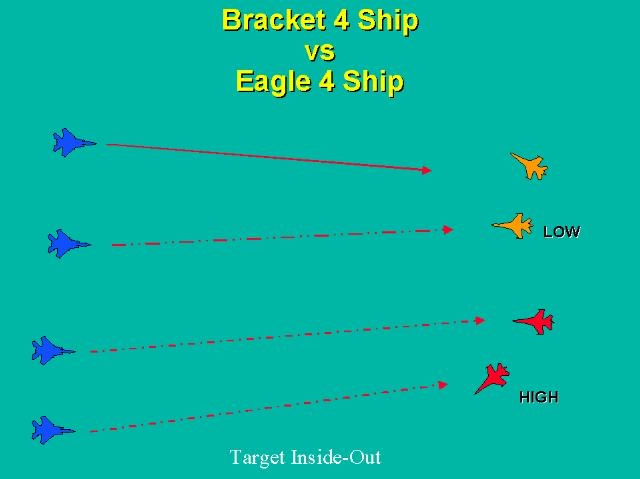
This is a 2v2 against a bandit group employing decoy tactics. Begin the
mission at the appropriate CAP points. Blues should commit when they
detect the red group leaving their CAP area and heading down track.
Commit formation can be either line abreast or echelon. At initial
commit radars should be set to look at the entire area. You will wish
to ensure both horizontal and vertical coverage so that no one can slip
by.
For this mission, the bandits will show one of three presentations.
Your job is to first recognize what is happening; second, communicate
your understanding to your wingman; and third, target each group
appropriately, with the most threatening bandit first. Fourth, target
and kill any others; fifth, survive. For any decoy type of
presentation, you should ensure both groups are found, monitored and
then engaged (see figure 7). Repeat as necessary to see all three
presentations.
TRNMSN 10. 2v2 ACM
This is a 2v2 against a bandit group employing shooter tactics.
Begin the mission the same as MSN 9. For this mission, the bandits will
present one of two presentations in which all bandit aircraft are
potential shooters i.e. no bandit aircraft will try to decoy or drag
away from the fight.
This does not mean the bandit aircraft will not beam in order to
break radar locks or decoy potential missile shots against them. For
any type of shooter presentation, you should ensure all groups are
found, monitored, and engaged before they have the opportunity to shoot
first. Additionally, do not let the bandit(s) get outside of your
formation into a position of advantage against your element (see figure
8)
TRNMSN 11. 4v2 ACM
This is a 4v2 against a bandit group having superior numbers at
the start of the engagement. Bandits can employ either decoy or shooter
tactics (1 each).
The key to success for this mission is try and force the bandits into
some type of ladder formation by offsetting to one side. By forcing
this type of formation on the bandits, you can then target successive
waves of bandits in a logical manner and not be forced to engage
multiple bandits at the same range (see figure 9)
This is a 4v4 against a bandit group having equal numbers.
Additionally, it is the first mission were the student has more than
one element in the blue group to maintain situational awareness
throughout the engagement.
The student should act as a wingman for # 1 on the first two
engagements and then as # 1 on any other engagements to practice
directing the other aircraft into the engagement (see figure 11).
With the successful completion of mission 12, you have the
necessary training to go out and compete successfully against and with
your fellow "sim" pilots on Jane's Combat.Net or any other forum you
choose. The purpose of this series of articles was to give the new sim
pilot and even those who have been around awhile a series of structured
training missions to work from in preparation for successfully flying
on-line or even by themselves. This series is certainly not the "final
word" in sim pilot ACM training.
There are many fine articles on COMBATSIM.COM and other places both
on-line and in written "hard copy" formats for you to use. This is just
another tool for you to use in your quest to become a better "player"
which gives you a proven structure for training, which I both observed
and used during my time in the USAF. Good luck and good hunting!
Credits:
Figures 1,3,10 curtesy American Fighters (www.ellsworth.com)