A year ago, when I purchased Falcon 4.0, I had preconceptions about how
immersive this combat flight simulation would be for me. It has, as my
wife will attest, become quite consuming for me. In fact, I am
beginning to plan how I can generate more free time for myself so that
I can dedicate more time to Falcon 4.0 and the next generation of CFSs.
Early on, before I joined the 404th T.F.W. (shameless plug for
my first online squadron), I spent an equal amount of time scouring the
Internet for tactics, hints, and tutorials as I did flying Falcon 4.0.
This probably helps explain my only average pilot skills or, in any
case, it is the explanation I choose to use. More recently, I have
become enamored with another aspect of Falcon 4.0 that detracts from my
flying time, mission building.
In 1999, I download Glenn "Sleepdoc" Kletzky's article on
mission building. I worked through one of the best step by step
tutorials I have ever read and completed my first mission that same
night. Sleepdoc's tutorial is required reading for anyone that wants to
get started building missions. It is recommended that you read his
article before you read mine as I refer to several things in his
article rather than copy them here (which would require the author's
permission).
I have over two hundred missions in my \Falcon4\Campaign\Save
folder, most were written by other people, and, disappointingly, many
have problems. Have you ever loaded a mission where the routes between
steerpoints are red? Have you ever flown a mission when no enemy
aircraft, SAMs, or AAA defenders appeared even though the briefing map
showed plenty? Has your Escort, Sweep, or HAVCAP ever RTBed just as you
began your ingress? Then you have been the victim of BMB (Bad Mission
Building)!
This series of articles will discuss three things: 1) Building
missions the right way the first time (this article). 2) Fixing busted
missions (next article). 3) Mission building tricks to add excitement
and uniqueness to your missions (look for the following symbol)..
Let's get to work! We will be building a mission which I have titled, "404th To the Rescue."
F4 Tactical Engagement
First we must plan the mission with as much detail as we can
muster. A friend of mine uses a white board with erasable markers to
literally draw out the flight plans for all his missions before his
fingers ever touch the keyboard.
Planning is critical in Falcon because the order of mission assembly is
very important. It is critical, prior to creating a package, that the
reason for the package to be tasked has already been placed in the
simulation. Your package cannot target something that does not yet
exist. If you are creating an intercept mission then you must put in
the aircraft to be intercepted first. If you are creating an air mobile
mission then the troops to picked-up must be in place before you add
the aircraft to pick them up.
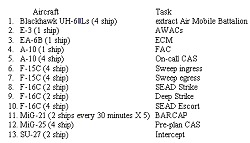
Mission planning requires the following information:
1) Objective (see list at end of article) for a list of the primary package types.
2) Support required. This will include type and number of aircraft, and their assignments, plus any ground support.
3) Air miles for all flight paths. You should generate this with
a 'test' mission. Go into the mission builder and create a flight from
airfield to target area for every flight. After setting up this test
mission just view the Briefing and add up the total flight miles.
4) Range for all aircraft.
When I build a mission I start planning from the center out. In
404th To the Rescue I was going to build an air mobile mission to
rescue troops that were trapped after a failed assault on an enemy
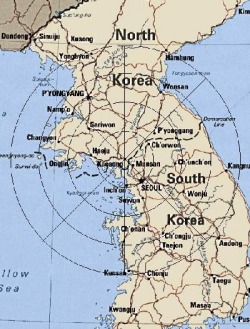
target. I began by looking at the map of Korea for a location for my
rescue.
A mission flown over the heart of Korea would probably result in
tremendous losses if built with a realistic number of enemy defenses.
Even if you could sneak in, you would have to fight your way out. Hmmm,
that little peninsula just south of Ongjin looks promising. What is
there?
This would provide the opportunity for some CAS, SEAD, and Strike
missions to provide coverage and protection for the retreating
battalion until the helicopters can make the pick up. Step one
completed, we have the mission objective.
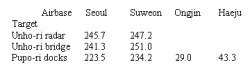
The Pupo-ri Naval Base, the Unho-ri Radar Station, a few bridges on
the peninsula and the Ongjin Airbase is nearby. The idea occurred to me
that an assault with a retreat to a waterside pickup was just what the
doctor ordered here (with apologies to Sleepdoc). Hence the mission
would be to pickup an Air Mobile battalion after they capture a North
Korean decoding machine temporarily setup in the Unho-ri Radar Station.
The Air Mobile would retreat across the peninsula to the docks at the
Pupo-ri Naval Station.
Step two is planning. The DPRK will be aware of the failed
attempt to capture a radar station. They will probably send some type
of response to capture or destroy our battalion. The Ongjin Airbase is
the most likely location for armor and CAS reinforcements to be
located. These would not be front line units so there will be a delay
before they are mobilized. We will need to keep our troops alive long
enough for the choppers to attempt a pick up.
And the choppers are hardly going to survive if they have to land in
the middle of an enemy armor battalion or a CAS strike. The mission
will take place in the early morning because I love watching the
'fireworks' at night. The mission could include a scramble flight to
allow the Air Mobile Battalion to survive long enough for the
Blackhawk's and all their support aircraft to arrive.
The sequence of events could be:
1. Attack on Unho-ri Radar Station fails.
2. Air Mobile Battalion (AMB) retreats and calls for pickup.
3. DPRK mobilizes armor to cut off AMB's retreat.
4. Joint Forces Air Command (JFAC) assembles package for extraction.
5. JFAC notes DPRK armor movement and scrambles deep strike to cut DPRK armor's access to extraction point.
6. JFAC tasks package with full electronic and air cover support (ECM, AWACs, HAVCAP, Sweeps, etc.).
7. DPRK sends CAS with CAP support to eliminate AMB.
8. JFAC package arrives at extraction point and successfully protects package.
9. Blackhawk's extract AMB.
10. DPRK scrambles intercept for Blackhawk's.
Additionally, DPRK BARCAPs will be patrolling their side of the
DMZ (this will conveniently put the BARCAPs directly in the path of the
incoming package.) Based on the above sequence of events we will need
the following flights (in no particular order):
Put every type of flight in your list that you might want in
your mission. When you build a mission it is easy to delete flights
that you determine are unnecessary but impossible to add them (after
you complete a package). If you determine that the second sweep swings
the balance of power too strongly (too easy a mission) to the Joint
Forces side then just delete it. You might add an additional F-16 SEAD
or CAS flight to play with. I prefer to limit the number of 'flyable'
flights in my missions so I can build a mission that really focuses on
just one or two flights but has lots of action.
Try to mentally group the flights into packages which have no
more than five flights. In the above list, for example, the AWAC and
ECM are a natural combination (both are stand off support), as are the
two sweeps. The enemy BARCAPs can be grouped together. The reason for
this limit is that the steerpoint editor drop down menu will only show
five flights. You can have more flights in a package but errors in
editing the steerpoints happen more frequently if you can't check the
flights callsign as you edit.
Now we need to look at the map again to decide where the
friendly and enemy squadrons will be located so we can calculate air
miles. When we take a look at the map and remember that squadrons can
only be stationed at airbases, the closest Joint Forces airbases are
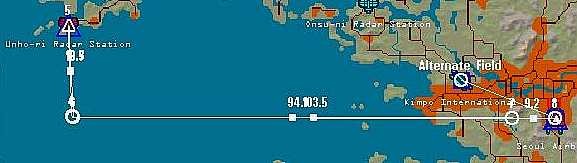
Kimpo International, Seoul, and Suweon. I avoid using Kimpo because I
thought I remembered that the Joint Forces tried to limit the military
use of that airport. That leaves us with Seoul and Suweon for the Joint
Forces. We have already chosen Ongjin for the DPRK, so let's add Haeju
for the DPRK too.
Use more than one airbase to task your flights. It reduces the
mess on the runway at take-off and it is more realistic. This is one of
the reasons for assembly steerpoints.
Now it is time to 'test' build a flight from each airbase to each
target area to estimate the flight miles. Build the flights using 90
degrees ingress. This will provide mileage with some cushion to move
the endpoints, have multiple targets, or set flight paths to avoid
enemy emplacements or CAPs.
Call up the briefing and total the distances for all the waypoints.
Just reuse the flight for each target (you will only have to
create one flight for each airbase then drag the target steerpoint
around to calculate all the distances).
Why calculate all this? Ever downloaded a mission where an aircraft's
flight path was completely red? You looked at all the steerpoints and
nothing appeared wrong (no impossible to achieve speeds, or altitudes).
The poor fellow was out of gas!
Falcon flags a flight plan that exceeds the range of an
aircraft by making it red. The combat radius for each type of aircraft
is in the Technical Reference Guide under Performance. You can fly
farther than the stated combat radius but you have no extra fuel for
dog fighting or other high fuel consumption maneuvers.
Helicopters have very short ranges compared to most fixed wing
military aircraft. They also can not refuel in-flight. The Blackhawk
has the longest range of any helicopter in our inventory with 160nm
combat radius.
The Seoul and Suweon airbases just are not going to work. We will ferry
a four ship to Kimpo, refuel them, and task them from there (We must
set the Blackhawk squadron at Seoul and use our imagination for the
rest. The mission editor has no provisions for ground refueling.) That
distance is 169.6 or less with a straight shot back. The A-10s are on
the edge with a 250nm combat radius but OK tasked out of Seoul.
Aircraft combat radius:
UH-60L 160
E-3 1000
EA-6B 450
A-10 250
F-15C 1060
F-16C 500
MiG-21 200
SU-27 810
Now we have all the information to begin planning the mission. We are ready for Part 2.
Part II
This series of articles is discussing three things: 1) Building missions the right way the first time (first article
and this article). 2) Fixing busted missions (next article). 3) Mission
building tricks to add excitement and uniqueness to your missions (look
for the following symbol)..
The sequence of events for 404th To The Rescue is:
1. The 116th Air Mobile Battalion completes their hijacking of
the DPRK decoder from the Unho-ri radar station and begins the run for
their pick-up at the Puho-ri docks.
2. The DPRK mobilizes the 3745th Armored Battalion to intercept and capture the 116th AMB.
3. Joint Forces Air Command scrambles a deep strike to destroy
the Unho-ri bridge thereby cutting the 3745th's access to Puho-ri. The
deep strike will include a SEAD strike to disable or destroy the
Unho-ri radar station in preparation for the extraction package (this
is our first flight)
7. Air Mobile package support departs (this is our second flight!).
8. Air Mobile Package makes pickup of the 116th AMB.
9. DPRK sends an intercept to shoot down Air Mobile Package.
10. DPRK flies BARCAP's to protect the Unho-ri peninsula (30 minutes on station, tasked every thirty minutes).
Order of mission assembly is critically important. Think about
how the sequence events would occur in the real world then assemble the
mission in the same order.
We begin construction of our mission with a series of trial and
error placements of the various air and ground forces to determine the
starting time for each action. Get your pencil and paper out to record
the times.
We will try to build the 'final' version of the mission at one
sitting with only one save. I can do this about 50% of the time. I can
build a mission with two saves about 95% of the time so don't get
frustrated if you get to the end of the mission and find you made a
mistake that requires a second save.
Do not 'save' a mission more than six or seven times. This is
the only advice I will give that is contrary to Sleepdoc. My experience
has been that missions built with the add a flight then save, make a
change then save, do anything then save approach get porked by the
mission editor more than occasionally. This requires that you plan your
mission and build your plan. If you build a mission right the first
time, there can be five cycles of fly the mission, tweak it, save it,
and fly it again without exceeding the six saves rule.
Our mission is a night mission. We will need to 'guesstimate'
the approximate pickup time for the Air Mobile Battalion (AMB) by
timing their run from the radar station. By placing the AMB and running
the clock forward until they arrive at the pickup point, we can
estimate the start. Before we start, let me repeat, READ SLEEPDOC'S
PRIMER ON MISSION BUILDING. Anything that he explained, like placing
ground forces, will not be repeated in this article. His article is the
best place to start. Complete it first then come back here.
Place all the ground forces first. I have yet to figure out how
to edit the waypoints for ground forces. Editing waypoints for aircraft
is simple and powerful.
Place the AMB at the radar station.
Select the AMB by single clicking on it.
Select the edit circle and drag it to a point south of Pupo-ri. Ground
forces have set waypoints. We can take advantage of this by attempting
to place the endpoint of the 116th's advance in the water south of
Puho-ri. The mission editor will insert a path along the road from the
Unho-ri radar station to the Puho-ri docks for our troops.
Select the minute numerals on the mission clock and begin advancing
the time. The 116th AMB will begin advancing towards the docks. Note
the time when the battalion arrives at the docks (try to get the exact
minute that the battalion stops moving south).
In this mission let me suggest we choose to begin the 116th's
run for the docks at 0350. This will have them arrive at the docks at
0425. The pickup will be at 0430 which allows them five minutes to set
up defenses but will not expose them to a long wait, stationary, in
enemy territory. It also provides an easy time to remember (I need this
crutch) which we will coordinate our rescue actions around. Our mission
begins at 3:50am (rise and shine boys and girls!).
We want to place a T-55 or T-62 squad at Ongjin Airbase using the same
technique. Our goal is to have the Armored squad arrive at the docks
only one or two minutes after the AMB. Why? Remember our scramble
mission? It will have to be successful if the second mission, the Air
Mobile package, is to have a chance of success. The scramble mission
will be a Deep Strike to hit the bridge at Unho-ri.
This mission, if successful, will block the armored unit from attacking
our battalion. Please experiment with placing the T-55 squad with
different starting times. My best guess was to have them begin their
march at 0440. They arrive at the docks a mear minute behind the 116th
with this starting time. We will need to record the time when the enemy
armor will be crossing the bridge. This will become the Time On Target
(TOT) for the scrambled deep strike. Use the running the clock forward
trick again to get this time.
We are almost ready to begin building the mission. Fortunately,
because of Falcon's excellent editor of air package waypoints, we do
not need to get the TOT exactly right for our flights. However, we need
to group our packages with no more than five flights. We should include
flights that we might need to 'tweak' the mission difficulty. Remember,
we can not add flights to a package after it has been created and
closed.
There are extra flights in both the DPRK and JFAC groups. We will
set their take-off times to several hours before this package to keep
them out of the way until we are sure that we have the balance of
forces correct in this mission. Let me discuss briefly why these
packages are constructed as listed. Both the DPRK and JFAC packages
include 'mission tuning' flights. This is an important idea to include
in all of your mission building plans. The dynamic nature of the
missions in Falcon is one of the things that makes this a sim to hold
our attention. It also makes it very difficult to estimate how
challenging a mission will be before you fly it.
Missions must be built 'tunable' so they can be tweaked to different levels of difficulty.
The Mig-21 BARCAPs are simple. Flights depart every thirty minutes and
remain on station for thirty minutes. This gives three hours of
coverage, more than enough for this mission. The first BARCAP departs
at 0330, the last one lands after 0630.
All three of the DPRK Pre-plan CAS missions are part of the
mission tweak options. We will try the four MiG-25s, then step down to
four Hinds or two Hokums if necessary. Any of these flights will be
enough to wipe out the AMB and the Blackhawks unless shot down by our
escort or RESCAP. The DPRK TARCAP can be added to really toughen up the
mission for the real hot shot pilotsJ
The Su-27 intercept is sort of a going away present for the
SEAD Escort. Wasteful use of weapons will leave the escort 'Winchester'
when the intercept arrives.
The tweak flights for the Joint Forces are the HAVCAP for the
C3I package, both Sweeps and the RESCAP for the Air Mobile package.
On the good guys side, you might notice there are only four
flyable aircraft for the scramble mission and four for the rescue
escort. You will notice when we complete building the mission that
these two flights are separated by enough time so that the same four
pilots can fly both missions. Most of my missions are designed with a
limited number of flyable planes.
If I had set up the Sweeps or the On-call CAS missions as F-16 flights
it would have provided more variety but generated too many variables to
create a mission which has to be flown correctly to win. I enjoy
building missions that challenge pilots to develop basic strategies and
fly technically correct (on TOS, follow RoE, etc.). My missions can be
'beaten' everytime by an average pilot that flies using proper
procedures and thinks before he or she gets in the aircraft.
We are ready to start building. Prepare your favorite beverage,
sign non-interruption agreements with your spouse and kids, lock your
door, muzzle the dog. Prepare for a "session."
Since everyone has read Sleepdoc's mission builder tutorial, I will just list the steps we will follow.
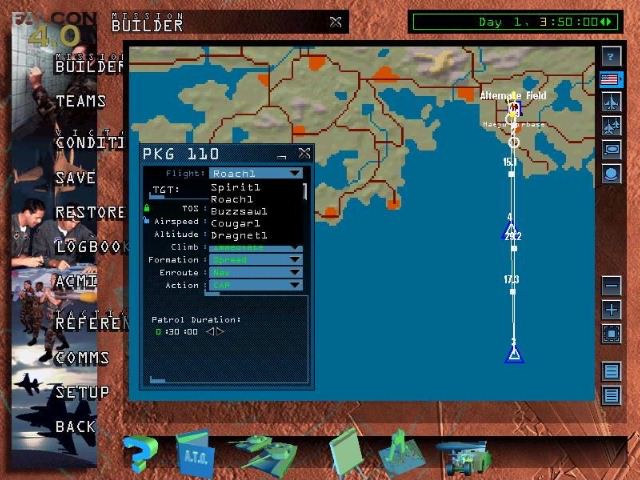
Pay close attention to the mission clock and the status of the
editing buttons down the right side. Every action you start in the
editor should be proceeded by a long hard stare at the mission clock
and a confirmation that you have selected the correct editor button for
the action you plan to take. Many mission building errors can be easily
traced to not following these simple rules.
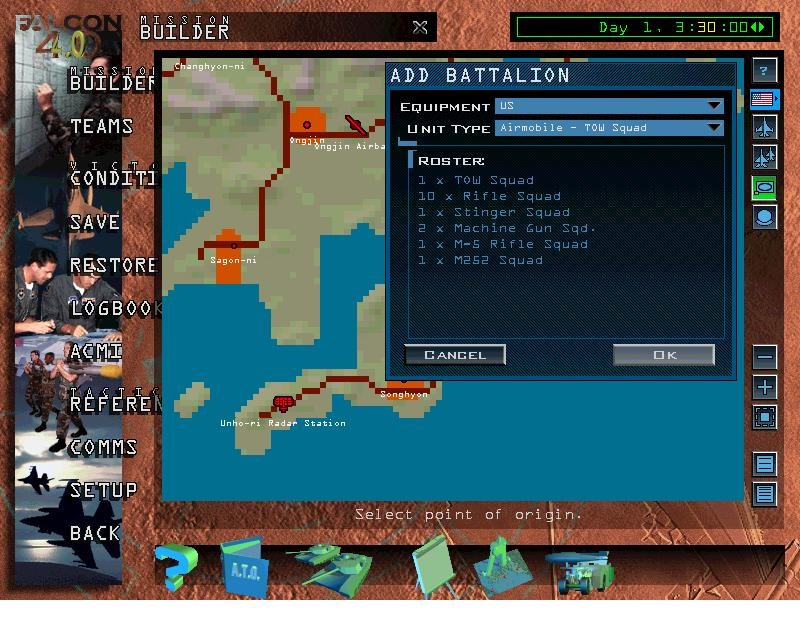
1. Place the Air Mobile Battalion at Unho-ri radar station.
With 0350 showing on the mission clock, select and set their target as
the Puho-ri docks. The mission editor will set their target to capture
the Puho-ri Naval Base.
2. Place the T-55 Armor Battalion at Ongjin Airbase. With 0440 showing
on the mission clock, select and set their target as the Puho-ri docks.
The mission editor will set their target to defend the Puho-ri Naval
Base.
3. Place squadrons of the following aircraft at the following airbases with clock showing less than 0330.
MiG-21 Haeju
MiG-25 Ongjin
Ka-50 Ongjin
Mi-24 Ongjin
Su-27 Ongjin
F-15C Seoul
EA-6B Seoul
E-3 Seoul
A-10 Seoul
F-16C Seoul
F-16C Suweon
UH-60L Kimpo (remember the range problem?)
4. Create DPRK BARCAP package with five flights of two MiG-21s. Lock
take-off times at thirty minute increments beginning at 0330.
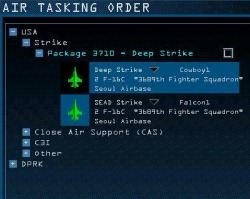
5. Create JFAC Deep Strike package. Set Time On Target (TOT) to one
or two minutes before the T-55 Armor Battalion arrives at the bridge.
6. Create JFAC C3I package. Set TOT to 0415 for both flights.
7. Create JFAC FAC/CAS package. Set TOT to a few minutes before 0430 for both the FAC and On-Call CAS.
8. Create DPRK CAS package. Set Take-off for the MiG-25s to the same
time as JFAC FAC/CAS TOT. Set the Hinds and Havocs TOT to 0100.
9. Create Air Mobile package. Set TOT to 0430 for the entire package.
We will not create the DPRK Intercept package until we have finished
adjusting steerpoint and times for the JFAC Air Mobile package. We must
have finalized the UH-60Ls flight path before we can target the flight
by an intercept.
When you have finished all of the packages then save the
mission once. Call it "404th To The Rescue(v1)" or something. Do not
overwrite this until you are absolutely sure the mission is just the
way you want it and you swear you are never going to look at it again.
I still have the rough versions of dozens of missions. It makes it very
easy to make wholesale changes that can virtually redesign a mission
when you have the raw mission setup and saved. This is where we stop
this week. Next week we adjust and tweak!
Happy Flying and watch your six,
Kurt 'Froglips' Giesselman
185th Reservoir Dogs
Falcon Instructor Pilot
Part III: Falcon 4.0 IP
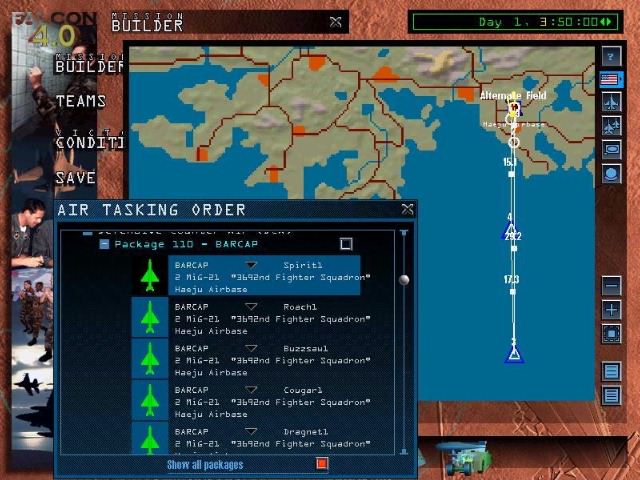
Time to finish this mission! We start by adjusting the steerpoints for
the enemy BARCAPs. All five BARCAPs should fly roughly the same route.
The thirty minute spacing between take-off times combined with a thirty
minute time on station should give 100% coverage of any direct ingress
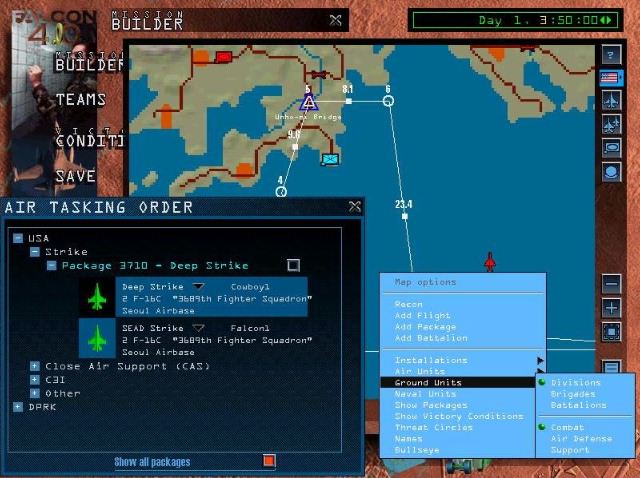
route. Begin by selecting Air Tasking Order (ATO), selecting 'Show all
packages', then open the DPRK's DCA folder to see all the BARCAP
flights you have created.
Select the first flight to see the steerpoints on the map. Adjust
the steerpoints location for all five BARCAPs. I have a straight
north-south flight path since these BARCAPs are to prevent ingress to
the Ongjin peninsula by Joint Forces from airbases directly to the
east.
Close the ATO box next and open the steerpoint adjustment box
by selecting any steerpoint on the BARCAP flight path still on the
screen. We can adjust all five BARCAPs from this menu because we
limited our package to five flights.
There is a procedure to follow when adjusting steerpoint times that will save you lots of agony.
Froglip's Safe And Virtually Error-free System for Adjusting Steerpoints Seamlessly
1. Make all adjustments to a flight path on the map by dragging steerpoints to desired location.
2. Open the steerpoint menu and select the flight to edit from the drop down menu.
3. Check that ALL TOS and Airspeeds for ALL steerpoints are
unlocked before you change any TOS. After the initial adjustment, a
steerpoint may be locked while you adjust another to force something
special to happen. Follow the 'N-1' rule when tweaking steerpoints (see
below).
4. Adjust Altitude, Climb, Formation, Enroute, and Action for each steerpoint.
5. Adjust time on station for CAPs or DCA next and use the
first steerpoint in the patrol route to make adjustments (in above
BARCAPs patrol begins at steerpoint 3). Be sure to unlock the TOS
(which will have locked again) when you are done.
6. Choose a steerpoint to adjust that is the critical point
in this flight for the mission design. This could be take-off for
BARCAPs, time on target for strikes, or even landing time (for example,
you plan a mission where the flight's Home Base is attacked, if you get
home on time you can save the base).
The N-1 rule. Adjust steerpoints with up to N (the total number of
steerpoints including the endpoints) -1. For example, between two
steerpoints, any one of the four variables could be locked (two TOTs
and two Airspeeds) when adjusting either steerpoint (remember adjusting
a steerpoint will automatically lock a second variable). If adjusting a
three steerpoint section then two variables can be locked while
adjusting a third, and so on.
This is very important. Falcon seems to get 'confused' when too
many variables are locked. The mission editor will set steerpoints days
in advance or behind when the system is over constrained. This leads to
a unpleasant cycle of adjusting, unlocking, readjusting all the
steerpoints in a flight. If this happens, it is often better to delete
the flight and start over on that package. The N-1 rule does not
guarantee that a red flightpath will not appear. It does allow an easy
recovery by resetting the TOS or Airspeed back to achieveable limits.
The single most common and frustrating mistake made when adjusting
steerpoints is forgetting to unlock all the steerpoints in a flight
everytime before making adjustments. There are a few specific instances
when you want to have more than one TOS or airspeed locked during
adjustment, as we will see when we adjust the DPRK Intercept later in
this article. Most of the time it is preferred to let the Falcon
mission editor readjust the other TOS and Airspeeds for the flight as
we set the specific TOS which is important to us. Unlock those locks!
Green does not mean Pass Go and Collect $200!
These locks can be more trouble than a SA-7!
Now that the BARCAPs are in place, the next airspace event is
our scramble flight to stop the enemy armor from getting to our AMB.
After selecting USA/Strike/Deep Strike from the ATO, turn on the
following menu options.
Installations - Infrastructure (to see the location of the bridge)
Air Units - Fighter, Attack, Support, Helicopter (so we can watch all a/c movements)
Ground Units - Combat (to watch the enemy armor's approach to the bridge)
Run the mission clock forward until the enemy armor is just about
to cross the bridge. This will be our time on target for the Deep
Strike. Follow the checklist to change the Deep Strike's Time On Target
(TOT) to the same as the system clock setting. This means hitting the
bridge just before the armor gets across. Don't be late! I am a great
fan of split second timing.
To make things even more interesting in this first flight I have
brought the SEAD Strike to the bridge seconds after the Deep Strike
with a wingload of cluster munitions. A DPRK armor column stacked up at
the bridge, a F-16 with a load of anti-armor weapons, does anyone have
any ideas what to do about this situation? The SEAD Strike hit the
Unho-ri Early Warning Radar and several coastal AA emplacements
previous to arriving at the bridge.
The SEAD Strike and the Deep Strike will fly a flightpath south
of the BARCAP at very low 'feet wet' altitude. Unfortunately, over
water, the early warning radar will still spot them but, hopefully, not
in time to vector in the BARCAP.
Real missions are not planned to fly into 'harm's way'. In fact, great
pains are taken to minimize aircraft and pilot exposure to danger
(planes are expensive, pilots irreplaceable). Plan missions in a
realistic fashion which reward 'smart' mission planning by virtual
pilots.
The next flight out of the gate is the Air Mobile UH-60Ls. If
we allow a bit of imagination we can see the Black Hawks being tasked
out at the same time as the Strike package but they have to move from
Suweon Airbase to Kimpo International (remember the range problem?) to
be refueled. If the steerpoints are again readjusted for an ingress
south of the BARCAP with the TOT locked at 0530 then takeoff will be
about 0415, about 25 minutes after the Deep Strike is scrambled to cut
off the enemy armor. Long enough to account for the flight from Suweon
to Kimpo and a quick refueling.
The Air Mobile mission type has two 'action' steerpoints, one to pick
up and one to drop off the AMB. When you created the mission the AMB
was the default target. We just need to drop the AMB off somewhere then
fly back to Home Base. You cannot win the mission if you do not select
a 'drop-off' steerpoint and just take the AMB back to your Home Base.
Set the pick-up time for 0530 and the time on the ground for two
minutes. This is a rescue. Get in and get out!
The Black Hawk's flight path turns red if you mirror the ingress and egress flight path, the combat radius limits, remember?
Move the steerpoints around until the flight path turns white. In
my mission I tasked the Black Hawks on an almost direct route back and
dropped off the AMB at Tongjin airstrip.
When you have the Air Mobile flight plan set, adjust the two Sweeps to
clear the path inbound and outbound for the Black Hawks. I did not set
up the F-15s as CAPs on purpose. By using sweeps we can have some fun
with the SEAD Escort flight on egress. The Sweeps should cross the
BARCAP route just before the Black Hawks arrive as this makes it a bit
exciting for the Escort who must decide whether to stay with their
package or charge off to help the bullies of the sky.
Finally, finish off this package by adjusting the SEAD Escort's
steerpoints. The escort is important to the success of the package
after the Sweep clears out the BARCAP. This is a complex flight to
tweak because the F-16s can not possibly fly as slow as the top speed
of the Black Hawks. If we design an intercept course to assemble the
Air Mobile and the Escort at 10- 15 miles south of the Puho-ri docks.
Then the Escort can lead the Black Hawks into the target, surpressing
any remaining air defenses, and protecting them from enemy aircraft.
Start by opening the ATO and selecting the box next to the Air Mobile
package. This will show all the flight paths for all the flights in the
package. Select the SEAD Escort and unlock all the steerpoints.
Set the IP steerpoint for the SEAD Escort on the Air Mobile flight
path. Turn on be sure to turn on fighters and helicopters from the map
options/air units menu. Advance the time using minutes on the mission
clock. Watch the helicopter pass its escort's IP then stop the clock.
Now select SEAD steerpoint for the Escort.
What ever steerpoint is selected for editing will ALWAYS lock when you adjust either the time or speed.
Adjust the SEAD Escort's TOT to be two or three minutes before the
Black Hawk's arrive. Leave the Tot steerpoint locked (gulp). Switch to
the SEAD Escort's take-off time and slowly (SLOWLY) using the minutes
adjustment retard (earlier) the take-off time. Eventually flight path
between the SEAD and take-off steerpoints will turn red.
Advance the time until the flight path turns back to white. Now look at
the steerpoints between take-off (1) and SEAD (4). Notice the Airspeed
is less than 150 knots. When we adjusted take-off while holding TOT we
forced our SEAD flight to fly slower and slower. When the speed dropped
below 140 knots on any leg of the flight plan then that leg turned red.
We can see the same thing happen it we try to take-off much later and
any leg exceeds 500 knots (these speed limits are different for each
aircraft).
The A-10 FAC and On-Call CAS should arrive before the SEAD
Escort. Just have them pound the shore Zsu batteries. The fireworks of
the A-10s pounding the ground at night makes the long flight in over
water quite a bit more interesting.
The AWACs and ECM flights can be adjusted now. Both flights
should be kept south of the action, out of harm's way. Both flights
should be on station at least a few minutes before the Air Mobile
package reaches the IP. Both could be on station as early as take-off
time for the Black Hawks. Sending up an AWACs is, to me, waving a flag
to the enemy that you are planning something in the area. The Falcon AI
is not that smart so you can add both flights early if you wish.
The DPRK has two flights to add, the CAS and the Intercept.
Remember we have three enemy CAS flights to choose from. Let's try the
Su-25s first. Their target is the AMB. Make their TOT for 0531. The
SEAD Escort should see this four ship inbound after they pass their
SEAD steerpoint. If the Escort does not take out the Su-25s then they
will bomb the Black Hawks on the ground. Adjust the TOT for the Hind
and Hokum flights to be 0800 so they are not in the air during any
portion of this mission.
If we discover during play testing the mission that we cannot take out
all four Su-25s and still provide Escort for the Black Hawk's egress
then we can switch to the four Hinds or two Hokums. The same results
for the DPRK if we don't shoot them down (dead AMB). Helicopters, even
Hokums, provide easier targets for our Escort.
The Intercept is a product of my twisted sense of humor. In
writing dozens of missions, then flying them with my online squadron, I
have found that pilots often relax after they have cleared the target
zone and begun their egress. On a personal crusade to try and cure this
lax attitude (GRIN), I often add something to the end of a mission just
to check and see if everyone is still awake.
In this case, I added the now very angry DPRK sending an Intercept of
Su-27s to shoot down the Black Hawks since they were not able to
recapture the decoding device. We did not create this flight when we
created all the other packages because Falcon will not adjust the
Intercept's location and flight times when we change the target's (the
Air Mobile flight) flight path or times. Therefore, adding an Intercept
should be one of the last things you do in building your mission.
To add an Intercept, turn on just helicopters in the Air Units
mission menu, run the mission clock forward until the Black Hawks are
at the position where you want the intercept to occur. Select add
flight, click on Black Hawks for point of origin, aircraft are Su-27s,
mission type is intercept, target is Black Hawk flight number.
The helicopters are flying at low altitude. The DPRK knows this. Adjust
the Intercept's altitude to 3-4000 feet. They would not climb to a 20
AGL assembly to attack helicopters flying at 500 feet only 20 miles
away.
To make this a scramble we will leave the TOT locked and adjust the
take-off time forward until the ingress flight path turns red then back
off until it turns white again. If you check the Intercept's
steerpoints you will see they are flying at or near full military power
for the ingress. I have tried to get them to fly at full AB but the
flight path always turns red at speeds over 500 knots.
Next we adjust the SEAD Escort's steerpoints to have them arrive at
the intercept point close to when the bad guys will arrive. To do this
we lock steerpoint six. We do not want to effect any changes in the
SEAD's ingress. I found that I had to insert two extra steerpoints to
'slow' down the F-16s egress. When I test flew the mission, the time to
shoot down the Su-25s actually burns up much of the time between
steerpoint six, seven, and eight.
I wish that Falcon gave us access to all the possible steerpoint
actions for every steerpoint. Then we could set up a flight that began
with some SEAD, then moved onto a HAVCAP, and ended with a Escort. It
seems like this would be expected of a multi-role fighter.
Nevertheless, keeping steerpoint six locked, adjust the SEAD flight's
TOS at steerpoint nine until the Black Hawks and F-16s arrive at nearly
the same time (the Su-27s arrive at the same time too!)
The end result should look something like the map below with
everyone converging at the same time. If the Escort was not too sloppy
with weapons management when they engaged the Su-25s they will have
enough A-A left to take on two Su-27s. If they were less frugal then
they can test their furball skills with gunsJ.
I hope that this mission building session will help everyone plan
exciting and bug free missions. Watch for a series of special tricks
for each mission type (very short articles, not like this tome).
Happy flying and watch your six,
Kurt 'Froglips' Giesselman
185th Reservoir Dogs
Falcon Instructor Pilot