As with all things, it is easier to learn something if you approach it
by first breaking it down into its most elemental pieces and then
examining each of those pieces. This is how we will approach the "Bane
of all Falcon Pilots", i.e. Air to Air refueling. The following items
are the critical components necessary for making an approach and hookup
with a tanker for A2A refueling: Altitude (pitch), Attitude (roll), and
Speed (power).
Basically, you have to line up horizontally, line up
vertically, and match speeds with the tanker in order for them to be
able to hookup an give you some gas. Sounds pretty easy, doesnt it. So
let's look at these pieces and get some clues on what we're doing wrong
and what we need to do to be able to hookup with the tanker.
Bobbin' and Weavin'
While Bobbin and Weavin is great for a prize fighter, it is the last
thing that you want when tryin to hookup to the tanker. It is probably
the one thing that most of us struggle with that make it impossible to
hookup to the tanker. For the purposes of this discussion I will define
Bobbing as Pitch, and Weaving as roll.
Why we bobbin? We are flying the boom, i.e. we are trying to line up
with the boom. This is a mistake since the boom will be flown to us.
All we have to do is get in the general vicinity of the boom and the
boom operator will fly the boom to us.
We are NOT flyin the Flight Path Marker. If we are to hookup with
tanker we must fly straight and level. The most important thing that I
have found to stop diving and climbing, aka "bobbin" is to make sure
that Im flyin the Flight Path Marker. Keep that baby lined up with the
Horizon Line on the HUD and presto .no more bobbin. You want to line up
with the tanker right from the start so you dont have to make huge
pitch corrections. Just fly straight and level. Now your major concern
should be roll correction.
Why we weavin? Weavin is gonna happen because you need to line up with
the tanker. The key to victory here is very small corrections and USE
THE RUDDER PEDALS! I have found that using the rudder pedal with the
stick, i.e. very small, co-coordinated turns is what gets me through
it. (if you dont have rudders, dont fret. You can still make it w/o
rudders just makes it a little easier.)
Again, the key here is very small corrections. Remember, the plane
doesnt fly like a car, its more like sliding across ice. You have to
anticipate and correct before the correction is needed.
Rules of Thumb
1. Fly the Tanker.
Dont try to fly the boom. Since the entry point for the fuel is behind
your head, you wont see where to direct the boom anyway. The guys that
work the boom are union, so they would be really POed if you took
their jobs away from them. So, fly the tanker. Work at positioning
yourself under the tanker.
2. Fly the Horizon.
Fly the tanker to get in close, but once you're close in you will need
to start flying the horizon. It's just like driving a car. You cant
watch the road down by your wheel and drive effectively. You need to
drive the car by watching way ahead of you. The same applies to getting
underneath the tanker; you need to fly the horizon. Thats where you
eyes should be looking and you should only briefly glance at the
tanker.
3. Watch your speed.
Now were stabilized. Were basically flying at the same height,
parallel with the horizon, and were basically lined up with the
tanker. What now? Speed! How fast are you going? Here there are a
couple of tricks that will help.
Make sure that you use the Digital Air Speed Indicator (hit "ctrl H" to
switch to this view) instead of the Analog Air Speed Indicator. Its
very hard to judge how fast you're going with just the tape.
Make sure you are watching your Fuel Flow indicator. It helps
to know how fast you should be going. I have found that when Im in
close, I want the consumption to be at about 2100 to 2300. That will
give me a walking gait takeover speed, which is about what you want.
Any slower and you wont catch the tanker. (Obviously you want your
initial approach speed with the tanker with a greater than this but
when you get close, i.e. you can see the boom, then you need to start
to really manage your speed. It is better to slow gradually then to
slam on the air brakes and try and match speed that way.)
The manual says that the tanker is traveling at approximately 300 kts,
personally I have found that when I'm in close I need to slow to about
297-300 kts. At this speed, I can overtake the tanker. According to the
manual, your approach should be somewhere between, 300 and 305 kts.
Experiment with this. I have found that 302 is too fast, I fly past the
tanker. It seems that hookup speed for me is 297 kts.
In Close
The tanker is set to give you instructions for corrections along all
three axes: pitch (Vertical), roll (horizontal), and power (forward and
backwards). You want to shoot for only having to make corrections for
one axis (i.e. forward/backwards, IOW Speed.) if you can.
If you have lined up properly during your ingress to the tanker you
should be pretty much on target and just need to match speed. You may
also have to make some minor corrections for roll, but if you find
yourself having to do all three you're in for a rough ride.
Once Im in close, believe it or not, I dont try and adjust my flight
based on the lights underneath the tanker. I simply listen to the
instructions from the "Boom Boss". As long as you're going just a
little faster (1 to 3 kts) than the tanker, when the boom can reach you
it should hook up (you'll know you have hooked up because the boom boss
will say "Contact"). As soon as it hooks up, take your hands off the
controls and enjoy the ride. Once you're full, the tanker will break
away.
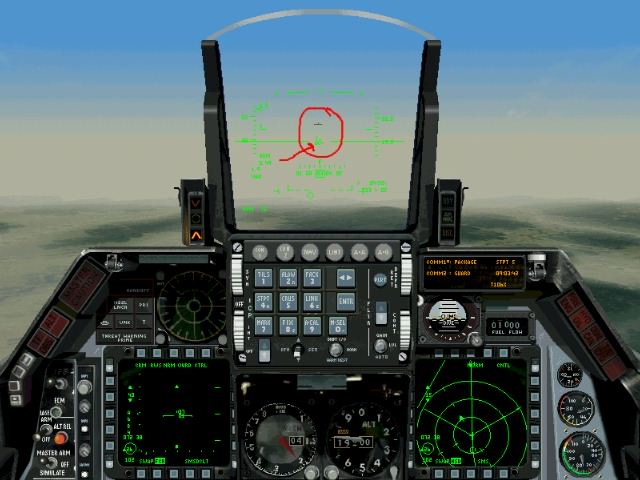
Initial Lineup (See Fig 1 below...)
This is just after you get into the refueling TE. We have already lined up with the tanker. A couple of things to note here.
Notice where the horizon is with relation to the Tanker. Were not
pointing our nose AT the tanker, were pointing our nose UNDERNEATH the
tanker.
Notice the position of the Flight Path Marker, centered under the
tanker and parallel with the Horizon Line. If we line up correctly here
it makes the job a whole lot easier .at this point were just under a
mile away.
Now you want to overtake the tanker. Make your speed somewhere between
325 and 350. The urge is to close the distance really fast, but that
can easily lead to an overshoot.
At this point I have bumped the speed up but am cutting it back. Notice
the digital display on the speed (circled in red ) and the cockpit view
is in the up mode. Note: I am using an edited cockpit view. The stock
cockpit view will not show you the Fuel Flow gauge (circled in red )
when looking thru the HUD View (this view is up one click from the
normal cockpit view.)
This is critical to be able to see this gauge as you overtake
the tanker and especially when you close it. I use this gauge when Im
close in much more then I use the Analog Air Speed Indicator. Again,
note the position of the Flight Path Marker and the Horizon Line.
Here we are still closing. Notice again.. Air speed, Position of
tanker in HUD, and Flight Path Marker and Horizon Line (All circled in
red ). Air speed is still bleeding down. You can tell this by the Fuel
Flow Gauge and the Digital Airspeed Indicator if you click to bring up
the large image.
Now were in really close. When you can see the boom, you want to be
approaching walking speed overtake. Here you will notice that I have
fallen below this speed. At this point I am having to add throttle.
Also note the position of the tanker in the HUD. RESIST THE URGE TO PUT
THE FLIGHT PATH MARKER ON THE TANKER OR YOU WILL PERMANENTLY MERGE WITH
THE TANKER.
Remember, the tanker is flying the horizon, so to hook up with the
tanker, you must fly the horizon. If you need any pitch correction it
should be extremely minor . Bring the Flight Path Marker just over the
Horizon Line, then put it back. We are talking a matter of 5 to 10 feet
vertical movement here. Also note, I am just a little off the correct
roll axis. A small correction to the left will take care of this.
We are now approaching the tanker at approximately the correct speed,
altitude, and attitude. 2100 to 2300 will give you a slow overtake of
the tanker. The current speed shows 298 kts on its way up to 300.
There is an attitudinal correction that will take place here. A SMALL
roll to the right will correct this (almost a non-movement of the
stick. Pull just off center to the right for just an instant then
correct with left roll for just an instant. The left correction should
be approx. ½ as long as the right correction.) Notice that the Flight
Path Marker is still on the Horizon Line. This is crucial to keeping
the correct pitch of the aircraft.
Hookup!
If all is done correctly you will be rewarded with the sight below. You
are hooked up and refueling. This is approximately where you want your
aircraft positioned under the tanker. Do not touch the controls, just
let the jet refuel.
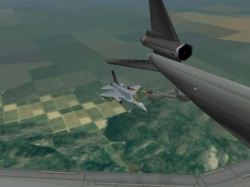
Figure 8 shows what it looks like from the outside. Once the tanker has
filled you up, it will disconnect you at which point you can go where
you will .If you are really devious, you may follow the course of
action outlined below.
And of course, no "SHOT" of an air to air refueling mission would be
complete without the "Money Shot". Thought that the urge to blow it out
of the sky would leave after you had conquered air to air
refueling .heheheh, Guess again!!! (This is not an official practice of
the 187th VFW.)
Well folks you now know how to do a mid-air refueling mission. I
hope that this has been helpful. If you're ever looking for some action
check out the 187th web page at www.187th.org, or come and meet with us
on IRC. The web page has all the contact details..... Happy refueling!