Falcon 4.0: A Practical Guide to Using Bullseye Radio Calls - Page 1/1
Created on 2005-02-08
Title: Falcon 4.0: A Practical Guide to Using Bullseye Radio Calls By: Rick 'Drummer' Centeno Date: 1999-08-04 2159 Flashback:Orig. Multipage Version Hard Copy:Printer Friendly
During our weekly online meets, the "185th Reservoir Dogs" fly in
packages of 3 to 6 pilots. These pilots often participate in different
flights, tasked with different objectives (Strike, SEAD, Escort, etc.).
Sometimes different flights follow different routes or become engaged
with bogeys while other flights are pressing for the Strike.
Trying to communicate our position to the others in the flights, we may
often refer to our relative position from known waypoints, using
bearing, range and altitude. However, the accuracy and effectiveness of
such calls is very much dependent on the relative position of the
aircraft and whether we (indeed) have a common waypoint for reference.
In the real world, the position of friendly and incoming bogey
aircraft are always called out using bullseye coordinates. This
bullseye corresponds to a predefined geographic point that everyone
uses in the theatre as a positional reference. You can use bullseye to
refer to your position or to the position of any other aircraft, like
when you ask AWACS to declare a contact friendly or hostile.
So any directional bearing and range call uses the same
bullseye as a reference instead of the any pilot's individual
reference. This allows for an increased situational awareness of all
planes involved in the theatre as well as ensuring that the enemy
cannot derive other assets positions from the known position of one
aircraft.
Therefore the actual position of the bullseye is kept secret and in the
real world this bullseye position will change frequently (typically
once a day). However, in Falcon 4 the geographical position of the
bullseye will remain fixed within the same theatre for the entire
duration of the conflict.
Which of these three is my bullseye?
How to Determine Bullseye Positions?
So how do you read this bullseye position and how should you use
it in your online play? Or how to react to AWACS giving you positions
of incoming bandits relative to bullseye while you're commencing your
bomb run? Is the bandit close? From which direction is he closing?
Should you break-off or continue?
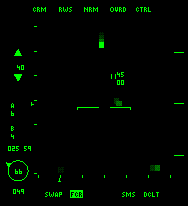
Let's first have a look at your own bullseye position. This information
is displayed in the lower-left corner of your radar display and HSD
page on the MFD's.
Within the circle you will find your range from bullseye. The figure
below the circle gives your bearing from bullseye. Finally, on the edge
of the circle you will see a little tick mark which points in the
direction of the bullseye. In the picture below you can see that our
current position is bullseye 049, 66 miles.
Now what about the figures displayed above the circle, i.e. 025, and
59? These numbers refer to the bullseye position of your cursors either
on the radar display or the HSD page. So by putting these over a
contact you can determine its position and pass it to the others in the
flight. The first number (i.e. 025) refers to the bearing, the second
(i.e. 59) to the range from bullseye of your cursor's position.
How to Turn to a Given Bulls-eye Position?
First you have to establish your own bullseye position relative
to the given position. So go ahead and determine your own bullseye
position first from the radar or the HSD display. Then determine
whether the given bearing is at a higher or lower angle than your own.
Next determine whether the distance is larger or smaller than your own
position from bullseye. Finally, determine whether bullseye is located
left or right relative to you, which you can determine using the little
tick mark on the circle.
Now the rule for turning towards a position with a lower bearing is
simple: keep the bullseye left of you. If you want to keep your
distance to bullseye constant, put the bullseye at your 9 o' clock (or
equivalently put the tick-mark at the 9 o' clock of the circle).
To turn towards a position with a larger bearing, keep the bullseye on your right!
Decreasing the range from bullseye is achieved by flying towards it,
right? So put the little tickmark on the top half of the circle. To
increase the distance, ensure that the tickmark is on the bottom half
of the circle. Easy isn't it?
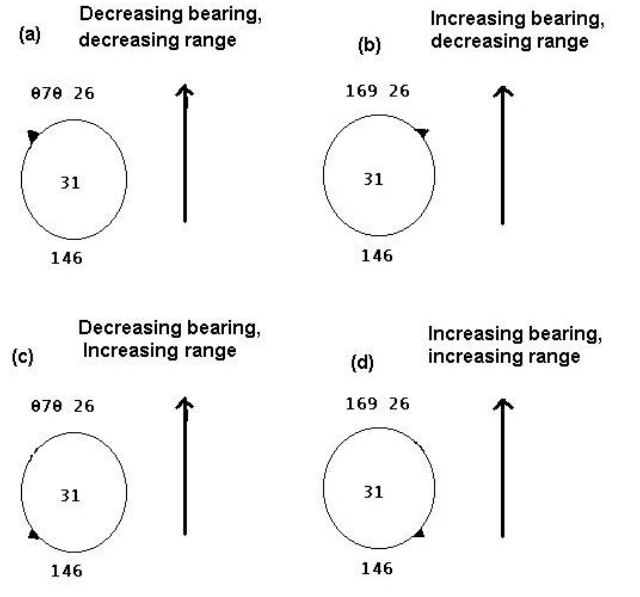
Anyway, to summarize these simple rules look at the following picture
which shows the effects on bearing and distance while flying in a
certain direction based on your relative position from bullseye.
Figure 1
As a practical example, say your position is as shown in Figure 1(a)
bearing 146, distance 31 nm, and that you're flying North. Suddenly,
you receive a call from AWACS that the nearest threat is at bullseye
165, 20 miles, angels 20. Suppose you have established that you should
engage, should you turn and if so, in which direction?
If you remember the rules outlined above, you know that in order to
increase bearing, the bulls-eye pointer (the little tickmark on the
circle) should be on the right side of the circle. Since the distance
from bullseye is less than your current position, you should keep the
pointer on the upper half of the circle. Therefore, the fastest way to
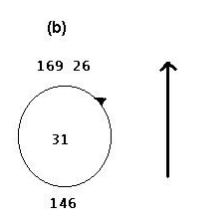
point your plane towards the threat is to turn your bird to the left,
till the circle and pointer look something like Figure 1(b).
How Far are Certain Bullseye Calls Away From You?
Now this is the more tricky part of the story. You cannot simply
use the difference in range to determine whether a contact is close or
far away from you. You will also need to consider the difference in
bullseye bearing as well as absolute range from bullseye. The further
from bullseye, the larger a small difference in bearing means in
absolute distance.
Normally we do not have a calculator at hand to do some basic
geometry calculations, nor do we have loads of time while being engaged
to calculate whether another bandit is close or not. So I have
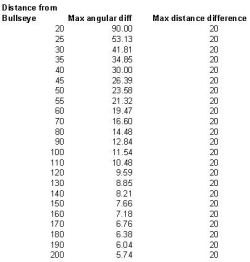
calculated a table for your reference and convenience.
The figures in the table are obtained by setting the maximum range for
engagement to 20 nm and calculating the maximum allowed difference in
distance and angle within which you should consider to engage. Similar
tables can be calculated for other engagement ranges.
Table 1
The general messages from this table should be clear:
1. Engage any fighter that is within 20nm distance of you if your distance from bullseye is less than 20 nm.
2. Between 30 and 80 nm from bullseye, you should only engage if
the angular difference is less than 40 degrees and the difference in
distance is less than 20nm.
3. Above 80 nm, any target with less than 15 degrees of angular difference and within 20nm should be considered dangerous.
So always check first whether the bogey is within 20nm of your distance
from bullseye. Then look at the difference in bearing given your
distance from bullseye to determine whether to engage or not.
I hope that this explanation helps you in improving your
situational awareness with respect to bullseye calls from your online
wingmen. Maybe you feel confident enough to start putting these
guidelines into practise and use bullseye calls instead of BRA in
Falcon 4. To enable this feature, you can select in the Setup screen in
Falcon 4 "Radio Calls use Bullseye".
Rick "Drummer" Centeno
Communications Officer
185th VFS The Reservoir Dogs
7th Tactical Fighter Wing
Using BullsEye Radio Calls is part of the "Advanced Training
Schedule" in the Reservoir Dogs Virtual Fighter Squadron. For further
details on the squadron, feel free to drop an email to MadDogMcQ