Title: B-17 Flying Fortress II: Engine Start Checklist By: Select Article Author Name Date: 1999-08-10 3581 Flashback:Orig. Multipage Version Hard Copy:Printer Friendly
Check Fire Guard
Check Fire Guard and Call "Clear." Look out the window and be sure that
the fire guard is posted at his proper station- behind and to the right
of the engine being started.
The starting sequence is engines No.1, No.2, No.3, and No.4.
This sequence should be followed each time in order to avoid confusion
for the ground crew.
The pilot calls "Clear left, and the copilot calls "Clear
right," before engines are started on either side. Both will make sure
that the mechanic hears the call, and signifies (by voice or hand
signal) that all is clear.
Master and Ignition Switches
Place the bar switch in the "ON" position. Put all ignition
switches in "BOTH" position. (NOTE: Except in the B-17G where
individual ignition switches are turned "ON" after hte corresonding
engine is meshed and the propeller has turned through one revolution.)
Battery Switches and Inverter
Move the inverter switch to "NORMAL." Then operate each
battery switch separately to detect a battery in need of charging.
Check the fuse and solenoid. Return all three battery switches to "ON."
Now check inverter in "ALTERNATE" position. REturn the inverter
switch to "NORMAL," and leave it there during flight. The alternate
inverter is used only in the event that the normal inverter fails. The
alternate remains new and unused for such an emergency.
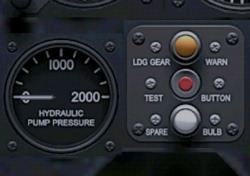
Parking Brakes and Hydraulic Check
Copilot sets and locks the parking brakes.
Check the pressure guages for sufficient hydraulic pressure
(600-800 lb.). Check the switch on the pilot's switch panel for the
"AUTO" or "ON" position- depending on the type of switch installed.
If the emergency pressure system is low, recharge by opening the manual
shut-off (star) valve. This will build up pressure in both systems to
approximately 800 lb.
After recharging, close the manual shut-off (star) valve. If
emergency system is installed, operate levers to ensure that upon
application pressure does not drop immediately to zero. Be sure that
the selector is in "NORMAL" position, and that the reservoir is filled
with hydraulic fluid.
Booster Pumps
Turn on the boosster pumps and check to see that each gives from 6 to 8
lb. pressure. The fuel booster pump is an independent electrically
driven source of extra fuel pressure. It takes the place of the wobble
pump for both starting and
emergencies, and augments the engine-driven fuel pump at high
altitudes. As a safety measure, it is always turned on for takeoff and
landing, for flights below 1000 feet, and for flights above 10,000
feet.
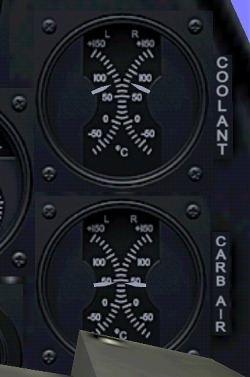
Carburetor Filters
Carburetor air filters must be "ON" ("OPEN") for engine
starting and all operations up to 8,000 feet in the B-17F (15,000 feet
in the B-17G). Check amber warning light for "ON."
In dust conditions filters may be left "ON" in the B-17F up to 15,000 feet (20,000 feet in tehe B-17G.)
But under no circumstances should the carburetor air filters be
left "ON" above these limits. When intake air passes throught he
carburetor air filters at such altitude the turbo-superchargers must
speed up to maintain desired manifold pressure. This can result in
turbo overspeeding.
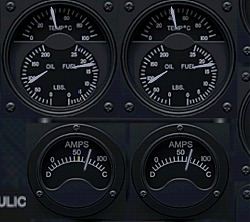
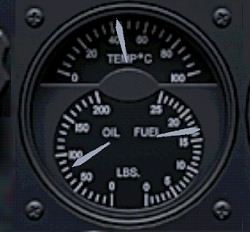
Fuel Quantity
Check the fuel guages for quantity of fuel in each tank.
Remember that the fuel guages are electric and will not operate unless
the battery switches and inverter are "ON."
Start Engines
1. The sequence of starting engines is: No.1, No. 2, No. 3, and No. 4.
2. Be sure the engine being started has been pulled through 3 or 4 complete revolutions.
3. If fire extinguisher system is installed , set the selector switch to the engine being started.
4. Indicate to the ground crew (by holding up fingers) which engine is being started.
5. When the copilot is ready, he will notify the pilot: "Standing by to start No.1."
6. Direct the copilot: "Start No. 1." The copilot will
then energize Engine No.1, and at the same time expel all air from the
primer with the number of strokes necessary to obtain a solid fuel
charge. The primer must be HELD DOWN until needed again.
7. After approximately 12 seconds of energizing, direct the
copilot to "Mesh No. 1." The copilot, while still holding down the
starting switch at "START," moves mesh switch to the "MESH" position.
At the same time he primes with strong, steady strokes until the engine
fires.
8. If the engine fails to fire after the starter has turned
it over 4 or 5 times, the copilot must release both switches quickly
while the propeller is still turning. This prevents damage to, or
sticking of, the starter.
If the starter dog sticks and the engine turns over while
re-energizing, stop re-energizing immediately, cut the ignition switch,
and release the starter dog by turning the propeller in the direction
of rotation.
9. When the engine fires, move the mixture control to "AUTO-RICH" immediately.
10. If the engine stops, return the mixture control to "OFF"
immediately, and repeat the starting procedure. As soon as engine is
running, copilot calls: "Oil pressure." Pilot notes pressure, and
responds: "Coming up" when pressure reaches 50 lb. sq. in.
11. If no oil pressure is indicated within 30 seconds after starting, stop the engine and determine the cause.
12. Warm up engines at 1000 rpm until oil temperature of 40 C is indicated.
13. If it is necessary to engage by hand, signal to the ground
crew by raising a clenched fist and pullling down an imaginary starter
handle. One of the ground crew will pull the handle on the nacelle.
Meanwhile, hold down both the starter and the mesh switches in the "ON"
positions. The booster coil will function only when the mesh switch is
on.
14. Repeat the same starting procedure on No. 2, No. 3, and No. 4 engine, in that order.
Flight Indicator and Vacuum Pressures
When an engine that operates a vacuum pump (No. 2 and No. 3
Engines) is started, check the rapid response of the flight indicator.
With vacuum pump operating, the flight indicator should erect itself
within a few moments. Sluggish response at this time indicates poor
operation of the instrument. At the same time check (1) vacuum pressure
- approcimately 3.75" to 4.25"; and (2) both pumps for proper
operation.