Falcon 4 is a high end sim unlike any other. The passage of time has
demonstrated that many of the problems people are having are the result
of insufficient training and practice. Many of the so-called "bugs" are
not bugs at all, but a lack of knowledge of how the various systems,
weapons and interfaces operate.
Part of this difficulty relates to tremendous complexity and fidelity
of Falcon 4. The Catch 22 is that realism demands realistic responses,
responses that require years of training in the real world.
The Campaign: the Challenge
The Falcon 4 Campaign is focused as much on the realism of the F-16 as
it is on the replication of real warfare. It burdens you not only with
the heavy workload of the real pilot, but all the responsibilities of
an officer managing a war. Furthermore, player interface is equally
complex, with insufficient help provided by the manual.
The war that F4 replicates is more like Vietnam than Desert Storm, a
strategic and tactical battle that many analysts concluded was
impossible to win. The Vietnamese conflict was a long, messy, and
extremely ugly struggle against an adversary that was both intelligent
and well-trained, an enemy that understood how to defeat modern
technology with rifles and sheer determination. Add to that the fact
that our leaders grossly and consistently underestimated the enemy and
the calamity was inevitable.
Now consider Falcon 4. It has high fidelity to the environment
of real war, including that dimension called the "fog of war." Is part
of our difficulty with this simulated conflict in Korea that we are we
underestimating the enemy? Are those weapons that refuse to lock up on
the target really displaying issues with bugs? Or is this the way it
plays out in real life?
With Falcon 4 the people who wanted a realistic simulation got one.
Real war is hell, and so is this sim. In real war, equipment failures
are as common as rifle jams. If you expect to win, you will have to
learn to master your aircraft, as well as the skills of a War College
General Officer.
SEAD Tactics
This essay, which appears in three parts, examines a single SEAD
mission (Suppression of Enemy Air Defenses) flown three times, each
time with different tactics. It first illustrates for you what happens
when you simply fly the Frag Orders, and why ultimately the sim burdens
you with having to think like a general Officer rather merely a pilot.
To succeed in Falcon 4 you must learn to think creatively and not
merely follow the beaten path. Too often the next war gets lost because
it was fought just like the last war.
In order to accomplish my goals we will begin by following a single
SEAD mission very early in the campaign when force levels are equal.
The objective here is to explore means of improving mission success by
examining tactics and results more closely.
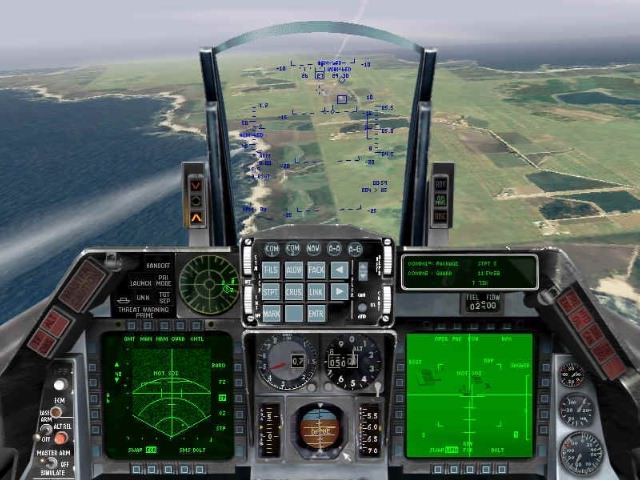
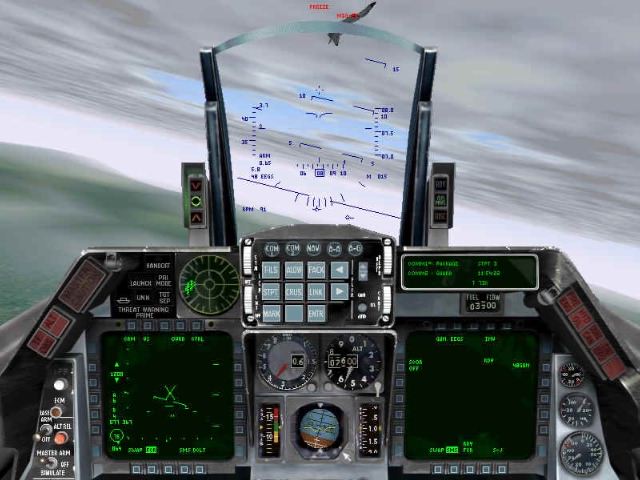
As I fly the mission I will discuss the events as they occur, followed
by a summary of what went right or wrong. This discussion is keyed to
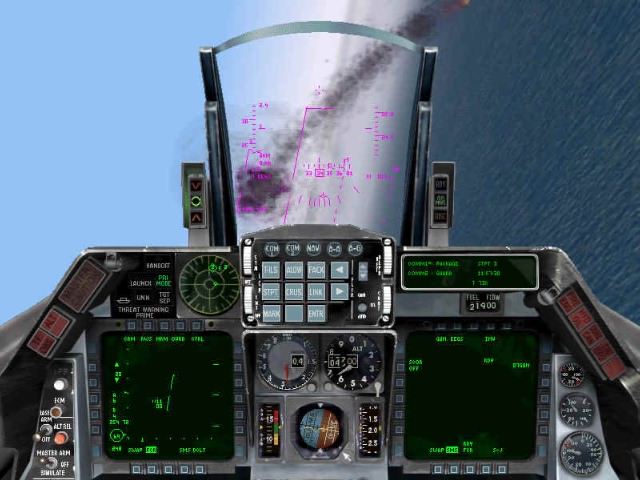
the screen shots that appear with the text. Pay close attention to
them, including the avionics, because they are an integral part of the
story.
The Mission
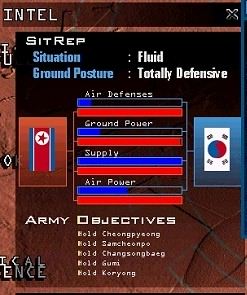
At the beginning of the campaign, the Intel report describes conditions
as "bleak." We are flying mission number 4116 in Tiger Spirit. Note
that the artificial intelligence (AI) will never repeat the same
mission exactly, even though you fly the same mission more than once.
Therefore this discussion can only serve as an illustration. In this
case the frag order targets a couple of AAA guns on the outskirts of
P'yongyang.
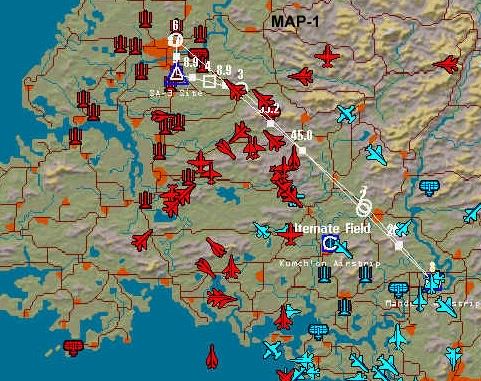
What! Triple A guns? P'yongyang? We take a look at the Planning Map and
see that the brass wants us to fly into a meat grinder just to take out
a couple of guns? That's nuts, and we're not going to do it.
Insubordination be damned.
This is the original fragged mission. My God, how do they expect us to
fly into the heart of enemy air defenses and come out alive? It can't
be done with the early warning radars (EW) in place. Down on the
peninsula south of Haeju and Ongjin, we see a nice juicy Early Warning
radar site that needs to be dealt with FIRST, plus another at
P'yongyang. Are the brass so brain dead that they don't know you must
take out the EW radar first?
So we take matters into our own hands and reroute the mission
to take it out. That's tough enough, but at least we can find a route
that isn't filled with enemy interceptors and SAM's. That EW radar is
going to see us coming, but fortunately, the distance is short. We
can't rely on surprise but at least we've got speed on our side and
hopefully we can outrun the intercepts.
[Special note: Since this writing Mr. Rosenshein confirmed that EW
radars are networked to the SAM sites. Take the EW's out and the
individual Fire Control Radars will have a much harder time finding
you, if at all. Some of you may remember that the North Vietnamese
often relayed info by telephone and land lines very effectively. The
noted interview follows:]
Leon: Yes, the GCI network is modeled. The network breaks down like
this: there are a handful of long-range search radars. These are the
ones that will normally track you [relaying your vector and speed], and
then local SAMs can have their search radars off.
The SAM fire control radars will, however, pop on to get your
attention. The long-range radars tell the SAMs where to look. If you
manage to take out enough long-range radars then the SAM sites will use
their fire control radars. But these small FCRs are not as effective
for detection.
Communication is two way. If you are not picked up by a long-range
radar but are picked up by a local radar, your position is then known
to the entire network. You will also find that the ground stations play
radar games; they will take turns, turning their radars on and off.
(See the extract below for a description of what this looks like in
Falcon 4).
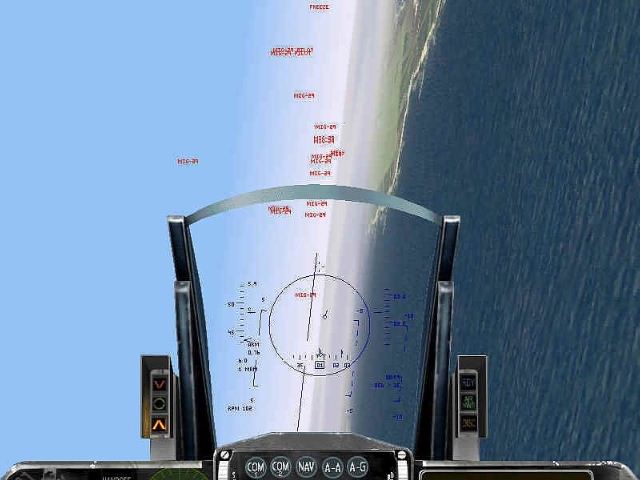
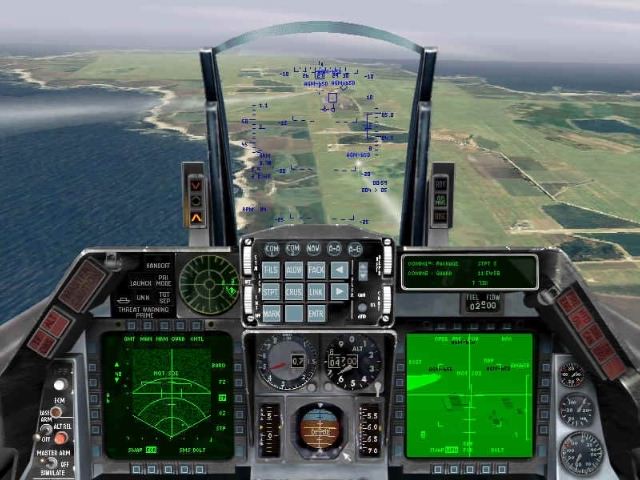
In the map above you can see how I have rerouted the mission out over
the Gulf of Korea about 20 miles offshore. I don't want to go too far
out because that would increase my exposure to interception.
Way point 5 is the alternate target. AWACS shows interceptor and cargo
aircraft over the water closing in on our push point. While that is
still threatening, it's a whole lot less to contend with than the
scheduled mission.
Since we are not in a support role, we don't have to worry about time
on station and all that. We're doing our own thing here: Jake Grafton
in his A6 Intruder on his way to Hanoi. It looks like a cake walk, but
we know better. There are no cake walks in Falcon 4.
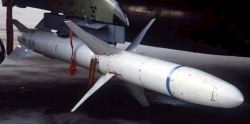
The original load out has us carrying two external tanks and 2 HARMS. I
will opt to keep the HARMs and the extra fuel. Since I have previously
reconned this radar site I know that it shuts down as soon as I lock it
up. If this occurs the mission will be a waste of time, so I've planned
an alternate target composed of several SA-2 sites fifteen miles to the
north, close enough to be a good alternative.
Taking off in a 4 ship flight, we're not to the push point when a
flight of Tupolov transports shows up directly ahead at 40 miles range.
At first they appear unescorted, but experience tells me it's unlikely.
Carrying extra fuel I go to afterburners up to 600 knots, knowing that
the escorts will soon appear or the enemy will scramble or divert
interceptors to meet my flight. Suddenly, off my 9 o'clock, a big air
battle materializes. F15's and MiG29's are duking it out. Radar says
they're 30 miles distant, too close for comfort. I swing left out to
sea a bit for some extra cushion.
As expected, the TU's escort of 3 MiG29's show up off my nose only
minutes later. My attention was diverted to the battle off my beam, and
as a result I'm slow to pick up the MiGs. This nearly proves fatal. I'm
going to try to avoid them but I doubt we can; these Charlies have been
known to shoot at anything that moves. We are at the IP now and can't
possibly make the run-in as planned.
What to do -- fight or flight? Well, its 4 vs 3. Because we're
relying on speed rather than stealth, I don't want to drop tanks just
yet. We'll be burning tons of fuel, besides which I've still got Plan B
in mind -- we are desperate to eliminate air defenses.
We do have an advantage with this encounter: we get first shot at Rmax.
I decide that we'll go for it. I lock up the MiGs and order the second
element to attack, holding my wingman in reserve. I'm cutting it close
so I let one of my own AIM's fly. A little insurance never hurts.
Incredily, all these missiles produce not a single hit. Two F16's
nearby (not mine) go down. I'm shocked, but the MiG's are inexplicably
backing off.
No, wait! There's a couple more F16's closing from the east at their
3:00 o'clock. Damn, all that adrenaline and I'm not paying attention to
my speed, nearly overshooting the target. I get lucky, the EW radar is
emitting and I lock up fast. Almost below Rmin for the HARM and a bad
over-shoulder shot. I start a turn and let her fly anyway, but I don't
feel good about this. I bank away to the right, push buttons like mad
and refocus on the MiG's.
Holy Guacamole! Haven't our guys graduated from flight school yet?
Those same three MiG's are still out there, joined by two more. An F16
goes up in smoke, and an F4E is trailing smoke. They haven't hit a
single MiG.
Sweet Petunia, we have a bunch of fresh pansies out there. I lock one
MiG up fast and send the second element after them. The enemy is now
headed east to deal with another two-ship flight of F16's coming after
them from about 20 miles away. The odds are looking better.
I feel comfortable enough to make another pass at the radar station but
I should have known better: it shut down and I'm out of luck. Screwed
and blued. It's not going to light up again.
Plan B
Turning around and heading inland (north), I order the element to
rejoin. One seems to be MIA although the screwy voice comms indicates
he's still alive when I know he isn't. AWACS still thinks there are two
Python8 flights out there, so I have to listen carefully and sort out
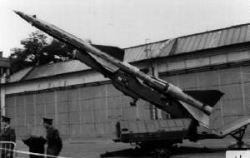
the calls. Fifteen miles ahead are a bunch of SA-2's (which are harmful
to the health of B-52's nearby) and I want to go home with something to
my credit.
Ahead a pair of MiG 21's roar skyward from behind a small hill.
Geez, are they going fast! These old fingers gotta work fast; the
SA-2's are lit up like a Christmas tree on the RWR. I love SA-2's
because they can't touch me down low.
I let the last HARM go. Then I order my wingman weapons free for AG and
cover for him, going after the 21's myself. It's drop tank time. I am
hitting 600 knots and they are in a steep climb and slowing fast. I get
the drop on one with my last AMRAAM and let a Sidewinder go to increase
their attention span.
My wingie is fire and smoke. The MiG21 that I failed to hit got him.
It's far too hot out here; time to RTB. But its no surprise that there
are now 5 MiG29's on my nose as I turn around, the one's that were
formerly behind us at the EW site. It looks like they nailed at least 5
of our guys. Are these MiGs invincible?
Two MiG29s are closing on me as a pair of F-16's break off their B52
escort, and an F5E is engaging the other three. Checking around, only
Python 84 of my element is left. I decide to sacrifice him, ordering
him to engage while I get out of Dodge.
The MiGs make quick work of the Falcons, but while they are engaged, I
have time to give them a wide berth. I hit the deck and beat feet in
afterburner, wringing the Falcon out for all it's worth.
Summary Analysis
A lot of unexpected things happened out there, like our guys getting
mauled without scoring a single hit. Cavalry comes to the rescue and
then falls in a ditch. As with any Lead who manages to get his flight
wiped out, I'm pissed off and looking for something to blame other than
my own bad decisions. Never mind; let's look at what really happened
out there.
The briefing shows that while we missed our primary target, we got two
SA-2's, a ground vehicle and a couple of KRaz something or others. But
I was the only survivor. The price was far too high even for Falcon 4.0
where getting slaughtered early-on is routine.
While this mission reveals that having a Plan B can be a good idea,
staying on station that long brings the interceptors in a hurry,
further reducing the chances of success. In hindsight, a 15 mile
separation between targets was too short. Escaping from the defenders
at the primary site, they simply followed us. Only by sacrificing my
element did I escape.
Carrying HARMs alone on a single target strike is a bad idea. When
target radar shuts down, or starts playing games with you, it's game
over.
In Fast, Out Fast
When enemy air defenses are strong, the key to success is a lightning
strike, getting in and getting out fast. If you have to make multiple
passes, chances for survival, let alone success, are about nil. Had I
been carrying a couple of Mavericks (having adequate time for a good
line up with bombs is doubtful; I'm not a hotshot bomber) that EW radar
would have been history. Instead, it's still operating.
I've yet to fly an uncontested SEAD mission in F4. On every mission
there comes a time to make the decision on whether to abort. The
opposition was not overwhelming, but it proved that I was
over-confident and then made a bad decision. Good luck is the exception
rather than the rule. When it comes to decision making under marginal
conditions one should always plan on things getting worse, not better.
Miraculous escapes are for the movies.
The Best Laid Plans..
Probably my biggest mistake was in not following my own advice. My
planning itself was flawed. We intended to take the EW radar out
because that was vectoring in the interceptors so that we couldn't take
individual SAM's out further to the north. Plan B was in direct
contradiction to the purpose of Plan A. In other words, how could I
take out any other SAM's when the EW system was still operating? This
was strategic stupidity in action!
I also made tactical blunders. AIM120's at Rmax in this sim have a slim
kill ratio. While I used my wingmen with a moderate degree of skill,
using the AIM120 to try to hold off the enemy didn't work. I hoped they
would try to beam and scatter, letting my guys pick them off. The MiG's
didn't scatter and my guys didn't score a single hit.
Another mistake was in failing to take account of the time it takes the
AMRAAM to go autonomous. Under these conditions, at Rmax, that's about
17 seconds and is far too long to hold the enemy in my radar cone. With
the enemy on my nose the closure rate was extremely high, yet under
those conditions I sent my guys into a shooting match with arguably
superior MiG 29s. I miscalculated the odds.
Detection and Avoidance
Could we have avoided detection by flying further out to sea, and then
going well beyond my IP and doubling back? Since all the interceptors
were to the north and east of the target, would this have worked? No,
because they would have found me anyway. They could and they did.
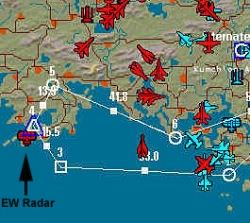
The DPRK has no AWACS, but we discovered the hard way that the EW radar
can easily pick up targets at 200 feet over open water. On the other
hand, taking out a primary EW radar is of critical importance that may
well have warranted the sacrifice, at least in a simulation. I tried
but failed, and these are some of the reasons why.
Now that we know there are AAA guns at this site, bombing is out of the
question. Next time we come in low and fast with Mavericks.
Confused by any terms in this article? See our Glossary
Part II
Introduction
In part one of SEAD Briefing we
flew a reconfigured SEAD mission to take out the Early Warning Radar
near Ongjin on the coast. Bad decision making resulted in a failure of
the mission and the loss of three aircraft.
A subsequent mission was run in which we went feet wet at 300 feet, 600
knots and stayed there all the way to IP. The EW radar picked us up,
and 20 miles after the push point interceptors decimated the flight
once again. Caught low, we didn't have a chance, pretty much proving
that if there aren't any mountains to hide behind, the EW radars are
going to find us.
SEAD III
In this next attempt, we're determined to get it right. Now we think we
know what works (after losing seven aircraft.) We forego the extra fuel
this time and load up with Mavericks and AMRAAMs. That heavy load in
the first missions proved fatal to our ability to defend ourselves. Tom
Basham confirmed this in his recent article on the Falcon 4 website:
Don't be a hero. Engage the necessary targets, drop your
weapons and go home. Every time I've been shot down on a SEAD mission,
it was the result of loitering over the target too long. By the time
the you hear the ZSU-23s open fire, it's too late. With extra ordnance
under the wing, the temptation is great to stick around and keep
engaging targets, but doing so almost always results in simulated
death. So above all else, I suggest you plan to take just enough
ordnance for the assigned target--don't load your jet to max gross
weight--and then drop it all on your target. You're more likely to kill
the target in question and you'll spend less time in the combat area.
Loaded up, we'll go to the divert air base, which is closer, in the
event we reach bingo fuel. Going feet wet at 2500, we enter a slow
climb at high speed, determined not to get caught down on the deck
again.
The AI never runs the same mission twice. Although the mission started
out looking much the same, it didn't last long. All seemed quiet on
this run right past the push point when trouble was heard via the
radio. Trouble is behind us and I had to turn and make a radar sweep to
find the pesky MiG29's again escorting a flight of Tupelovs. As in the
earlier flights they were not content to ignore us and broke off from
their escort position. Had I ignored the radio warning, we would have
been in big trouble. Instead, we shot first, splashed 'em and asked
questions later.
Only a hint of things to come, this is not exactly what I had hoped to
see as we reached the IP. The radar and sky filled with yet another
Cluster Foxtrot at 2 o'clock. One moment the sky was nearly empty, the
next it was thick with aircraft. Do these guys scramble fast or what?
Play by Play
This time I do not hesitate, making an instant decision to designate
and send my whole package after the threats. A quick radar sweep shows
that five MiG29's are approaching the 40 mile range to the left but
closing fast. Two F-15's are engaged, with one scoring a splash.
Locking on, I call for the second element to attack. Another three
MiG's are in range but moving to the right. I separate and bracket
left, quickly lock up and light off an AIMer at the three to the right.
At the same time, I'm keeping an eye on the target location. Clearly
the odds are against us and any sensible lead would abort. However, our
strategy from the start was to keep any interceptors sufficiently
engaged to allow me to break out of the fight, swoop down and nail the
target radar.
In order to do this, my timing is critical; I must be positioned so
that I can launch missiles at the attackers, wait for them to go
autonomous, break off and be properly aligned with the target. If this
fails, the mission will fail.
Not waiting to see the results of my shot, I brake, turn 90 degrees and
head on in to the target, now within optimal range with a good line up.
The three in-range MiG's have to contend with my guys on the attack,
but I keep my wingman for cover. Calling him to clear six keeps him
with me. Having checked the threat ranges carefully, I estimate closure
rates and figure I have at least a minute to get in and out. That's
adequate.
I never did actually see the radar antenna at the site. There's
something that looks like a water tower - I suppose they could conceal
it as a water tower -- but since I've got six Mavs, I'm going to spray
the whole compound. There won't be much left after that.
Life is lovely. Mav #1 is off, the sky looks good around me and I have
time to pickle four more Mavericks. The explosions are pretty
substantial and I'm feeling confident that either the radar antenna or
the support systems are now smoking rubble. It later turned out that
the thing that looked like an old, wooden water tower was indeed the
radar, same as the one at T'aesong. If all my radio commands worked, I
would have told wingie to go ladder, but they don't.
Clearing the target at low altitude, I don't see the AAA guns anymore,
but off to my right at nine o'clock another enemy flight is closing
fast, now within range for radar missiles. No problem, I'm still at 560
knots from the dive and I can outrun them. The good news is that I bank
hard and they never get off a shot.
The bad news is that as I pull G's, I'm headed smack into more
converging interceptors, altogether too close aboard. Incredibly, my
package is intact and blowing off bandits admirably. Equally incredible
are another four MiG29's that are on us in a heartbeat. No time to
designate, I call "clear six " again.
"What the . . . . ?" A MiG 29 pulls one of his Paris air show stunts
right in front of my nose, setting himself up for the fall. Never mind,
push those damn buttons fast! Gulp, no need for buttons; guns, guns,
gun!
"Break high," comes the call, and I do. Now I see several Charlies
closing on me from on high. "Energy, energy!" and thank God I've got
it. They're coming down and I'm going up. Looks like I've got the
advantage. Short version of the Immelman, roll inverted and I might get
on his six.
Now I'm overshooting badly. Jam on the brakes and roll once, down to
280 knots, darn near corner speed at the right time. I almost collide
with that MiG coming nearly head-on, as big as a poster of Kim Il in
P'yong Square (or whatever they call it.) Another MiG is head-on 500
yards on my 11 o'clock but he's not even close to a line up on me.
Fortunately, Python 83 is on his tail, soon to relieve him of his
overconfidence.
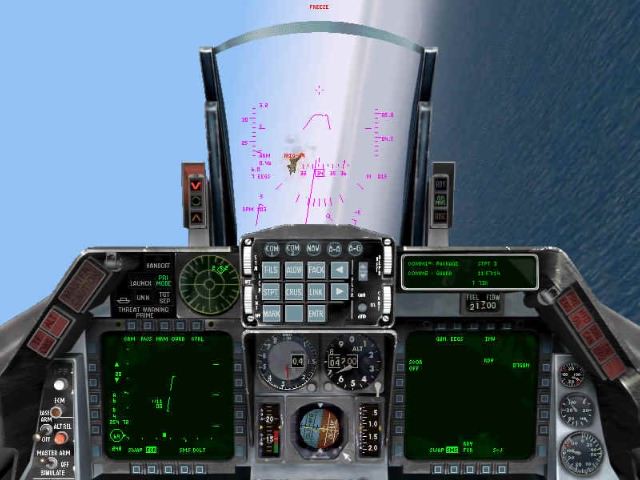
Hallelujah! My gun shot on the stuntman couldn't have lined up any
better. He's flying straight into my sights; the first short burst
scores. The only thing I have to worry about now are airplane parts
coming through my canopy. I strafe him up the length of his starboard
side and I've time to turn away before he blows very nicely, thank you.
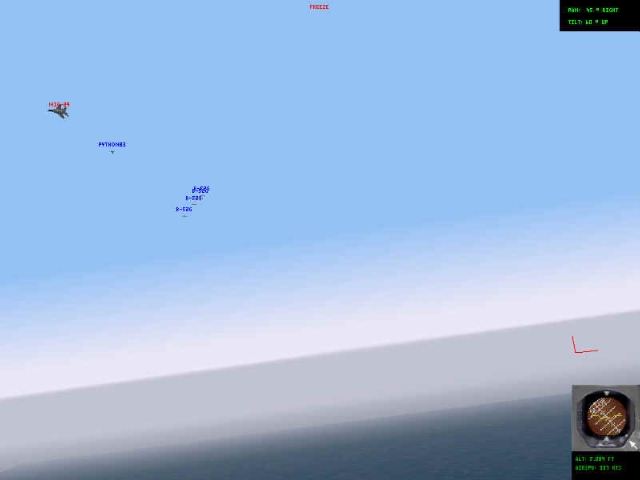
Bye-bye, MiG. Here are the shots:
Mash the throttle forward, get the speed up, look around to see
where my buddies are. Tighter than a miniskirt on Cher, they're on the
six of the three other MiG's. The sky is thick with aircraft, missiles,
smoke and explosions from my 3 to 12 o'clock. But there, just as nice
as can be, is my little 45 degree escape window from 12 to 3 o'clock.
Four of four MiG's get splashed. I smell a big victory here, so
frantically I call my guys home. No answer, so I keep commanding,
"Rejoin, RTB, formation," whatever. Just get the heck out of this mess!
NOW!
They never did answer those calls, but slowly they begin forming up when I'm 20 miles out.
Counting heads . . . one, two, three . . . all safe and accounted for.
It's hard to say what the odds were, even with labels on. It's
impossible to count all those noses and measure those distances, but my
guys sure did a bang-up job. Not until we RTB and hear the briefing do
I know how good. An incredible dleven kills including my own two,
meaning that the three of them got three apiece, plus my lucky gun
shot. That would rate a medal in any man's air force. But since we
didn't complete the assigned mission, we got a "horrible" rating
anyway. Never mind, the dreaded EW radar is rubble, along with a few
other assets.
SUMMARY
In the real world a pilot has only one life to lose, and a lead would
have aborted this mission based on highly unfavorable odds. It's a
little different in a sim. To take out a vital target may be worth an
aircraft or two.
Again, it's impossible to ignore the huge role luck plays in battle, as
true in real war as it is in this sim. We were plagued in this mission
with nearly as many attacks as the prior missions, yet this time around
it played out just right. I can't say I did a wonderful job directing
my package, but the nature of the AI dictates that I give my element
directions, not merely order them to unloose their weapons.
After designating, I sent them off to do their job while I did
mine. All elements accomplished their tasks with flying colors. Maybe a
year from now I'll understand how the AI plays this game. Perhaps it
does such a good job producing random circumstances that it really does
create the fog and luck of war. Yes, good planning played a big role in
this mission, but so did good flying.
Understanding the Enemy
There is no mystery about why veterans are so rude to
"greenies." Experience equates to survival. Our success is relative to
the amount of effort we make in understanding how the enemy operates.
In all strategy games, it's you against the AI.
Learning how the AI works is the same thing as analyzing the enemy in a
real war. Our real enemy here is a computer program and our job is to
defeat it. You shouldn't let this reality affect your believability
quotient. It is no different in real war in which great efforts are
made to understand how the enemy thinks, his tactics, and how he
employs his assets.
Why my package flew so well still remains something of a mystery. Is it
keyed to how well I fly? Or does the AI randomly have them perform
differently on every mission? Did the downing of the EW radar give us
the edge in that battle on egress? Under attack, of course, the radar
would shut down. Did the inability of radar operators to vector
interceptors on us play a role? No doubt it did.
It is also clear that how well a lead manages his flight plays an
enormous role. If a lead can find time to designate targets for each of
his wings, success will increase proportionately.
Know your weapons and their limits. Choosing the right weapon for the
job can make a huge difference. The ability to launch five Mavericks
quickly at individual targets was critical. Note that the Mav's did the
job because the field of fire was completely open. Cluster bombs could
have done the job, but bombing while we are under attack poses the risk
of failure. In such a case, stand off weapons are the right
choice.
Another good choice was choosing a medium altitude to initiate the
attack. Without the higher altitude, there was no possibility of escape
when attacked; I'd end up low and trapped. My decision to attack only
when I had an open egress window was equally critical. Previously, I
egressed the target straight into the oncoming enemy. That's not
healthy.
Also note that on a strike mission, it is possible to use your
flight members as cover while you take on the target. This turned out
to be a very good decision. To keep them from attacking the target, all
you have to do is bug the interceptors and order ALL of them, element
and wing, to attack the AIR targets. This is a good tactic for any 4
ship flight without an escort. Hold your own wing man back to cover you
personally.
Who makes the attack? For single, very high value targets such as this
SEAD mission, it's better to do it yourself. Basically, the decision as
to whether you assign your wings, or yourself, should depend on how
much cover you need. On targets of lesser importance, and especially
where few, if any, intercepts are involved, it usually works out better
to send your wings in first while you fly cover and then do the clean
up, if necessary.
Don't delay decisions to attack or flee. While it may only be fifteen
seconds, the advantage can be lost during the wait. Time is precious.
If you are uncertain about what to do, the correct decision is to
abort.
Good decisions are based on experience; experience is gained by
repeating the same missions until what works is thoroughly understood.
Ultimately, if a pilot practices a variety of missions at least three
times such as we have done here, he will learn how to make fast,
intuitive decisions, as well as improve his mission planning.
There is no time for sightseeing when flying the route. I now notice
that my attention was previously scattered instead of being fixed on
the never-ending search for the enemy. It's very easy to become
distracted. There is only one time to relax, and that is in the
debriefing room.
Another critical and stupid error in prior missions was to get
impatient and advance the speed to 2X prior to IP, allowing the enemy
to get the jump on me because I couldn't react fast enough to turn time
advance off. In the time it took me to react, I could easily lose 15
seconds and 5 miles, enough to kill me.
The same applies to the failure to be constantly monitoring the
horizons in all directions, and with all available means, including
listening to the radio using the bullseye and AWACS. You are at an
acute disadvantage if you don't know how to monitor COMMS. It is
difficult to learn because you have to train yourself to visualize
enemy positions using reported bearings and distances. Learning to
visualize the battlefield dramatically improves your survival rate,
though it will also cause more frequent abortion of missions.
Hopefully you will be able to profit from my little exercise here.
There isn't only one right way to run a mission, but at the same time
your responses must be appropriate to the circumstances. Initially, I
had my doubts about the caliber of the Falcon 4 campaign and some of
its modeling. Those doubts have now been put to rest. This is one
amazing piece of work that will certainly keep me entertained for a
long time to come.
The degree of difficulty of this sim can be daunting, even to a
mid-level player, yet alone a novice. Just like a real world jet
jockey, a lot of practice and training is required to create a
competent pilot. With time and a little persistence, eventually the jet
jockey's tricks of the trade will be revealed.