Falcon 4.0: Prima Strategy Guide: Review - Page 1/1
Created on 2005-02-04
Title: Falcon 4.0: Prima Strategy Guide: Review By: Len 'Viking1' Hjalmarson Date: 1999-02-16 1925 Flashback:Orig. Multipage Version Hard Copy:Printer Friendly
Prima Strategy Guide written by Pete Bonanni and James Reiner
This guide is publisher by PRIMA and is some 340 pages in length. It
includes a large number of illustrations, but text dominates.
Inevitably, there is substantial repetition of material from the Falcon
4 manual, but some sections contain more material that is better
organized, and screen shots and diagrams are original to the Guide.
Before we get into the nitty-gritty, here is a partial listing of chapters in the Guide:
Chapters 1-9: Falcon Overview, Main Modules, AC Handling and Views, Cockpit and Instrumentation, Flight Ops.
10: Radar Operation
11: Air to Air Missiles
12: Air to Air Gun
13: Unguided Weapons
14: LGBs
15: Maverick
16: HARM
17: Max Performance
18: Basic Fighter Maneuvers
19: Intercept Basics
20: Falcon Missions
21: Mission Planning
22: Air to Air Tactics
23: Air to Ground Tactics
24: ACMI Debrief
25: Logbook
Appendices,
Pages 309-346. Appendix A : Getting Started; Appendix B: Phone Book
Setup; Appendix C: Radio Command Summary; Appendix D: Mission Cards;
Appendix E: Korean Theater Airbase Listing; Appendix F: Avionics Fault
Summary; Appendix G: Glossary. Index: page 337-346.
The Guide seems to be designed in such a way that someone who does not
have access to the original manual can use the Guide to get the most
out of F4. It's an appealing layout, and I would guess that many who
have never flown F4 will be attracted to the sim via this guide.
The integration of "I was there" sections is attractive and sets the
mood. It's interesting to note, however, that the space devoted to the
Campaign and to Tactical Engagement is quite brief. Perhaps for the
best, since TE especially is likely to change substantially over time.
But
what's in it for those who already own the game? Comparing the sections
on Realistic Radar, the Guide has twenty one pages to the seventeen in
the F4 manual. However, the section in the Guide integrates the
discussion of the B scope (section in the manual pages (4-6 to 4-9), so
length alone doesn't show what is happening here. Let's take a look at
a sub-section from each to compare the approach.
The F4 manual, section 21 page 22, contains a sub section describing
30x20 Submode. This single paragraph is about thirty five words in
length. There is more information to be found in the F4 manual if you
search for it (section 4-4 4-5, and in the training mission, 4-12 to
4-13), but in the Guide most of this info is available in a single
section, on page 154. Here it is:
HUD MODE (20 x 30)
Use this radar search pattern when you can turn and point your jet
close enough toward the target to see it in the HUD. The radar scan
pattern in this mode searches a 20x30 degree area that closely
resembles the field of view (FOV) through your HUD (Figure 10-18).
The one limitation to using this mode occurs when you have several
aircraft together within your HUD FOV. The first contact the radar sees
as it scans this area will be the one it acquires, whether it was the
one you wanted or not. TO be more discriminating about which aircraft
you lock, refer to the next section on Boresight scan mode. If no other
aircraft are near by the target, the HUD scan mode will certainly do
the job.
The HUD symbology with this scan pattern does not give you any
specific cues about what scan mode the radar is using, so confirm you
have selected the HUD scan mode by glancing down at your radar MFD. As
in figure 10-19, you'll see ACM indicating your current air-to-air
radar mode and "20," displayed on the top center of the MFD. In this
ACM scan mode, the two vertical "goal post" lines set in the center of
the MFD represent the 30 degree wide scan pattern.
As the radar is sweeping to find a target, you'll see the elevation
caret moving up and down the left side of the MFD and the azimuth caret
cycling within the confines of the search pattern at the bottom. No
target information is displayed because the radar has not locked on,
because you are presumably looking through the HUD to acquire something.
When the radar acquires a target, you'll see the digital readout of
information on the contact across the top of the MFD, the radar picture
will return to a B scope display, and the target will be displayed as
an STT symbol.
From this quotation, you may get the idea that Bonanni assumes a lesser
degree of familiarity with the systems of the F16 than the writers of
the manual assume. This, plus the greater integration of the Guide
itself, explains the greater length of many sections. The Guide would
make a good gift or companion volume for air combat simulation novices
who want to get the most from Falcon 4. What about the rest of us? Good
question!
As I transitioned to the later chapters of the manual, notably
eighteen and forward, I was looking for some additional tactical
information. For example, I was curious to see if Bonanni would address
the question of transitioning from a BVR engagement to a within visual
range engagement, and the move from TWS radar mode to an ACM mode.
As I read on into chapter eighteen, I had to concede that Bonanni's
discussion of air to air engagement, proceeding from a discussion of
the Weapon Engagement Zone (WEZ) and the control position, was
excellent and would benefit any novice as well as some more experienced
virtual pilots. For the curious, this section proceeds as follows:
(pages 217-239)
ATTACK GEOMETRY
The Pursuit Course
Attack Geometry In-Plane with the Bandit
Attack Geometry Out of Plane with the Bandit
Reasons for a Pursuit Course
Weapons Engagement Zone
OFFENSIVE BFM
The Classical Control Position
Offensive BFM Overview
Lag BFM
Turn Circle Entry
Offset Turn Circles
RATE BFM
Offensive BFM Mechanics
Turning Room
Horizontal Turning Room
Vertical Turning Room
Assessing the Bandit's Performance
Nailing the Coffin Shut
Offensive BFM Summary
The next section, Defensive
BFM, continues from pages 240-256. This discussion is also excellent!
Chapter nineteen then continues with ten pages of discussion on the
Intercept.
This introduction sounds promising:
What happens when you are winchester AMRAAMs (after you've fired all of
your AIM-120x) and there's another MiG between you and the border? You
must rely on your basic intercept skills to get your AIM-9 Sidewinders
and 20mm cannon to the fight. Or what about when you need to intercept
and rejoin on the tanker to fuel up? Even today, basic intercept skills
must become second nature for the fighter pilot. Every aspect of the
mission requires understanding the concept of intercept basics.
RWS Situation Awareness Mode
The previous chapter covered the building blocks of aerial combat -
basic fighter maneuvers. This chapter describes the maneuvers you'll
need to get yourself to the fight - the intercept. To be a successful
(and lethal) Falcon pilot, you must understand concepts like aspect
angle (AA), antenna train angle (ATA), collision antenna train angle
(CATA), offset, turning room (TR), and conversion turns.
Hmm. CATA and conversion turns. This sounds interesting. It doesn't get
us the info I was hoping to find on the transition from a BVR
engagement to ACM, but I don't recall reading anything on CATA in the
F4 manual. In fact, a quick look at the glossary of the manual supplied
with the game will confirm that there is no mention of such.
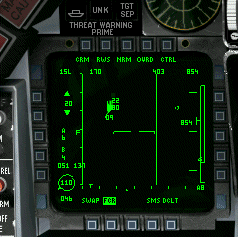
Falcon 4 ACM. Note NCTR bar
.
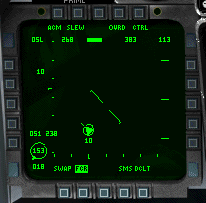
So just what is CATA and why is it so important? Here is Pete Bonanni :
What heading will put you on a collision course with the target? By
flying this course you will offset the bandit at a certain angle from
your nose at a specific angle of attack, called the Collision antenna
train angle, or CATA. This will be your direct path to merge with the
bandit...
How do you find this angle? As you might guess, the F16 finds it for
you. Whenever you lock a bandit on radar a "steering cross" is
displayed on the radar MFD which represents the F16s calculation for a
CATA, taking into account the target's current airspeed and heading.
Turning to center the cross in the middle of the MFD will put the
target "on the CATA."
Helpful, isn't it? The particular question I had in mind was
not addressed, but many a pilot will take the lessons and information
presented in this Guide and begin to learn or improve their knowledge
of the dynamics of fighter maneuvers.
Another area that is better handled by Bonanni than by the
manual supplied with the sim is NCTR. Basically, when you lock a target
in Single target track a small green bar will appear in the center of
the top of the RADAR MFD. It originates in the center and extends out
to either the left or right. The more it extends to the left, the more
likely that you have an enemy contact. The more it extends to the
right, the more likely your contact is a friendly.
This is extremely useful in dog fighting when you are in BORESIGHT mode
and lock up a target within 5 miles. At short ranges the NCTR has a
high degree of certainty and can tell you instantly if your contact is
friend or foe. When in padlock, you can see the NCTR bar clearly in the
MFD.
My overall impression of the Prima Guide remains the same. This is a
well written and well organized guide, containing excellent shots and
illustrations, by someone who knows the subject matter intimately. I
would recommend it to novices or to anyone who has found the manual
supplied with the simulation to be too complex or too scattered in
structure.
However, more accomplished virtual pilots may find that the
Guide is too repetitive, covering already familiar territory with only
a few exceptions. I suggest finding a copy you can peruse for a moment
before making your decision.