Falcon 4.0: Missile Avoidance: A Holistic Approach
One of the very first things we
learn in Falcon 4 is that missile avoidance is difficult, and often
impossible, depending on your mission and what stage of the war you are
in. This essay takes an holistic approach to missile avoidance, rather
than the more usual topic of evading specific missile types.
The reasoning here is very simple: The F4 campaigns are bristling
with missiles, so being able to dodge one or two is like bailing out
the ocean with a tea cup. We can fool some of the missiles some of the
time, but it won't be long before our luck runs out. We need to deal
with the subject on a campaign-wide basis, which requires that the
subject be placed into the context of the broader war effort.
Many wonder whether F4 missile modeling is realistic. Reports
from real world experience and literature suggest that it is (Note:
Possible exception is the Archer. In F4 it seems impossibly fast). For
the most part, our troubles with missiles stem from a lack of
experience, training and reading materials. There are only two major
wars that involved considerable fighter/missile experience -- Vietnam
and Afghanistan.
The circumstances of Desert Storm are of little value. They
are too unique from the standpoint of the open desert, a not-so-smart
enemy, and little having been written on the subject. From my readings,
the record of both earlier wars indicate that missile technology, even
as far back as the late 1960's, was extremely deadly.
One has only to look at the record of the US Air Force and
Navy to see just how deadly the NVA air defenses were. In Vietnam,
fighter pilots fared poorly against strong missile defenses. US air
losses in 'Nam were horrific, as were Russian losses in Afghanistan
against the portable Stinger. It's hard to imagine shoulder-fired
Stingers taking out MiG27's, but they did. CIA devised tactics were
more than enough to make up for the limitations of the weapon. Strategy
and setting up traps was the key to success.
Do you want to know how bad US aircraft losses in Vietnam
really were? The Pentagon itself is willing to admit to losses of 3,689
fixed wing aircraft and 4,857 helicopters, five times the number of
Korea and about half of WWII (6,000). Moreover, two US fighters were
lost for every three MiG's shot down in air battles. With those
numbers, do you still think missiles aren't modeled accurately in F4?
Those were pilots whose lives depended on their skill, and they still
came up short.
When it comes to air-to-air engagements, there is still very
little in the way of real world experience after 'Nam. A2A combat was
nonexistent in Afghanistan, and very limited in Desert Storm. In part,
this is one of the reasons there is so much controversy regarding the
whole spectrum of A2A missiles. No air force in the world (with maybe
the sole exception of the IAF) really has much direct experience since
there have been no major A2A wars since 'Nam.
In point of fact, none of this should make much difference to
the sim pilot. The only thing of importance is the missile modeling in
the sim. THAT is what we have to learn. Whether it's accurate or not,
that is the hand we are dealt and have to play.
One of the most common complaints of Falcon drivers is
hearing the audible warning "ARCHER INBOU . . . ." and blam! The
warning isn't even finished before you are incinerated. In fact, I got
so frustrated with this that I started timing it. On average, 3-5
seconds between warning and warhead explosion. About enough time to
pump some flares and start a turn, but not enough time to avoid. Blam.
Party's over!
As Spectre pointed out in his recent article, there's really
only one way to learn to deal with missiles . . . practice, practice,
and more practice. Bear in mind that Falcon 4 is a new sim, just two
months into its release, so most of us have a long way to go before we
gain a strong body of knowledge. And as most of us discover, what works
in one sim, don't necessarily work in another.
In the meantime, here are a few more tips based on my meagre
168 hours of cockpit time. I don't profess to be an accomplished pilot,
but hopefully what I have learned can help other novices -- especially
those of you who, like myself, got a lot more than they bargained for
with Falcon 4. Make no mistake, this is one tough sim.
When considering missile avoidance tactics, the subject must
be kept in context of the kind of mission we are flying and weapons
we're carrying. Balancing the risks of achieving one's goals versus
staying alive is a constant consideration. It must also be considered
where you stand in regard to air superiority and the overall war. That
means that early on, when both the ground and skies are thick with
missiles, just staying alive becomes the number one job.
We are not going to be able to just select missions that suit
our fancy and go merrily on our way blasting hell out of the enemy. War
does not work that way. There is a natural order of battle and we must
get in tune with it sooner or later. Moreover, if the frag order in our
campaign hasn't got things right, we've got yet another problem. You
ain't gonna fly BAI's into an area thick with defenses and succeed.
While mission planning is not the major subject of this
essay, please note that it is an underlying theme that everything you
do must be considered in the overall context of the war. There is no
escape from this reality, even in a simulation. If you are a TAW or
F-15 flier, you know you have exactly the same problem in those sims.
Missions must be flown in their proper order or failure will be the
only result.
If, like me, you are not a graduate of the War College, then
you'll also quickly discover that you have a long way to go before you
gain a basic grasp of war strategy. It takes time to learn what
missions to fly at what point in the war. This is something to always
keep in the back of your mind. Ultimately, we are just students, not
experts. We have a lot to learn. In the meantime, we get shot down a
lot.
1. Avoidance
The most effective key to both types of missile avoidance is to
stay out of harm's way. In working campaigns, I've discovered that
there are an abundance of no-win situations in the frag orders; these
are conditions in which the enemy air and ground defenses are so strong
that I am not going to survive if I fly head-on into them. That
includes combinations of air and ground elements. Consider this
statement taken from World Air Power Journal: "There is no place for
sportsmanship or chivalry in air combat - the aim is to do maximum
damage while exposing oneself to minimum risk."
In order to prove this out for myself, I flew 24 strike missions into
the heart of enemy defenses. Battles were going on fast and furious in
the air and on the ground. In each there were no less than 50 aircraft,
usually more, all flying around shooting at each other. At rookie level
my results divided out evenly between success, death, ejections or
crash landings on RTB. In most cases, I never knew what hit me. These
were conditions Chuck Horner wouldn't even consider flying in.
While I've found most of the information in the F4 manual to be
accurate, I did find this amazing statement: " . . . most of the time
your route should keep you away from SAMS and AAA." [p.27-15]. If you
take that to mean that the default mission flight plan will keep you
out of harm's way, think again. I've found that well over half the
time, at least in early stages before many SEAD missions have been
flown, the default flight plan will fly you straight into a veritable
hornet's nest of opposition. In fact, there are so many air defenses,
they are hard to avoid. Instead, take that to mean, "YOU should keep
your route away from SAMS and AAA." Don't expect the mission planners
to do this for you. They don't.
If your experience is anything like mine, you've found the
theater map difficult to use for intel gathering and mission planning.
What we see, at least superficially, on the map looks relatively
benign, yet when we get where we're going, its an entirely different
matter. You find SAM and AAA batteries all over the place that didn't
show on the map. (That's because many of the mobile air defenses are
listed with the infantry or army air defense units, and don't show up
as symbols. You have to call up each battalion and expand the inventory
to see what they have. That takes a lot of time.)
As a result, you find yourself blasted out of the sky time
and time again. This gets very frustrating. Nor should we forget that
the manageable few CAP flights that do appear can be quickly augmented
by reinforcements. The enemy does scramble missions too.
2. Gathering Threat INTEL
As any real world pilot knows -- not to mention quite a few
dead ones -- it is suicide to fly a mission without a reasonable degree
of certainty what threats you're going to encounter. The key to
survival is in keeping the odds in your favor, whether by threat
avoidance or management.
Pilots are inveterate map readers and intel gatherers, and we
should be too. If we don't think we're getting adequate intel from the
sim, then the only solution is to assemble our own. Remember, you
wanted a realistic sim, so if you expect to beat the AI, then you'll
have to resort to real world tactics and do what real fighter pilots
do. Yes, it is time-consuming, but less so than seaching through all
those unit inventories.
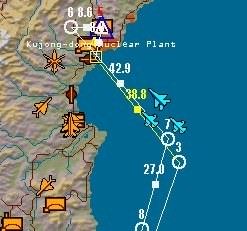
Making my own maps was the first thing I did that improved my
mission success. I photocopy-enlarged the map provided, then started
drawing in the flight plans I had flown, then marking the air defenses
with colored pens as I located them. That means stopping the mission
and filling in the map.
How to Print F4 Maps:
Make the map large with the enlarge icon
Hit Alt-Print Screen, this will load it to clipboard
Close F4 and bring up Paint Shop Pro
Go to EDIT,PASTE,AS NEW IMAGE
This will give you a .jpg of the map
Cut and paste the part you want and print
Use full page and landscape settings
Print a 8.5x11 Map
The worst of these defenses are usually found just past the forward
line of battle or FLOT, followed by the fixed installations around NK
bases deeper in enemy territory. By the time you do this on a
half-dozen missions, you'll get a pretty good picture of what you're up
against, one that you can't get from the theater map. In the end,
you'll find this takes quite a bit less time than all that clicking
around you have to do on the theater map.
Another thing I have been doing by
way of learning to defeat the AI is to fly missions as RECONS. One
great thing about F4 is that it allows you to discard a mission as you
exit from it. Take advantage of this to recon a mission before you get
your head handed to you.
Need still more help? Turn on invulnerability, and THEN fly the recon.
Make copies of the map, mark the route and then place SAM sites (or
enemy fighters) as you find them. If you feel that's cheating, then fly
some BDA's where most of the path before you has been cleared and you
will be far less threatened. CAP's and naval strikes are other good
opportunities to gather intel. However you do it, just make sure you
do. There's nothing like having been there before to even up the odds.
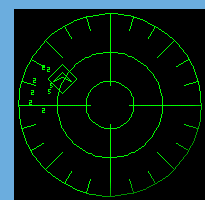
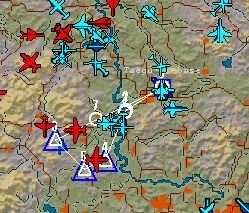
Use Your RWR
The Radar Warning Receiver is an extremely valuable little gizmo and
you need to thoroughly learn its use. Be sure to read chapter 17 on
this subject occasionally. There's more good advice beginning at p.
27-10 on mission planning. It is not easy to use RWR because the
picture it presents is one of merely relative positioning.
There are two threat rings, inner and outer. The system prioritizes by
identifying the missile via radar signature and then calculating the
missile's range to arrive at the priority. Even though an old SA2
missile may be much further away, it may place it within the inner
ring, and draw a priority box around it, because of that missile's
great range and speed. It doesn't necessarily prioritize the threat
merely by how close the missile site is, although that too is possible.
Very often, you will find the symbols closely grouped: these are
serious traps to avoid, and I'll discuss them in detail in a moment.
The RWR also has audible warning sounds. It is EXTREMELY beneficial to
train yourself to recognize these sounds. The Tactical Reference
section within the sim can play all the radar tones for you. It's a
good idea to run through these occasionally and become familiar with
all ten radar missiles. (Alternatively, download TWS Tutor here).
Know Your Enemy
It's an equally good idea to read through the specs and learn the
performance and ranges. Some of these are not very big threats, while
others have limited ranges. Others, like the SA13, 15 & 7 are very
deadly, but only have ranges of 3 to 5 miles. They're a threat only
when you fly over them. They're the ones people complain most about not
being able to evade. Of course you can't evade when you're that close.
Others, like the SA3, 4, & 8, are late model medium range SAMS that
give us fits when effectively deployed.
This sim employs real world air defense array tactics: amazing! Arrays
are large emplacements (actually a group of SAM batteries) that are
designed to entrap you within their envelope. The tactic is that
different sites alternately light you up, each for just a few seconds.
The use of this tactic is an attempt to cause panic and to literally
overwhelm your defenses.
You see, those site operators on the ground have radar too.
They will play very clever tricks on you, trying to make sure that you
do not know exactly where they are. They do this by turning their
radars on and off in a predetermined sequence that can make flying any
kind of mission maddeningly difficult, particularly a SEAD. You get
maybe a dozen blips on your RWR but you can't lock onto any of them!
Unless you have a strategy for defeating them, there's only one thing
to do in this situation: GET THE HELL OUT!
Another trick is to go to SETUP and select Invulnerability. Turn on
labels and now fly over some of these sites and note how they are
placed. Notice that you may see a group of six circles on the ground,
with a missile launcher at the center of each. Others may be hidden in
a forest.
Yet on your RWR, all you see is a single highlighted number for the
whole group of six. This is called a "battery." An "array" is a group
of batteries set out in such a way as to achieve a specific objective,
such as a trap. Normally they're set up to take advantage of expected
lanes of approach.
It is a no win situation when you fly into a cone of air defenses. This
is literally flying into a trap from which there is no escape. Here,
the defenses are set up in an inverted V shape, the cone. Once you fly
between the two legs of the V, you are surrounded with SAMS and AAA on
two or three sides.
But a trap doesn't have to be a cone. A straight line of launchers
spanning a distance of 15 miles is also deadly effective. Consider what
happens when you fly into this line: you may be faced with incoming
from both sides. Only a combination of great luck and great skill will
get you out. Most of the time you will die.
Air defense traps are usually detectable on both your RWR and your HSD,
if you are carrying HARM missiles. The HSD is slaved to your radar with
the AGM88 selected. Learn to detect these situations before you reach
the point of no return. Note that the RWR can be displayed in enlarged
view on the MFD, which is useful if you have trouble seeing the small
panel instrument. The down side to this is that you have one less MFD
to use for another display such as the mission map. (Yes, you can use
SHF ] to add another the RWR MFD to your display top right in you are
flying in no cockpit view).
Triple A and other guns are frequently employed in conjunction
with SAM's. By itself, AAA is fairly easy to evade, having down ranges
of 1-2 miles and a max burst altitude (straight up) of around angels
20. They will set up these gun sites in what appears to be your obvious
escape route, hoping that you will fly into them, which we often do.
They are most often employed down-range of SAM sites where you hit the
deck to avoid the SAMS, only to be picked off by the guns.
Perhaps one of the worst situations to find yourself in is a major air
battle that is occurring directly over heavy air defenses. In this
case, you've got A2A and G2A to deal with.
Many large allied strike packages are faced with this situation, and
the losses can be large. The best means for survival is to either abort
or move out of the major area of battle, attempting to seek the safer
perimeter of the melee. Notice here that until your side begins to
establish air superiority, the major portion of your deaths will occur
when you are caught in the pincers of both air and ground elements. It
is possible to defeat one or the other, but not both.
This discussion of missile avoidance focuses mainly on avoiding getting
shot at. This is truly your most effective form of avoidance. Once a
missile is launched, your odds are not good, so it's far better not to
get launched on from the get-go. It's one thing to encounter a lone
battery; something else again to face an entire defensive array. You're
dead meat against an array, so that's what we want to avoid.
What about maneuver options in a pincer? Let's say you are flying your
flight plan and you suddenly notice that the RWR starts to light up
with missiles at your 11 and 2 o'clock. Or, first the 2 o'clock lights
up, followed a minute or two later by the 11 o'clock. (You'll find many
these of situations in all early campaign missions. The fact is that
you do not know the exact distance or placement of these sites. If
you're carrying HARM's, call them up and the attack display will give a
far better indication of positioning, along with a range scale. If you
do not have HARM's, it's wise to steer clear of this mess. Pronto).
With SAM's at your 11 and 2 o'clock positions, this should alert you to
the possibility that you are flying into a trap. So what to do? Two
months is not a lot of experience with even a much easier sim than F4,
so avoidance is the operative word here. I feel perfectly free to turn
on labels and check the skies. The question in my mind is: can I go
around these defenses?
Heading left around the 11 o'clock battery looks like the
shortest distance and seems a good bet. If the air is clear, then do a
radar sweep in this direction out to radar max range. If all looks
good, make sure you've got enough fuel and that your package is
reasonably intact.
But if you've got a clot of red lettering to the left and the
right, with an air defense trap in the middle, well buddy, you've been
sent on a suicide mission. It took me a great deal of wailing and
gnashing of teeth before I realized that there was absolutely no point
in continuing on. Don't be afraid to abort the mission and RTB. 'Tis
far better to live and fight another mission. As they say, discretion
is the better part of valor.
Notice that in early missions the AI will send you out on
deep strikes long before the air defenses standing in the way have been
dented, yet alone suppressed. Again, under these conditions you cannot
win unless a way can be found around them. Considering how poorly
wingmen perform, even if you do fly NOE and manage to get through, the
likelihood is that you'll lose part of your package, and when you get
on target you'll be highly vulnerable and ineffective.
We don't want any more of those "The airlines are hiring," or
"goat rope," snide remarks, so finding alternatives to flying into the
grinder is the thing to do. We are not required to accept suicide
missions. We are not kamikaze, the divine wind.
Survival: Alternatives
There are several options to be considered here. The obvious
one is to find a safer, alternative route. This is where the
preparation of your own intel maps becomes valuable. Heading out over
the water where there are no SAM sites is one good option when
logistics and fuel permit. Be sure to figure the distances and adjust
fuel rate and speed for these longer routes.
Another option is to forget about your assigned targets and
start chipping away at the edges of the defenses that stand in your
way. In Operation Tiger Spirit, the weakest area of air defense is
right up the center of the peninsula. If you can completely clear out
this corridor up the middle (and keep it clear), all your succeeding
missions can be routed up the middle.
In the short run, chipping away at air defenses will hurt you
because you'll get mission failures (there's no credit for unassigned
targets). But the advantage is that after getting those nasty SAM sites
cleared, you'll have established clear flying at least over the ground.
Pay now or pay later. Or you can just cross your fingers and hope
someone else does it, but I wouldn't bet on that.
You must also learn to make effective use of your wingmen if you
are to be successful. If you don't, you're trying to fight a war single
handedly and you will surely fail. In chipping away at an air defense
array, it makes sense to skirt the perimeter. Try to check the shape of
the array, then attack the farthest corners of it.
Make sure you NEVER fly between batteries. Order wingmen to
stay in formation and "Close Up". Lock up targets and order the wingmen
to attack when in the most advantageous position. Remember that with a
4 man flight, you've got 8 HARM's. You've got to get all of them off to
make a dent in a large battery. If six hit, you're doing real good, but
one mission alone won't be enough against 24 SAMS.
A note on wingmen employment. Many people complain that
wingmen don't perform properly. Yes, there are still bugs even after
the 1.04 patch. Half my commands still don't work. But many of you are
still not up to speed on how wingmen are commanded.
In F4 there are two basic formations: a two-ship and a
four-ship. If you are flying in a four ship formation, you basically
have a wingman and another element. As Lead, you would be the #1 man in
the four-ship.
A four-ship is divided into two elements. The #1 man leadns
the four-ship and is also the lead of the first element. The #3 man
leads the second element but must follow the instructions of the #1
man, or flight Lead.
F4 breaks down radio calls into wingman, element and flight.
Wingman calls affect only a single aircraft. Element calls affect the
second element or the other two-ship in the flight. Flight calls affect
everybody: your wingman along with the other element.
There are important differences been one and two element
flights. In a two element flight, we have to use the [W]ingman and
[E]lement keys. If you are attempting to direct your second element
from [W], it won't work. Both elements, your wingman, and packages are
commanded separately. After the mission, you may see that you and your
wingie did fine, but the other element did nothing. In that case,
reread the Coms section of the manual to be sure you understand how
this works.]
Wingies are most effective when you lock SAM targets up for them, but
this is not always possible. Laying the cursors over the target
(without locking) and ordering the attack is somewhat less effective,
but often necessary when the Fansongs are turning on and off in
sequence in an attempt to defeat you.
Try ordering all your wingmen to attack before you make an
attack. You will be more effective than they are, so YOU be the "clean
up" man and take out whatever they have left. It's usually a lot. Pay
very close attention to your stand-off distance. You need to be doing a
lot of circling.
Finally, if you score an effective hit on an emplacement, try
to make it a point to come back and clean up with another mission.
You'll never get all the SAM's out, but at least get rid of the most
deadly.
Clearing a corridor for future missions greatly tips the odds
in your favor. I will often sacrifice and alter a CAP, load up with
HARM's, and clean out the remaining SAMS. Then I take my green marker
and mark my safe corridor on the map. This will be the corridor I use
for all future missions to this area. It keeps a lot of shrapnel out of
my air frame.
AAA is fairly easy to deal with. The two main objectives are
(1) make yourself a difficult target and, (2) get out of range fast.
Triple A most often hold their fire until you are directly overhead.
Choose a line of escape (continuing your same direction is usually
best), go to AB, then initiate a series of violent turns in that
general direction. But not so violent as to bleed off airspeed below
350 kn. A series of thirty degree S turns will usually do the trick
with a pinch of luck. If the AAA has got your altitude, you can also
make a steep climb if you're 500 kn. or greater. Keep air speed high.
Strike Target Assignments
In case you haven't already noticed, the AI loves to test your mettle
against impossible odds by assigning you to strike heavily defended
targets. There are several tricks you can employ to help even things
out. If you fly missions scheduled for an hour into the future, you can
refly them as many times as you want until the real time limit is
reached. Just discard the mission at the end and it will basically
re-run the same everytime. Create your own map of the target area,
noting the type and relative positions of SAM batteries.
In this case, it's helpful to work with Intel and the theater
map to fill in all the gaps. Note the range of each type of SAM and
draw in your own threat circles. I use a package of those kid's
coloring pens to do this.
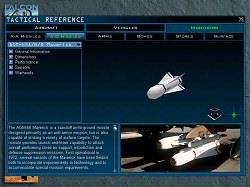
F4 Tactical Reference: ZSU 23
When you've got everything accounted for, now start looking for the
weakness in the defense. For example, a manufacturing district of
P'yongyang is heavily defended with SA 2's and 3's. It's suicide to
attempt a bombing run over the target since these long range missiles
won't let you get close.
Yet both these missiles provide an opening for you for a good
standoff weapon: use the Maverick B. These old missiles were designed
to take out high altitude bombers and don't work worth a diddly at low
altitude. The Mav won't be much help against factories, but since
you're tasked with taking out a fuel tank farm, this 10 mile range
little beauty will do just fine as a stand-off weapon. F4 models
proximity damage just fine: hit one tank and others will go up with it!
The important point to note here is that the AI is often your
enemy as much as the DPRK is, leading you into SAM traps and air
battles from which you can't escape. We are given a default route and
load out without regard for crew safety.
Be aware that frequently this is far from the best set of
options. The weapons you employ in SAM avoidance are as important as
selecting your route. When faced with a suicide mission, 'tis a far,
far better thing to settle for partial mission success with a lesser
weapon than to entertain certain death and failure.
The Maverick is a much under-rated weapon in most sims, but
they have some tremendous advantages despite their lack of blast power.
High accuracy, easy targeting, abundance and stand-off range make them
a great alternative to dying young. They're also very good for hit and
run tactics when the air is filled with enemy fighters since they can
be gotten off fast.
Furthermore, with their medium range, you can resort to terrorist
tactics by working the perimeters of well-defended targets. The MAV is
the most used missile in the world with over 5,000 having been launched
with a reported accuracy of 90%.
A2A Missiles
"Archer Inbou . . ." Blam! The entire arsenal of A2A missiles
employed against us are IR. That means big trouble. Know that the only
way to avoid a heat seeker behind your wing is to not put yourself in
that situation in the first place.
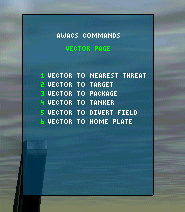
Two things here: querie AWACS frequently and have your
wingmen clear your six when you're unsure what's back there. It is a
big mistake to let our wingmen move out of protective formation,
leaving our butt uncovered. More on that in a moment. Second, you have
to do radar sweeps periodically to prevent being snuck up on during
ingress and egress. In addition, you must be very alert to not fly
directly into the same kind of air traps as the ground traps described
above.
Early on, don't be afraid to use labels to recognize these
situations. When you begin to see large packages of enemy aircraft, and
these begin to close in on you, it's time to get the hell out of Dodge.
Never mind that BARCAP tasks you with keeping all enemies out of your
corridor. Do you want to be a dead hero? They don't get any credit in
this man's war! Be alert to large packages of the enemy closing in on
you -- frequently more than one aircraft, and from different directions
at the same time!
[One caution about using labels when the sky gets really
crowded. They can lead to more confusion than clarification. In that
case, it's usually better to take your time and do radar sweeps while
directing wingmen to defend.]
Evade the Hornet's Nest
You will see things like both enemy bomber and fighter missions
converging with flights of allied aircraft. Get too close to these
insect hordes and the bomber escorts will break off and attack you,
(hmm... probably a bug), precisely at the same time you're dealing with
some other problem. The result is the fog of war and a horrific air
battle in which there are no clear winners. Stay out of these things!
With closure rates in excess of 1000 knots it's very easy to let your
guard down and suddenly discover that they've closed in on you from two
sides, just like our SAM traps. It's never a good day to die.
Regardless of how you are tasked, the thing to do is to stay away.
Don't press your luck, and don't try to beat the odds: they are stacked
against you.
Instead, do what the Red Baron did: On a CAP, back off, patrol the
perimeter of the air battle, and be content to pick off the wayward
sheep if that is the best you can do. He became an Ace by choosing when
to fight and when to flee! With weapons like the AMRAAM you can engage
and then turn away and run while the missile takes the risks.
Reign your wingmen in with the "weapons safe" and "rejoin"
commands when they're inclined to heroics. Don't sacrifice wingmen
until you are threatened. If you get an unexpected, "One, major pucker
factor here," calls, know that you've failed to control your wingies.
Resolve not to let it happen again. Decline AWACS commands that would
have them divert from the mission, no matter how desperate the plea.
Also decline AWACS commands that would have you charging into
the fray. "I need help now! I need help now!" You'll hear it over and
over. "Chuck you Farley. I got my own problems." Good samaritans die
young in this man's war.
RTB or Die
In judging how to stay out of trouble, try to never let the red guys
get behind your wings. If they start to migrate behind your 3-6 line,
double back. If necessary, abort the mission and RTB. Dead heroes don't
fly.
Remember that when you encounter these situations, as you
often will early on, it is very unlikely that you will be able to
complete your assigned mission. Your package has been broken up, you
may have lost your escort, you have shot off A2A missiles, a wingman or
two are dead, and your defenses are so weakened that you'll be lucky to
get back to base. And you want to finish a deep strike under these
conditions? Yeah, you and the tooth fairy.
This leads to one final point. When you do get in trouble
with enemy fighters, be sure to use your wingmen. The best way to
defend yourself is to get your wingies on the attack. Once they are on
the tail of the bandit he will be thinking about other things than
ruining your day.
Whenever possible, get your wingmen engaged first, saving your missiles
to defend yourself. Lock up the bad guys to make them think twice. If
you haven't yet applied the 1.04 patch, do it, because wingman
performance is much improved.
As you can see here, I've stressed that knowing when to
fight, and when to tuck tail and flee is a critical skill. This is
solid tactical thinking. Unfortunately, simulations work against us in
this regard. It's too easy to be killed and come back to try again.
Survival depends on your taking even simulated death seriously.
The other critical key to success is getting rid of air defenses.
Recall how establishing air superiority was the number one priority in
Desert Storm. Never lose sight of the fact that you will never become
so good at missile avoidance as to survive very long against bad odds.
Don't fight until the odds are on your side. This principle cannot be
overstated.
We do not know how the AI intends to play the war out. In the
meantime you will constantly be presented with the siren song that your
side is in dire straits, that your grunts on the ground and in the air
need your help. This lures you into playing Rambo and trying to become
the hero. Don't buy in.
If your troops are being creamed on the battlefront, the
implication is that you can single handedly bail them out. Nonsense. If
the brass have screwed up the frag order, don't become the victim. Stay
alive, minimize frustration, nibble around the edges and see how things
play out. There is no sense in taking on a deep strike or BAI if you
have no hope of getting there with your package intact.
What we've discussed here are the basic methods to avoid
certain defeat. To avoid missiles, we first have to avoid impossible
situations. We first have to learn to recognize when more missiles are
going to be fired at us than we could possibly hope to evade.
There are those of you out there with far greater skills than mine. But
this piece should at least offer newbies a place to start with some
basic principles on survival, and how to keep frustration levels below
the point of tearing your hair out with this amazingly realistic sim,
perhaps surreal !
Summary of Air Defenses in Falcon 4
This is only a summary. The Tactical Reference section of Falcon 4
contains detailed information on virtually every weapons system and
platform modeled in the simulation. Spend time learning the strengths
and weaknesses of these systems and your success rate, as well as your
survival rate, will improve!
SA2 Very old large Russian radar missile designed to take out
high altitude bombers. Very poor performance against fighters. Range 23
mi,. huge warhead. Transportable but not mobile. Easily avoided.
SA3 Also very old, large, radar, range 15 nm, burn time 23 seconds. Moderately easy to evade with chaffe and maneuvering.
SA4 Late model, semi-passive radar, mobile, fast (Mach 4) and deadly above low alt. 22 nm range and up to angels 80!
SA5 Similar to SA2. Fast but poor maneuverability. Range 9 mi.
SA6 Tracked vehicle, medium sized radar missile with 16 mile range. Avoidable. Moderate threat.
SA7 Portable rear aspect only, shoulder fired with 3 mi max range. Small warhead usually won't bring a fighter down.
SA8 Radar, quad, mobile, range 9 mile. Moderately good turn radius.
Moderate to high threat. SA13 Late model, mobile, big, bad and deadly.
Combined radar/IR tracking. Turns on a dime. Range 3 mi. Major low alt
threat to strike missions.
SA15 Radar, range 5 mi, ceiling angels 19. Very nimble, major low
altitude threat. Burn time only 12 seconds. Last minute maneuvers work
best to defeat this one.
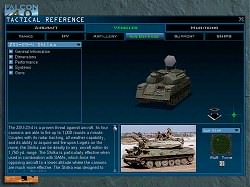
ZSU-53-2 Old AA guns but can be very effective when arrayed with SAMS. Range 1 mile. Low threat.
ZSU-53-7 Modern version of 53-2. Moderate to high threat.