
|
JANE'S F/A 18 : HARM Mission Briefing
by Leonard "Viking1" Hjalmarson |
||||
|
When you enter the mission you will find youself on the carrier deck watching the launch of your flight members. Your engines are already humming. The "tower" will instruct you to release your wheel brakes when you are ready to roll. The first thing to do is to increase throttle to full afterburner. You will hear your engines spool up, and then hear yourself call that your engines are at full throttle. The tower will instruct you not to touch the controls until you are off the deck. Your aircraft is controlled by the flight computer until you touch the controls. A moment later you will be launched down the CAT and fly off the deck. If you don't pull your gear up manually the flight computer will do so. I usually cut off the afterburner when I pass three hundred knots. When I reach 10,000 feet I level off and continue on course at about 75% power until I reach the push point. The lower power setting means that my flight doesn't have to use their afterburners quite so much in order to formate.
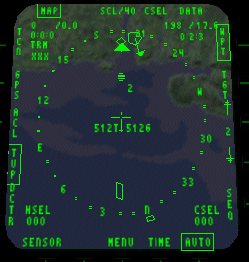
 I then engage the Autopilot so that I can worry about other issues, like configuring my flight systems and flight planning. In the screen above you can see that I have configured my ALE-47 for SEMI-AUTO operation (the REC means "receive mode") and the AP is engaged. I have the SA MFD in my right display, the HARM "TOO" (target of opportunity) mode in the left display and you can see by the HSI (lower center) that I am dead on course at 46.9 miles and 5:38 from the next waypoint.
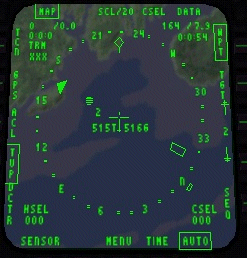
 I ordered my flight nose cold and relied on AWACS for updates on air activity. The target area remained quiet. The next shot is from a screen taken a few minutes later as I approach the 15 mile mark from my target waypoint. The HSI is in MAP and WPT mode and shows that the target waypoint is actually about fifteen miles distant from the target area. I took this shot just as I called "Orbit Here" to the Section, which consisted of Raven 3 and 4. My intention is to divide my flight into two attack groups and attack the targets simultaneously from two different directions. I've found that dividing the radar coverage of defensive systems increases survivability for my flight as well as increasing the success of my attack. |
 I brought my HSI display into my right MFD so that I could maintain my orientation to the target waypoint. I then began my turn of about 60 degrees from the waypoint and proceeded ten miles further. I think that the next time I fly this mission I would add an additional two waypoints, thus: 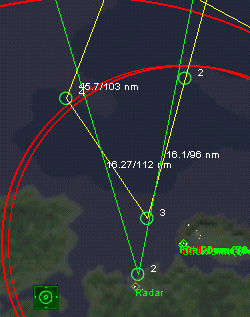 Additional Waypoints As you can see above I have added waypoints 2 and 4, and the original waypoint 2 has now been renumbered as 3. I placed the new waypoint 2 at the edge of the furthest SAM threat circle. Now when I reach waypoint 2 I can order 3 and 4 (the "section") to ORBIT and I will know they are at a safe distance. I can then change my NAV waypoint to number 4 and proceed on the edge of the SAM threat distance to another position. When I flew this mission the first time I turned toward waypoint 2 and used HARM "TOO" mode to engage the surface threats when I had reached approximately the position of waypoint 4 on the map above. After launching my first three HARMs I turned away from the target, waited approximately thirty seconds, then turned toward the target and ordered my wingman to engage.
 First HARMs Fired When my wingman had used all his HARMs I used my final three, then waited another thirty seconds and ordered the section to engage. Go to Part III
|
|||
|
Copyright © 1997 - 2000 COMBATSIM.COM, INC. All Rights Reserved. Last Updated December 20th, 1999 |
||||