Page 2
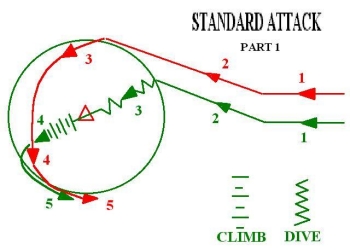
So how do we arrive at the attack cone and prosecute the target while maintaining mutual support? This is the art of Target Area Mechanics. While there is no one correct way to do this, we do have a number of generic target attacks that we can build from in order to minimize our risk in the target area. The first of these is the Standard (or Welded) attack.
The above diagram depicts a standard or welded attack. It can be to the left or right. Both fighters enter the target area in combat spread at time 1. At about 6 NM from the target, the flight leans to the right about 15 degrees or so. This initial offset direction is how we name the attack, in this case, "standard right". This has the effect of pushing dash two out in front slightly, as shown at time 2. At time 3, lead has arrived at the attack cone (indicated by the green circle), and has rolled in on the target. Notice that dash two remains up at altitude in a position to look through lead into the target area. Two's responsibility during this time is to watch lead's back while he concentrates on his attack run. Off target at time 4, lead should acquire dash two coming across his nose as he is climbing back up to altitude. Lead turns to follow as dash two arcs out to the attack cone in order to arrive in trail at time 5.
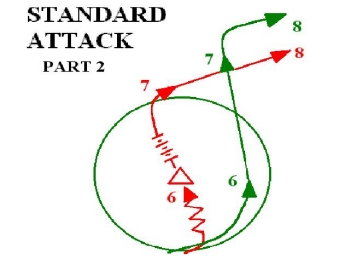
From the attack cone, two rolls in and prosecutes the target while lead looks through him into the target area (time 6). As dash two comes off target, he makes a hard right turn and acquires lead coming across his nose from right to left at time 7. Lead makes a hard right turn to expedite the return to combat spread formation as shown at time 8.
Advantages of this attack are that the cover element is always near the target in a position to engage and suppress any popup threats. A disadvantage is that each aircraft spends a long amount of time in the target area. For this reason, this attack is rarely used from low altitude.
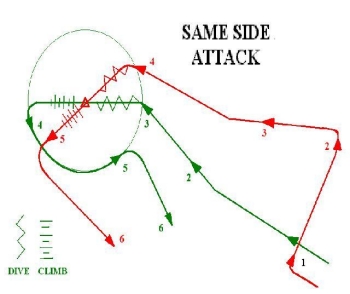
There are times when both aircraft must attack from a certain general direction. In this situation, a same-side attack might be the way to go.
As the flight ingresses, dash two generates separation from lead by turning 90 degrees to the threat axis about 8 miles from the target while lead continues inbound. This separation maneuver is performed in the same direction as lead's planned offset. The example above is a same-side right. At about six miles, lead offsets to the right just like in the standard attack. After about 15 seconds of flying with the target in the beam, dash two turns back inbound. The optimum separation from lead at this point is about 4 miles, which equates to 30 seconds separation at 480 knots. As dash two's nose comes back toward the target, lead is entering the target area. As lead rolls in on the target, dash two is now in a position to observe the target area in order to watch leads back. As lead is coming off target, dash two is approaching the attack cone. Dash two rolls in at time 4 when lead turns back enough to get his eyes into the target area. Lead continues around the attack cone during dash two's run, and makes a hard right in order to rejoin dash two in combat spread at time 6.
This is a good attack for CAS, because it puts both aircraft in a position where the FAC can control the flight and offers enough time between aircraft so that the FAC can give aiming corrections to dash two based on lead's hits, i.e., "from lead's hits, north 50 meters." A disadvantage of this attack is that both aircraft come in from the same general direction, which decreases dash two's survivability because it's now easier for the enemy to spot him.
© 1997 - 2000 COMBATSIM.COM, Inc. All Rights Reserved.