German Fighter Tactics Against Flying Fortresses - Page 1/1
Created on 2005-02-08
Title: German Fighter Tactics Against Flying Fortresses By: Author Unknown Date: 1999-08-08 13270 Flashback:Orig. Multipage Version Hard Copy:Printer Friendly
Office of the Assistant Chief of Air Staff, Intelligence. Washington, D.C.
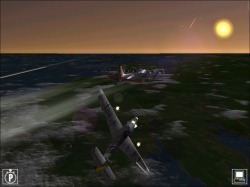
This report reproduces a study dated 11 November, 1943 by the Third
Bombardment Division, VIII Bomber Command, covering German fighter
attacks against Flying Fortresses. The tactical diagrams and
conclusions are a result of an analysis of more than 2,500 separate
encounters covering a period of 6 months.
An analysis of this information has revealed that enemy tactics can be
divided into a number of standard patterns. While there are minor
variations of these patterns, the tactics presented here are the
standard attacks in use at the time of the study.
The accuracy of the diagrams has been verified by several
hundred experienced bomber crews as well as by numerous operations
officers. Their reliability has also been checked by a number of
fighter pilots who have escorted B-17 formations.
It is emphasized that individual crews may have seen attacks
which vary from these standard patterns. The Hun is an opportunist and
is quick to change his approach. It is also emphasized that the ranges
at which attacks begin and end may vary from those shown here. Ranges
given on the diagrams are representative and should be considered as
averages.
Brig. Gen. Curtis Le May, commanding the Third Bombardment Division,
states that he considers this study as "an excellent example of a
thorough collection of intelligence data bearing on the employment of
fighter aircraft by the enemy during the progess of combat operations."
One intelligence officer in each group has been appointd to
specialize in the collection of information covering enemy tatics. This
report is the result of the work of these officers. Final compilation
was completed by the A-2 staff at Third Bombardment Division under the
direction of Lt. col. Carl Norcross, Assistant Chief of Staff, A-2.
It is believed that this material will be of value to
operations officers, intelligence officers, and gunnery officers in
training air crews.
Pages describing tactical diagrams may be removed and projected in a balopticon for purposes of instruction.
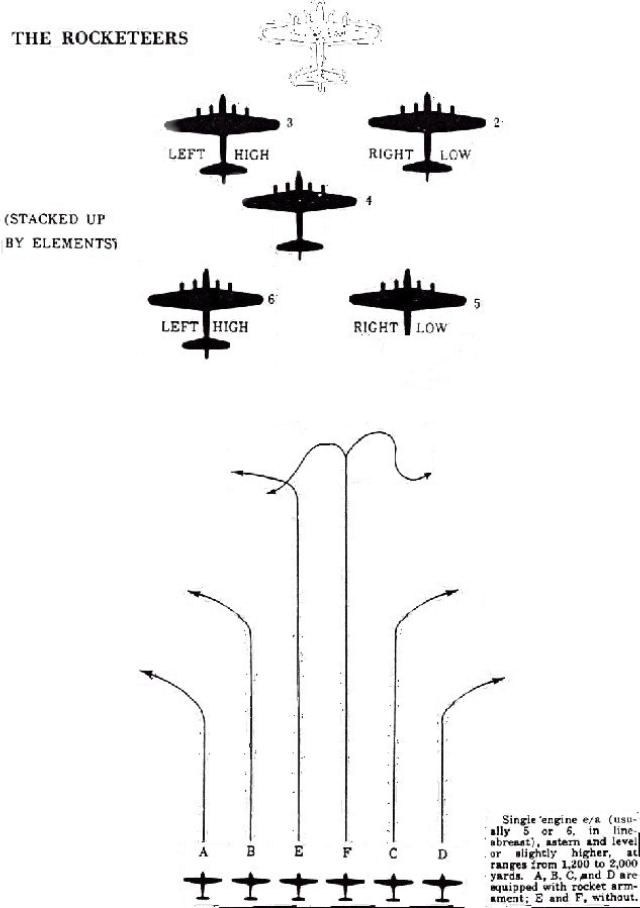
The Rocketeers
High Squadrons of High Group, of Any Combat Wing, But Usually of Last Over Target
TACTICS DESCRIPTION
This attack was first employed on the Schweinfurt mission, 14
October. In Line-abreast, the single-engine e/a approach on level or
slightly higher position. Aircraft A, V C, and D after firing their
projectiles, peel off as indicated in dieagram. Aircraft E and F, which
are not equipped with rocket armament, close in to attack any
Fortresses which may have been crippled by the rocket projectiles or
which may, for any other reason, seem to straggle. How close aircraft E
and F press home their attacks depends upon the prospect of the "kill".
Note.- This same line-abreast formation is used by twin-engine
e/a when firing rocket projectiles. After the projectiles are fired,
the twin-engine e/a often close in for the cannon attack.
TACTICS LESSON
It's a two-to-one bet that the e/a which will close in for
attack is or are located in the center of the formation. THE
STRAGGLER'S NUMBER IS UP. KEEP IN FORMATION AT ALL COST AFTER EXPLOSION
OF ROCKET PREJECTILES. The tail gunner (officer) in Fortress No. 1 must
be alert to this attack and warn formation leader when e/a are
jockeying into position.
DON'T BE LED AWAY FROM MAIN ATTACK BY E/A PEELING OFF.
DON'T WASTE AMMUNITION ON LONG SHOTS.
The best defense against rocket attacks from the rear is slight
weaving of the fromation. Due to high trajectory and low velocty of
rockets, slight weaving will carry the formation out of the effective
range of bursts.
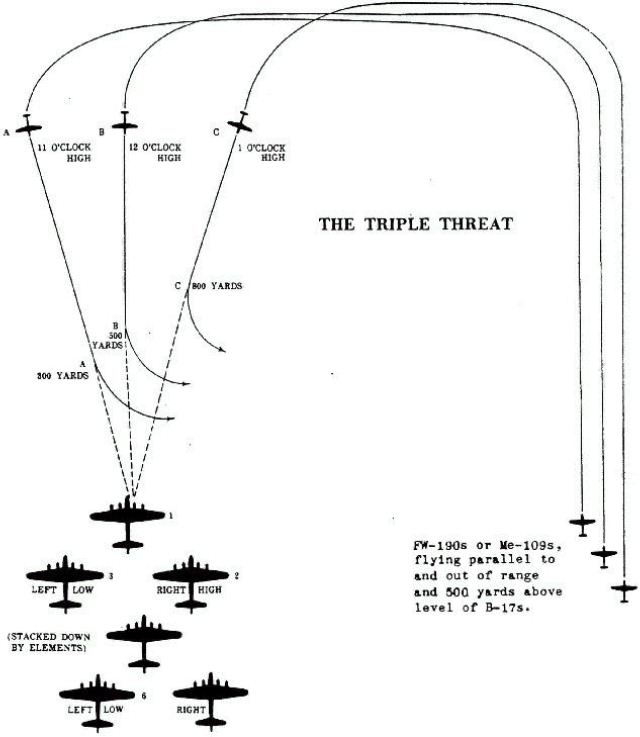
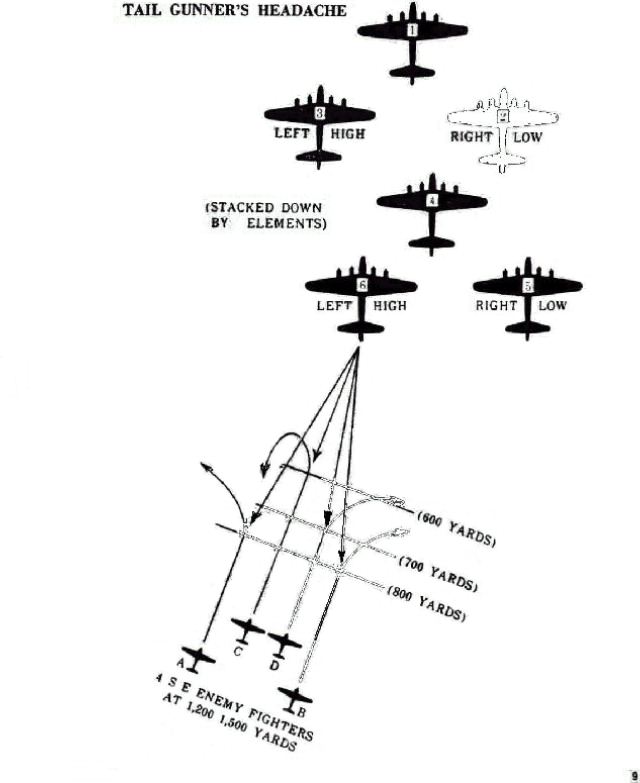
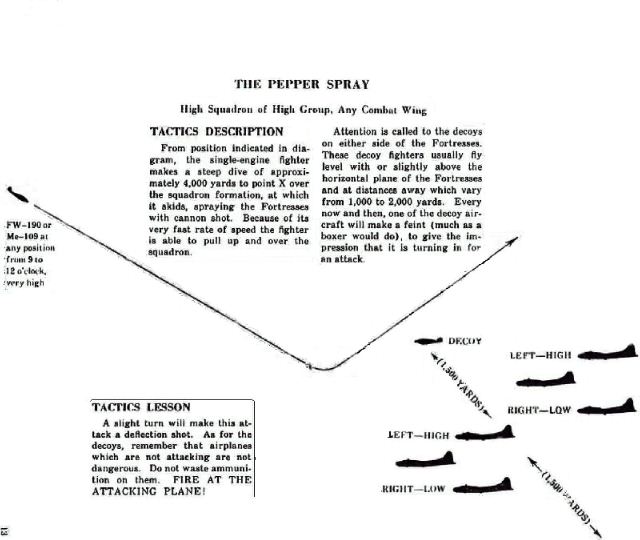
THE TRIPLE THREAT
Lead Squadron of High Group, Any Combat Wing
TACTICS DESCRIPTION
This maneuver, as practically all other head-on attacks, is performed
by single engine aircraft. The fighters, flying parallel to Fortresses
as indicated in the diagram, pull ahead into positions at 11, 12, and 1
o'clock for commencment of their respective dives. At this time they
are approximately 2,000/2,500 yards ahead and 500 yards above the level
of the squadron to be attacked. They appear to be converging as they
come head-on.
Break-aways are made as follows:
C does wing up break away to left at 800 yards.
B does slow roll and belly-up dive (the Split "S") at 500 yards.
A does wing up break away to left at 300 yards, and dives until out of range.
Sometimes (as was done by "Goering's Abbeville Kids" in the
Stuttgart mission on 6 September 1943), the dives are extended as
indicated by the black lines in diagram, with slow rolls and belly-up
dives (Split"S") underneath the squadron.
The same diving attacks are often made from the rear of
Fortress formaations. FW-190s and Me-109s can and do make these angular
attacks, singly and head-on or from astern. Such attacks can be made
from any clock position from 10 to 2 or from 4 to 8.
TACTICS LESSON
A slight turn will make all of these attacks a deflection shot. A slight dive or climb will uncover more turrets.
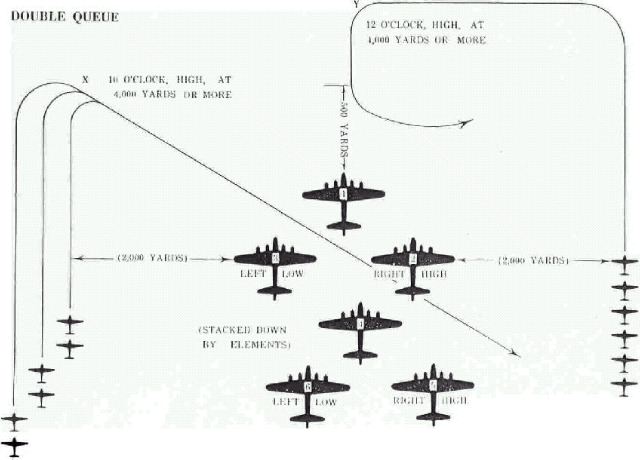
DOUBLE QUEUE
Low Squadron of Lead Group, Usually of First Combat Wing Over Target
TACTICS DESCRIPTION
On either side of the squadron and at a distance of approximately 2,000
yards, the single-engine fighters queue up for attacks in trains. They
are about 500 yards above the level of the lead squadron, flying a
parallel course.
These formations vary, but at points X and Y the fighters are in trains
of two or three to the side, ready for alternating dives, with from 5
to 10 seconds intervals between. In other words, two or three e/a, in
train, dive from point X, then two or three e/a, in train, from point
Y. The procedure is repeated until all planes (sometimes 18 or more to
the side) have taken their turns in diving.
Fighters diving from point X pass under the lead squadron,
while the e/a from point Y do a shallow dive, a slow roll, then a
belly-up dive (Split "S") when within 500 yards (or less) of the lead
element of the squadron. The low squadron can be attacked in the same
manner.
The same tactics are employed in dives through the formation,
i.e., between the lead and low squadrons or between the lead and high
squadrons.
TACTICS LESSON
If these attacks are not properly coordinated, it is a gamble to
take evasive action against either of them; if they are coordinated,
the nose attack with no deflection is most dangerous. Don't give the
fighters a no-deflection shot.
Because of the decoys, this maneuver more than any other, has a
tendency to draw fire from Fortress gunners. The group or squadron
showing poorest combat formation is usually the one to come under
attack.
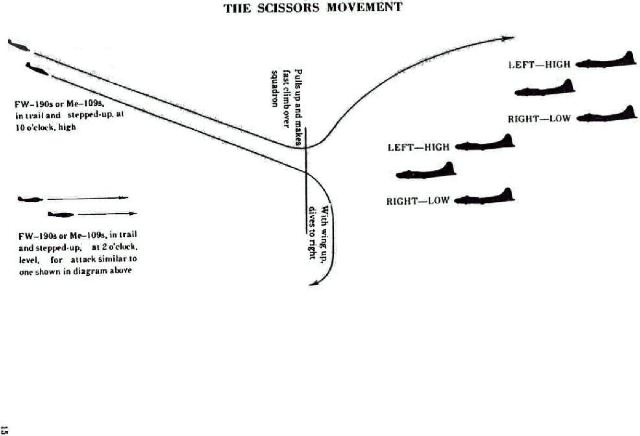
This maneuver is conventional and designed to break up the Fortress
formation. The trailing e/a (on top) pulls up at about 500 yards range
and does a fast climb over the squadron. The leading e/a (on bottom)
comes in closer (usually to 400 yards) and, with wing up, dives away to
the right.
Other single-engine ea can often be observed lining up for
similar attacks from other clock postions: sometimes from high,
sometimes from level. If from level, the attack is often suicidal for
the fighter which tries to pull up and climb over the squadron.
The Scissors Movement can be commenced from clock positions ranging
from 10 to 2. It could be used against the lead squadron, with leading
e/a diving away to left.
TACTICS LESSON
Avoid giving fighters a no-deflection shot. Make slight turn
into the attack. wing a/c must hold formation on this attack and not
take individual evasive action to avoid fire.
Gunners must be alert to targets in their respective sectors.
One of these fighters will be available to the top-turret gunners,
while the other will be available to the ball-turret gunners.
This attack, known as the "sneak" (tail), can be made against No. 5 and
No.6 Fortresses as well as against Fortress No. 4. The approach is from
slightly low to level and, almost invariably, is from "out of the sun"
or from a cloud position. How much below level the attack is commenced
will depend upon the position of the sun or the cloud with respect to
the Fortresses.
The same type of attack is often made from the 5 o'clock position, slightly low.
The lead squadron is not immune to attack of this type, but seldom
experiences one. However, the high squadrons of groups have known
fighters to sneak up on them from 5 and 7 o'clock positions, slightly
low. It seems to be the gereral practice for sneak attacks from astern
positions, slightly low, to be made agaisnt low squadrons of groups.
TACTICS LESSON
Attacks by individual airplanes are not dangerous and this one
can be shot down, if all gunners are alert and cover their sectors
properly.
BEWARE OF THE HUN IN THE SUN; LIKEWISE, IN THE CLOUD!
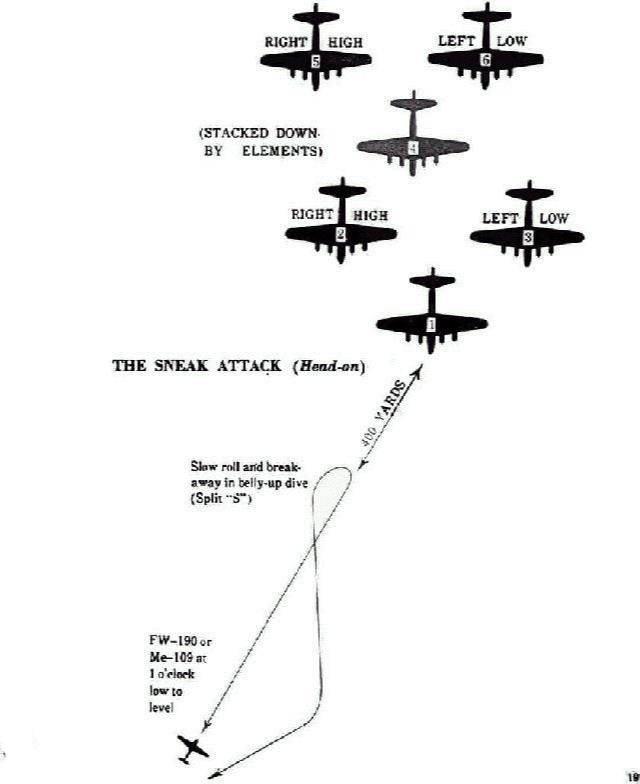
This attack is known as the "sneak" and is made against the lead
element planes of the formation. Almost invariably, the fighter will
attack " out of the sun" or from a cloud position, when it comes
head-on from low. How much below level the attack is commenced will
depend upon the position of the sun or the cloud with respect to the
Fortresses.
The attack is often made against the No. 2 Fortress from the 1 o'clock,
slightly low, position. From this position, the No.1 and No.2
Fortresses of the high squadron are often attacked.
The same type of attack is often made against the No.3 Fortress
of the lead and low squadrons from the 11 o'clock, slightly low,
position but the breakaway is the same, i.e., there is a slow roll,
followed by a break-away in a belly-up dive.
TACTICS LESSON
The same old song: BEWARE OF THE HUN IN THE SUN, LIKEWISE IN THE CLOUD!
Attacks by individual airplanes are not dangerous and this one
can be shot down, if all gunners are alert and cover their sectors
properly.
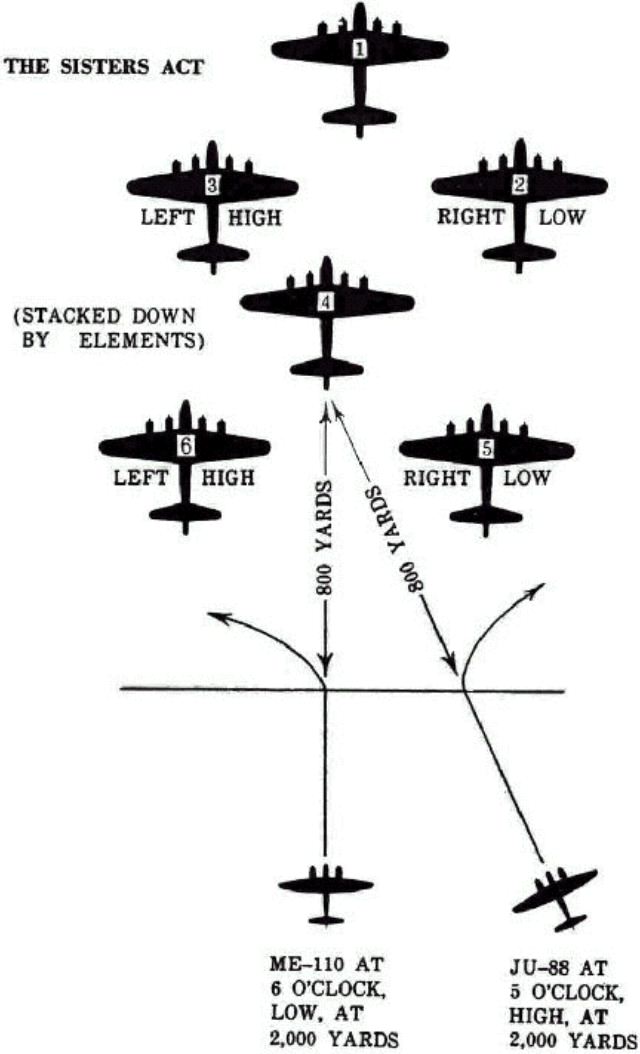
The Me-110 and Ju-88 attack simultaneously, as indicated in diagram. At
point Y, the Ju-88 breaks away to the right, wing-up, while the Me-110
does a slow roll and a break-away to the left in a rather steep dive.
Sometimes this maneuver is performed by a pair of Me-110s.
TACTICS LESSON
Each gunner must cover his sector. Coordinated attacks are common. Tail
gunner in Fortress No. 5 must be alert to this type of attack.
Top-turret gunners in rear of Fortress formation should watch e/a
attacking from high, astern.
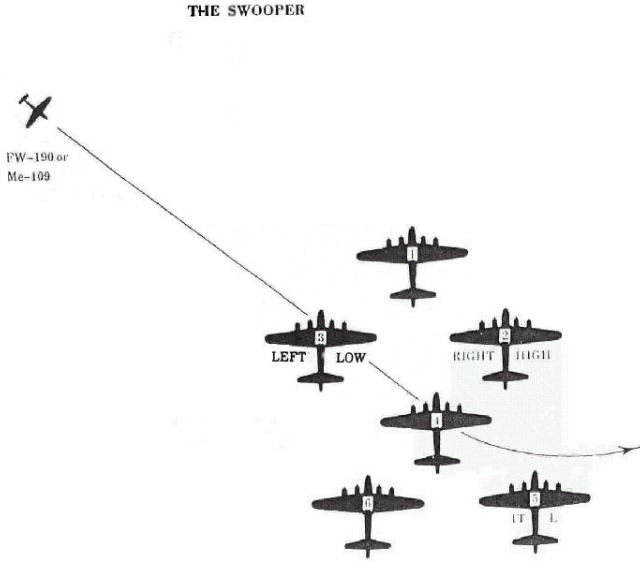
THE SWOOPER
Lead Squadron of Group, Any Combat Wing
TACTICS DESCRIPTION
In the diagram above, the single-engine aircraft makes a diving attack
from 10 o'clock, high, swooping down under the squadron. Seldom is the
fighter closer to the Fortress squadron than 500 yards, and in this
type of attack the fighter comes down from an angle of between 30 and
40 degrees, without rolling over. The fighter pulls out of the dive
when clear of the squadron.
IMPORTANT: This type of diving attack can be and often is made under the high and low squadrons, as follows:
(1) Under low squadron, from any position between 6 to 12 o'clock, high.
(2) Under the high squadron, from any position between 12 to 3 o'clock, high.
The diving attack under the lead squadron is often made from any position between 9 to 1 o'clock, high.
VARIATION
While in the majority of these swooping attacks the figher goes under
the squadron formation, sometimes it goes over the formation. If the
combat formation is bad, the fighter may dive and go through the
formation, i.e., between the lead and high squadrons or, if diving from
the 12 to 3 o'clock positions, between the lead and low squadrons.
Almost invariably, when the fighter dives and pulls up over the
formation, the pull-up is over the high squadron.
TACTICS LESSON
Diving attacks with deflection are what we like. The fighter is
at a disadvantage. He has a hard shot and can get in only a short
burst. Gunners have plenty of time to shoot him down.
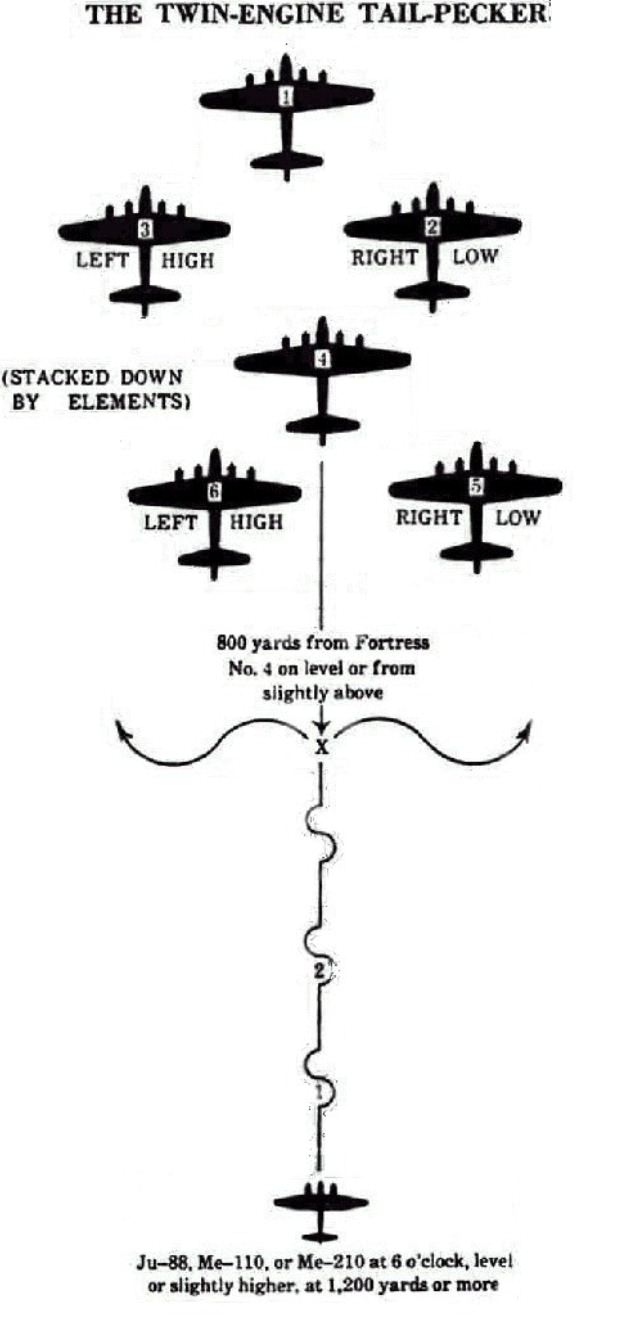
Low Squadron of High Group, Usually of Last Combat Wing Over Target
TACTICS DESCRIPTION
The twin-engine fighter approaches from 6 o'clock, level or slightly
higher, and at points 1,2, and 3 takes slight evasive action by
weaving. Evasive action can be expected to follow almost every burst of
cannon fire.
The twin-engine fighter, equipped with rocket armament, fires
from 1,200 to 2,000 yards. It may close in for cannon attack after
exhausting supply of rocket projectiles. In making the closure, evasive
action is taken as indicated above.
At point X, the fighter peels off to right or left and does a shallow dive until out of range of .50-caliber M/Gs of Fortresses.
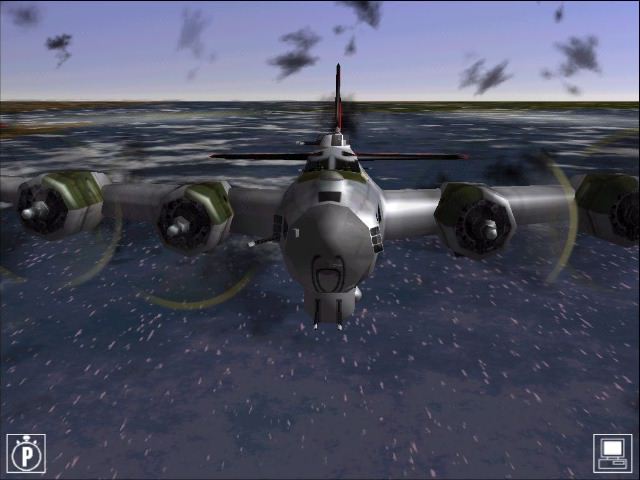
This attack occasionally is made against No. 5 and No. 6. The
attack is seldom closed to less than 800 yards behind Fortress No. 4.
TACTICS LESSON
The twin-engine tail-pecker can be expected to return to its 6
o'clock position after evasive action is taken. Hold fire until fighter
is within range, then nail him to the cross on his straight-and-level
flight, not when he is taking evasive action.
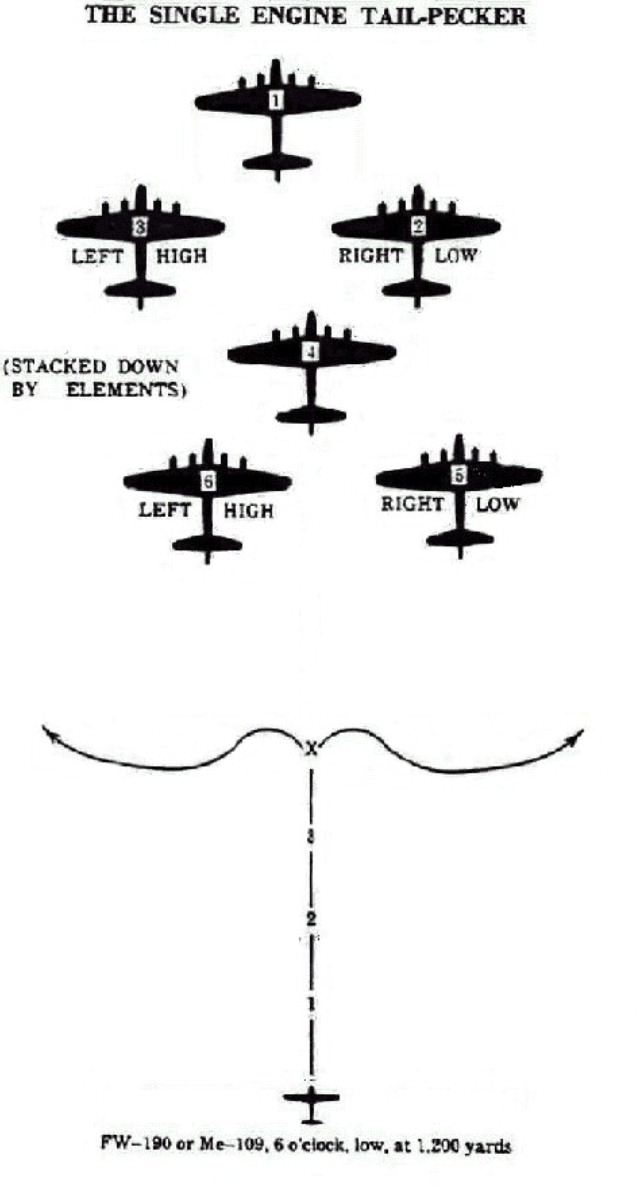
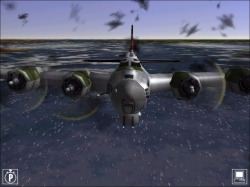
Low Squadron of High Group, Usually of Last Combat Wing Over Target
TACTICS DESCRIPTION
Fighter flies on level (300 yards below horizontal plane of Fortress
No. 4), but at points 1,2, and 3 lifts nose and fires a few bursts of
shot. The peel-off is to the right or the left at point X which is
approximately 800 yards behind Fortress No. 4.
This typical tail-pecking attack is sometimes made against Fortress No. 5 or Fortess No. 6.
TACTICS LESSON
Although quite common, this type of attack is not too dangerous.
The ball turret gunners can have a lot of fun with the tail-pecker
which comes in from below, but should avoid long shots.


