With the release of Falcon 4.0 and others sims that allow for multiple simmers on the same side, I think its time
that someone covered ACM in a little detail. We have all heard BFM until our ears bleed. We know Aspect, HCA ,
WEZ and all the rest of the buzzwords until we can probably teach Lt. Col. Bonanni a little about it <just
kidding, sir>. But what happens to all this great BFM when you have your buddy on your wing at the merge?
Is your buddy going to accurately predict every maneuver youre going to make? Probably not, thats what ACM is
all about, what to do when you get to the bandits, who does what and how. In this little missive, Im going to
try to give you some ideas.
Objectives
The objective of ACM is threefold:
Knowing how to maneuver as the supporting fighter
Teach specific engaged and supporting fighter roles in a visual fight
Develop enhanced situational awareness(SA) for the element
How many times have you gone into a fight with a wingman (human type) and found the fight got totally confused?
Maybe you bugged your wingman, maybe even pasted him, and a lone enemy fighter laughed as he put you both down in
flames? Knowing what youre going to do beforehand is the KEY to not letting that happen and turn that lone enemy
fighter into a smokin hole.
To do this, you have to understand 2 key points. The first is the concept of the engaged and the supporting fighter
in a fight, thats covered a bit later. The second point is effective communication. No matter how you and your
wing communicate, you need a clear and precise way to get your point across. Whether you use a separate telephone
line (Recommended, with inexpensive telephone headsets from Radio Shack) or the chat function in the sim, your
comms need to be precise.
Communications
There are 2 basic types of comms you will use in a fight, directive and descriptive, each has its place in the
fight.
Directive calls
Directive calls are just what they say, directive and immediate. There are times when your buddy will see a threat
you dont and vice versa. Things happen pretty quickly on a mach 1 jet with mach 3 missiles flying around.
Theres no time to utter "Uh, Lead, I think you should make a quick turn to 350 to avoid that Archer thats
inbound." Rather, your call will consist of something more like this, "Lead, Break right",
later on, you can add "missile inbound, your 5 oclock". The format for a directive radio call is:
Call sign of the receiver Order (e.g. "Cowboy 1, jink now")\
Keep a tally on the receiver to see if hes doing as ordered, and if not, retransmit your order. Keep in mind,
there is no rank or pecking order here. If the newest non-MQ guy in the squadron sees that Archer inbound on the
Squadron CC, hes going to make the call and the boss usually wont yell at him for saving his bacon. Conversely,
if youre the receiver, dont think your too damn good to have a missile aimed at you, if wing says break right,
DO IT.
Descriptive calls
Descriptive calls are generally used to inform the flight of whats going on with you or the area. The format for
a descriptive (Bandit call) is as follows:
Call sign (your own)
Type threat (Bandit/Bogey)
Left / right
Clock
Range
High / low / level
Amplifying remarks
e.g. "Tasty12, Bandit right 2, 3 miles level, closing fast"
Youll continue to transmit this type of info until everyone tallys the threat. There are variations to the
format, as you might expect. People have asked why you give left/right and clock position, the answer is simple
(I think). The direction tells you where to snap your head, the clock position is fine tuning to your scan.
Merely giving a clock position isnt enough in the heat.
Continue is sometimes added to the end of the call to tell your mate that he can continue the current maneuver he
is doing since it looks good to you. So if your boss is already breaking right and that seems correct, tag on
the word continue.
Many times these calls (directive and descriptive) are combined:
e.g. "Cowboy 1, break right NOW <pause to see if he does it> Bandit right 3, 1 mile high, shooting,
continue"
This comms info is vital to allow the other fighter to start the right BFM to engage the tally, or start his best
defensive BFM, whatever the situation calls for.
Obviously, typing this stuff in a chat window can get tiresome, so its best to agree on codes for the most basic
information. These codes can be as simple or complex as you and your squad mates feel like. Heres an example
line from a codeset I used with some of my squadies:
"1,2r,tr3,1h,c"
1 - Agreed upon code # for each member of your flight
2r - agreed codes (1 = jink, 2 = break, 3 = jink, 4 = engaged ,5 =Cleared-in etc ) the r is for rt/lt
tr3 - t = bandit / y = bogey, r = right, / l = left , # is for clock position
1h - # is range , h = high / l = low / v = level
c continue, if used
Now that you can talk to each other, well move on to the meat of the ACM world, the ACM contract between you and
your mate.
The Contract
The contract between you and your mate is signed and paid in blood before you ever step into the jet. The key here
is to know exactly what your job is at any point in the fight. If lead is engaged with a bandit, that does NOT
free you up to hunt for ground targets. Quite the opposite in fact but that comes in a few paragraphs.
Formation integrity and flight discipline are the keys to surviving in the modern air fight. Formation integrity
allows the flight to maneuver synergistically to defeat a bandits attack or prosecute the kill. The engaged
fighter does his best BFM to kill the bandit while the supporting fighter maneuvers for the kill shot or supports
the engaged fighter based on the criteria set forth before the flight <at the brief>.
This is why it is key to have a flight lead/wingman relationship before the flight. Lead makes the tactical
decisions before the fight starts, but he knows what the contract was before he took off. That means he knows what
youre going to do. Lead may have an A/G loadout and pre-briefed that if the flight is jumped, wing automatically
moves up to be the engaged fighter while he supports. Who knows what the situation may call for? Its better to
brief this stuff in a leather chair with some coffee than it is at 10k burning JP-8.
So what is all this garbage about engaged and supporting fighters??
Well, in offensive maneuvering against a bandit, there can be only ONE! <Highlander theme goes here>. I mean
one engaged fighter that is maneuvering in specific relationship to the bandit at a time. On defense, the BANDIT
picks who the engaged fighter is, thats obvious. Why only one? Well, if you can keep a tally on your lead, the
bandit and maintain SA all while maneuvering your jet in relation to both, let me know, cause the USAF wants to
clone your butt! The chances for mid-airs, blocked shots and other nasty incidents are just too high in a 2 ship
BFM against a single adversary. So, what do each of you do? Glad you asked.
Engaged Fighter Responsibilities
The engaged fighter(EF) is the guy who is currently maneuvering against the bandit. The engaged fighter:
Maneuvers using all the great BFM he has learned to kill the bandit
(offense) or negate the bandits attack (defense) in minimum time. This
is where you fly the BEST Off/Def BFM that you know, and we all
graduated from Maj. Bonannis FACT, didnt we?????? (If not go pick up
a cheap copy of Falcon 3 gold, its worth it for the on-CD Art of the Kill videos.)
Clears the supporting fighter to engage if he is in a better position to shoot
Clear the supporting fighter if defensive and the engaged fighter
is not safely out of the supporting fighters weapon FOV, or if target
debris would be a factor for the supporting fighters shot.
Keep the supporting fighter informed of intentions, plans, capability and future intentions
Supporting Fighter Responsibilities
The supporting fighter(SF) in a fight has a multiple role to play in the fight. You have to divide your attention
between a lot of duties when your mate is engaged. The supporting fighter:
Maintain visual to the fight and try for a good tally
Inform the engaged fighter of position. (Critical in a good tight
BFM fight, since a mid-air is a cheesey way to give the bandit 2 kills)
Sanitize the area in and around the fight using any means possible
(Radar, AWACS, RWR, Check your own damn 6, dont get channelized on the
fight)
Maneuver to AVOID the fight (The mid-air thing again) but also maneuver so as to have an easy entry into the fight.
Employ ordnance if the bandit is in WEZ and it doesnt 1) violate the leads game plan and 2) compromise the EFs safety.
Engage other bandits (Yes, even bandits have friends .just watch
Johnny Quest) that are/become a factor to the fight youre in, AND keep
the engaged fighter informed of whats happening as you do it.
Maintain SA around the fight with an eye to the escape window, egress avenues and fuel states.
Direct the egress from the fight (the engaged fighters SA will be about 2 by the time 270°
of turn have been reached in a turning fight. You are his only hope now).
The SF has a lot of work to do while the engaged fighter fights for his life or a kill. With the right
coordination, a 2 ship can wax ANY single bandit made and survive a heck of a lot of defensive fights.
Flight Lead/Wingman Defined
In the discussion of engaged and supporting fighters, no mention was made of flight lead / wingman relationship,
since it just doesnt matter. The engaged fighter is the guy who is in the best position to get the kill when
on offence. Put the ego back in the pocket and get ready to support your wingman. When youre defensive, the
bandit is picking the engaged fighter, so even if youre flight lead, it does no good to scream that youre lead
and should be engaged.
Ok, thats fine, but how do we know who is in better position to engage? Normally, thats easy, the guy with the
better angles. It may also be pre-briefed, such as Wingman has a total A/G loadout. In those weird cases (that
happen in sims a lot more than in real life), someone has to assume the support role. Its better to have the
wrong guy press the fight than to be arguing about it all the way through 180°
of turn into a bandit. At that point, youre both losers. So, if youre a good flight team, there will only be
one call of "Cowboy 1, engaged".
Role Exchange
Ok, but what if the engaged fighter cannot convert his BFM to a kill when the fight is offensive? What do we do?
Positive Exchange of Role is what you do! This calls for more comms and more flight discipline. The engaged
fighter needs to call for the exchange when:
He feels that he can no longer achieve the kill in good time.
He loses the sight
He cannot convert his energy state to a killing shot
The SF tells him the he has a perfect shot
Be careful with that last item. We all saw top gun, and Maverick ALWAYS had the shot. That was ego talking.
If you tell the EF that you have the great shot, you better mean it and drop the bandit in one pass.
Hopefully, EF and SF have been talking, and when the EF knows that the SF can enter the fight and its time to
change roles. How, you may wonder? Well, if you recall, the SF was doing all kinds of things, including gaining
an easy entry into the fight.
So, over comms, youll see something like this (assumes 1 is EF and 2 is SF):
<Authors Note: My thanks to TF for the following Comm passages that are 10 times better than mine and more
descriptive>
"Chevy 1, Engaged, Bandit right 2, 2 miles, Low"
"Chevy 2, Tally, Visual, Out east." (tells 1 where he is heading in his SF role)
<our roles are now defined but the fight does not go well for 1>
"Chevy 1, Neutral" (1 is stagnated against bandit.)
"Chevy 2, Tally, Visual, 15 seconds" (2 is nearing re-entry to fight.)
"Chevy 2, In from the southeast, High, Tally, Visual" (2 has 1 and bandit in sight. Ready to enter fight.)
"Chevy 1, Blind, Continue" (1 doesn't see 2. 1 remains EF. 2 continues to maneuver for a shot but remains SF.)
"Chevy 2, Right 4, High, <A Briefed Codeword>, Come-off Left" (2 has an immediate shot and provides a
deconfliction direction. 1 remains EF.)
"Chevy 1, Blind, Continue" (1 says tough luck this is my bandit. :-) )
"Chevy 2, Right 4, Level, <A Briefed Codeword>, Come-off Left" (Same as before.)
"Chevy 1, Blind, Off Left, Press" (1 clears 2 to engage.)
"Chevy 2, Engaged" (2 is EF. Note: 1 is still blind so there is some Big Sky -- Little Airplanes Theory going on
at this point but 2 did provide a deconfliction direction.)
"Chevy 1, Visual, Out north" (1 finally sees 2 and maneuvers to support.)
"Chevy 2, Fox Two"
"Chevy 2, Splash"
Chevy 1: "Chevy Flight, Egress northwest" (1 retakes directive control of flight.)
"Chevy 2, Visual" (2 does a victory roll to celebrate.)
If #1 had kept the sight, he would have called
"Chevy 2, In from the east, High, Tally, Visual"
"Chevy 1, Visual, Continue" (1 sees 2 but is waiting for 2 to get into a better position. 1 remains EF.)
"Chevy 1, Visual, Off Left, Press" (1 sees that 2 is in good position to engage and transfers roles.)
"Chevy 2, Engaged" (2 assumes EF role)
In a final note on the role exchange, extreme amounts of coordination
are required to exchange roles when you are defensive, and the bandit
hardly ever takes the time to learn enough english to make this happen,
SO DON'T TRY IT! <grins> Truthfully, you can
sometimes hook and lead a bandit when defensive, but it's the rare
pilot that is dumb enough to give up an advantaged position to go after
the SF. In the defensive fight, the SF is looking to get into the fight
and clear his mate, but we'll cover that soon enough.
Summary of Part I
So far, in this article, we have learned a few things (I hope):
Good communication is vital, no matter how you do it
You have to know who is going to do what when the 'fight's on'
Wingman and Lead are interchangeable in the Engaged/Supporting fighter role
Lead is the BOSS, his plan is what the supporting fighter has to keep in mind as he maneuvers
PLAN before you fly, not in the middle of the fight
Engaged fighter BFMs, Supporting fighter tallies, sanitizes and maintains SA for the flight
Supporting fighter must be ready to exchange when needed
Check your ego at life support when you pick up your bag, you don't
need it up there (Well, you do, but .... ah forget it, you know what I
mean)
Part II - Offensive ACM
Part one of this article discussed the basics of ACM, how to
communicate, how to determine your role in the fight and what to do if
you had to change roles. Now we'll start to focus in a little on the
offensive and defensive choices that you have. A great deal of this
section will deal with what the supporting fighter (SF) does as opposed
to the engaged fighter (EF). Naturally the engaged fighter is going to
be BFM'ing his butt off to get the kill or avoid letting the bandit get
into a WEZ. The SF has to work in concert with the EF to make the plan
work out successfully. We all remember the quote from days gone by: no
matter how many kills you got, if you come home without your wingman,
you've lost.
So, there you are, your wingie is with you and you have a spike
on a bandit. You plan the perfect merge and everything works. It's time
to end the intercept phase and get into the 'kill the bad guy' phase.
How do you know when this happens? Easy, the intercept is over when you
start visually maneuvering on the bandit. This obviously assumes that
due to ROE or other factors you were unable to BVR kill the bandit.
(We'd almost always like to BVR kill the bandit, no BFM required :)
So, here we move into the maneuver portion of the wide world of ACM
Offensive Maneuvering
It is imperative that roles in this fight get established immediately.
Flight lead should say his intentions and get the ball rolling right
off.
"Dusty 1, engaged, nose, 3 miles" <anchors the flight and tells 2 he is the SF for now>
or if 2 is in a better position, or as previously briefed (in the soft chairs back at ops )
"Dusty 1, 2 cleared to engage, nose 3 miles, press" <anchors the flight, tells 2 that he is EF>
The EF's job now is simple, he BFMs the bandit to his WEZ and
gets the kill. If EF's attack is negated, he still needs to keep the
bandit defensive. If EF goes neutral or worse, defensive, get on the
horn and tell the SF immediately,
The SF now has all that work that we talked about in part one
to do. He has to do all those things at once now. (Time sharing and
task priority comes up big now.) To set up the support for the fight,
the SF needs to 'blow through' the fight and extend as quickly as
possible. Here is a chance to sanitize the area as soon as you start to
extend away.
Things to Remember!
NEVER place yourself, as the SF, in a position where the bandit
could get a shot at you, even a snap shot. While this seems obvious,
it's more difficult than you might think. Some other areas to avoid as
the SF are;
Directly above the fight
Directly below the fight
Within 2NM of the fight (12,000 feet horizontal)
Why? If you're above or below the fight, you have to keep your
attention on the fight and you can't clear the area (sanitizing) and do
all the other duties you have to do. If you are within 2NM you are in
the bandit's snapshot WEZ and may just give him a freebie. Even if he
just lobs a missile at you, it forces you to fight the missile and drop
your SF role. The bandit effectively negated your support.
Breaks
Blowing through the fight at the start of the 'BFM' phase of the
fight is usually pretty easy. Depending on what the bandit does, your
choices as the SF are cut and dried.
If the bandit breaks away from the fight, your options here is simple,
check off the fight 30° , blower on to 450 knots and establish your
separation from the fight. See figure 1 where Viper 2 is the SF.
Figure 1 - Bandit breaks away from the fight
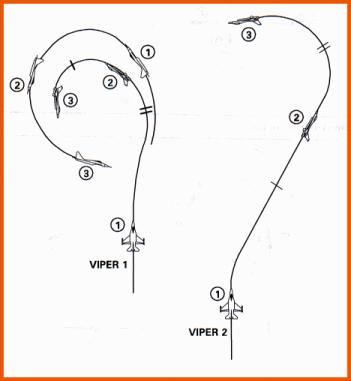
If the bandit breaks into the fight, you have 3 choices, depending
on the situation and the plan. You can do a straight ahead extension,
lag the fight or pull the bracket.
To do the straight ahead, keep the bandit at very high aspect with BFM,
hopefully achieving a head on pass, from which you will simply continue
the extension until you establish your position of advantage on the
fight. The advantage here is that you can unload and gain knots while
the bandit is eating up energy in his defensive BFM against the EF. See
figure 2.
Figure 2 - Straight Ahead Extension
Lagging the fight is more difficult but gives you a few advantages.
It should only be used against an inferior opponent. You'll need a high
airspeed, so use the blower as needed, maintain that 450 knot speed.
What you'll do is lag your EF through the first part of his turn to the
bandit, and then split plane the fight in the opposite direction.
You'll end up turning in the same direction as the fight (ready for a
co-flow entry) and you'll clear the EF's six visually as you turn.
Resist the temptation to stay with the turn and 'be a part of the
fight'. Your job is to get outside the fight and support.
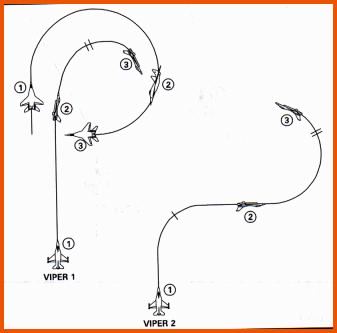
To bracket the fight, you'll do basically the same as if the
bandit had broken away. You'll check turn away from the fight, but
you'll also have to go vertical to get your separation. When done,
you'll have the bandit between you and the EF. As the bandit's nose
rotates through you (you'll see his apparent turn rate get a lot
faster) you are then outside the fight and ready to start the support
role. You'll be in a good place for an opportunity shot or an exchange
here. You must do the vertical move, because if you stay in plane with
the bandit, you will offer him a snapshot and maybe go defensive
yourself. Figure 3 shows a bracket maneuver forming.
Figure 3 - Forming the bracket
Keep in mind that these breaks cover only the first 'reaction' moves
on your part as the fight begins. Whatever you do, remember YOU are
responsible for flight path deconfliction (don't hit the EF).
How to Support the Fight
The best place to put the fight is at your left 10 o'clock or right
2 o'clock, depending on your break in direction. Keep your speed up in
the 400-450 knot range and keep the sight. You can do this easily
(hopefully) by turning to keep the fight visual, then rolling out wings
level a few seconds, then pull back into the fight. Use the blower if
needed to keep your energy up and always be looking for the fight entry
and the egress route. What you want to do, in the best case, is fly
straight lines and check turns, keeping the fight 2-3 miles away and
3-4000 feet above/below you. This range and altitude split will allow
you to keep the area sanitized, and gives you maneuvering room
(remember that from BFM school?) to give you the shot or role change.
If you do this, you'll keep those hot feathers in the back from
attracting any of the bandit's heat seekers and turning you defensive.
Never let the bandit's extended 3/9 line get past you, it never
should since you have the time and the sight to prevent this. If need
be, break turn into the fight to keep your advantage in position. All
this time, your radar should be in ACM slewable while you are playing
with the antennae elevation to sanitize the area around the fight.
There may be a time when the bandit, because of lack of SA or
desperation may stop defending against the EF, stop his fight and turn
to you. Watch his nose, it will telegraph his intentions. If you have
to, use the dist/alt split you maintained to negate any shot he makes.
Your position and energy advantage should guarantee your success. At
this point, you must BFM to deny him his WEZ. His extension toward you
should provide the EF with a shot opportunity.
Fight Entries
Ok, life is good, the EF is BFMing the bandit and you're in a great
support position. The fight's going as briefed. Then you hear on the
radio that EF is neutral, he can't convert the fight into a kill, or
worse, EF just went defensive. Time to go into the fight and help out
the EF.
There are two types of entries into a fight, either a move in the
vertical or a move from outside the turn circle (TC) of the bandit. The
outside moves are defined by whether your turn will be with the turn of
the fight (Co-Flow) or against the turn of the fight (Counter Flow).
Keep in mind that the entry you pick also determines the BFM you will
be doing, so be ready to accept your choices.
Vertical entries are easy, simply pull yourself into the bandit
and maneuver for the shot (If cleared by the EF) or simply be ready to
become the EF. Be ready to take the opportunity shot if cleared and
necessary. Your energy should be better than the bandits, but don't
squander that advantage. Entries from below are difficult, the fight is
probably already going downhill and that's denying you turning room.
All vertical entries are fleeting and have to be very accurately timed
to work.
Depending on the Co or Counter flow position you are in, you
will have several choices to make on entry to the fight on the same
plane. When it's time to enter the fight, you'll be able to keep behind
the bandit's 3/9 line and keep the fight on your 10/2 o'clock. If you
are Counter-flow to the fight, remember that the bandit will cross
through your position (and hopefully in your WEZ) more quickly and
often than if you are co-flow. If you are co-flow on the entry,
remember you have the energy advantage over the bandit (or should) so
getting to WEZ should be easier. As you look at your entry
opportunities, remember to NEVER put your nose on the fight unless you
are taking a shot. You are not the EF yet, your just maneuvering to
either become the EF or take the Opportunity Shot
As you look for entries, remember to keep sanitizing and
checking your own 6. Until you are called in and cleared in, you are
still the SF. Keep an eye on your position and WEZ, but let the EF have
the fight until he clears you in. When you are cleared in for the shot,
or because EF has gone defensive, convert this entry into a BFM fight
using all the methods you already know. Keep in mind that a Counter
flow entry is a lot like a two circle fight in BFM, you'll need a lot
of energy to turn it into a kill. As you are working a Counter Flow
entry, you have more opportunities to employ weapons than in a Co-Flow
entry (the bandit is crossing through your WEZ twice per full turn),
don't waste those opportunities.
Opportunity Shooting
There are two reasons for an opportunity shot, first if the EF
requests it from you and second if survival requires it. Survival could
mean that either the EF has gone defensive, or if a situation outside
the fight requires it (e.g., A flight of 4 bandits is 10 miles out,
heading for you. As the SF you can't engage these offensively so it's
time to drop the bandit and bug out )
Three things are required for your opportunity shot as the SF
Bandit is in your WEZ
EF is not in your weapons FOV for its ENTIRE time of flight
Bandit debris will not affect the EF
You will not enter the EF's control zone (CZ) to shoot (CZ is the space between EF's nose and the bandit's tail)
<Did I say three things??? Hmmmm>
Only two things remain to remember about opportunity shooting;
YOU have to make sure that EF is clear and has cleared you for the shot
YOU have to make sure that EF is clear and has cleared you for the shot!
Yes, it's that important...
Egress
When the bandit is destroyed, the fighter who has the highest SA
should direct the egress. This is normally the SF but it could be the
EF if the SF took the kill shot. Get the flight moving in the same
direction out of the area and get low to isolate all threats to the
area above you. Start building back element SA with a new picture from
GCI or AWACS. The fighter with more speed will be responsible for
dressing up the formation, but this is secondary to gaining visual and
egressing the area. Both fighters should get a good check 6 and start
sanitizing their areas of responsibility.
It's advisable to have one fighter be in ACM slewable to
sanitize the area and the other in RWS to start clearing the exit path
and regaining area SA. Do your formation re-join as soon as possible
and re-establish the original mission. At this point in the
maneuvering, Lead starts to reassert tactical control of the flight and
modifies the original mission or presses on, as the situation warrants.
Notice I didn't talk about what happens if the bandit isn't
dead. In a 2v1 fight, the bandit should be dead by the time egress
happens, but there are other concerns. Fuel state, prioritized items,
etc., that might lead you to extend and leave the fight. If this
happens, the EF is the guy who drives through the escape window first,
then the SF goes. If the bandit pursues the EF, the SF should be
presented an easy kill. If the bandit bugs out, the threat is over, not
a factor. If the bandit turns on the SF, well, we're back where we
started, except the SF is now the EF and BFMing while the former EF
(now SF) maneuvers as SF to Opp Shoot the bandit, or return to normal
SF roles. You cannot disengage from a determined bandit, especially if
the EF is defensive <that's pretty obvious>. What you can do as
the SF is maintain your energy state while the EF bleeds the bandit of
energy, leaving the SF with a sure Opp shot kill.
Summarizing Offensive ACM
Establish your roles ASAP, before BFM begins.
The EF BFMs the bandit for the kill, the SF gains separation and uses it
NEVER place yourself, as the SF, in a spot where the bandit can employ ordnance on you!
The SF maintains SA for the element and maneuvers to preserve an entry into the fight
The SF sanitizes the area for the element
For opportunity shots, the SF has to make sure that EF is clear and that the EF has cleared you for the shot
On egress, get clear, get low, get smart (build SA) and get in formation
Part III - Defensive ACM
Obviously, the best situation is to not be defensive, but these
situations will occur. Good preventive measures to avoid the defensive
maneuvers are simple:
Use line abreast formations (help keep your buddy's deep six clear)
Sanitize with radar coverage (overlapping)
RWR
Visual cross checks, and keeping your own deep six clear
AWACS and any other services available
There are four basic priorities to think about for survival in a defensive situation:
Detection of the bandit
Negating the threat
Maintaining flight integrity and mutual support
Lethal weapon employment against the bandit
When the flight is defensive the obvious concern is survival,
negating the bandit's initial attack. Fractions of a second are
critical, the flight must have pre-planned maneuvers that are well
understood and thoroughly practiced. These maneuvers, are by nature,
defensive BFM (defensive turns). Once the initial attack is negated,
the flight must now concern itself with killing the bandit or
separating. The engaged fighter must fly his best BFM and be liberal
with the chaff/flares.
If separation cannot be achieved, the bandit needs to be sandwiched
and killed. Here is where mutual support and the role of the SF/EF are
critical. Normally the roles are established by the bandit, but if both
fighters are tally and blind, lead needs to establish roles and
tactics. Flight path deconfliction is achieved by giving references off
the bandit, and knowing, through practice, what the flight is going to
do.
When the bandit is located, it's time to split the element, either
laterally or vertically, depending on the bandit. Increase airspeed and
perform either a break turn or hard turn into the bandit. Break turn if
the bandit is in a WEZ, hard turn otherwise to maintain energy. If
you're unsure, call the break turn, better to be safe than sorry and
create maximum BFM problems for the bandit. <That's from Lt. Col.
Bonanni > The key here is to defend yourself and not give the bandit
an easy shot on your buddy. Use your best BFM and know that your buddy
is out there, but never count on him to come help you survive. He may
be BFM'ing a missile
So here goes, the initial maneuvering starts
Initial maneuvers when defensive
The initial move in defensive ACM is the key to survival.
These moves need to be part of the ACM contract that both flight
members know by heart. PRACTICE! The goal of the moves should be to
keep your cone of vulnerability away from the bandit (i.e., your tail
feathers; those hot, blind tail feathers). The main principles here are
easy:
When defensive, avoid putting both jets in the same area, use split plane maneuvers.
The pilot who is engaged should (simultaneously):
Do his best defensive BFM, break turn into the bandit;
Direct the flight to turn (left or right);
Shovel out chaff and flares like hay if needed.
The supporting fighter should:
Perform the break turn as called;
Dispense chaff and flare as required;
Attempt the acquire the tally;
Attempt to employ ordnance against the bandit, keeping the EF in mind as he does so.
A quick note on defensive maneuvering. Remember to put that switch
to dogfight and use a short range ACM mode (Boresight or 10 x 40).
Remember you don't need a lock for the AIM-9, get a tone and shoot,
especially if the bandit is employing ordnance against your buddy.
Defensive Maneuvering for the Flight
Depending on where the bandit shows up, there are manuevers
you can use to maintain your 2 ship advantage against the bandit. These
maneuvers depend on when and where you detect the bandit. There is no
hard and fast rule (as in all of air combat) or formula to tell you
when to do what. The maneuvers, as presented, should be practiced and
used when the time is 'right'.
Sandwich
If a bandit shows up in your six, and presses his initial attack
against the EF, a sandwich may become possible. This is almost always
limited to those times when the bandit is unaware of the SF or simply
not reacting to him. As the EF does his break turn, the SF can delay
his turn a moment to let the bandit commit to his turn also, the SF
then turns into the bandit and lets the EF pull the bandit into his
WEZ. NOTE: Never, ever do or ask the EF to do something that you
wouldn't do. We don't sacrifice the EF for a kill. The EF will be
BFM'ing his butt off, and the SF's role here is to react and employ
weapons.
Early or Late Switching
The early or late switch is available when the bandit is aware of
both fighters. Switching is communicated as soon as possible so that
roles can be established. Both switches accomplish the same thing, but
the difference between them is the location of the bandit. If he is in
the EF's turn circle (TC) then it is a late switch. If the bandit is
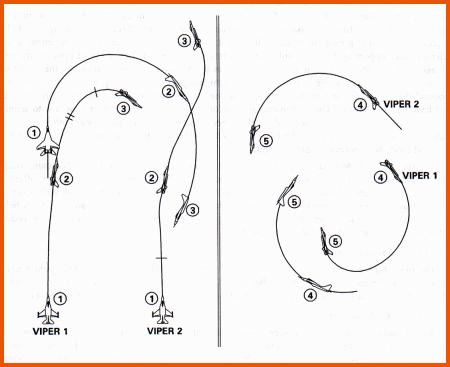
outside the TC, then an early switch is possible. See figures 4 and 5.
Figure 4 - Early switch (Bandit starts outside the TC)
An early switch allows the EF to start a constant rate turn defense
or an extension, depending on the bandit's BFM. This allows him to back
off the turn to preserve energy and keep a tally on the bandit all
while keeping his tail rotated away from the bandit. All the while, the
SF is maneuvering for an entry into the fight, or weapon employment
opportunities.
Figure 5 - Late switch (Bandit starts inside the TC)
A late switch gives the SF the chance for a high-aspect pass at the
bandit and maybe even the flight with an extension opportunity; again,
depending on the bandit's BFM. If the extension opportunity is there,
the SF needs to communicate that to the EF. As the bandit turns to
point his nose at the flight, his ordnance capability needs to be
assessed, extension may not be a viable option.
Same side break or Cross turn?
When the bandit's cannot be clearly judged, the same-side break or
cross turn become options for your flight. The idea behind these two
maneuvers is to:
Deny the bandit a shot opportunity.
Present maximum BFM problems for the bandit.
Force the bandit to commit to one fighter.
Maximize your flight's offensive potential.
Establish the EF/SF roles.
The same-side break is preferred if A) the bandit is detected
outside of WEZ or B) has not yet entered into either fighter's TC.
Figure 6 shows the same side break.
Figure 6 - Same-side break turn
The advantages of the same-side break are:
Viper one can maintain the tally through the turn;
The bandit MUST commit to one or the fighter, or blow through the fight;
He no longer enjoys the same offensive potential against both fighters;
Each fighter has isolated the threat on the same side of their aircraft;
There are no flight path deconfliction problems;
The SF can keep rotating his nose back into the bandit while the EF does his best BFM.
The disadvantages are;
Viper two may lose the tally as the bandit gets pulled through his deep six.
The bandit may take a possible snap shot at viper two as he starts his turn.
The cross turn is not the best of maneuvers, but is effective if the
bandit is detected inside your turn circle where he can maximize his
offensive capability on one fighter. This maneuver has many
disadvantages, but can be used to 'fluster' the bandit into committing
himself to a turning engagement with one fighter. Your flight's
abilities here are minimized, but if you have superior equipment (or
ROE), it can be used. See figure 7.
Figure 7 - Cross turn / Hard to six turn
The advantage here is:
Each fighter maximizes the BFM problem for the bandit;
Neither fighter turns his tail to the bandit;
Both fighters increase their possibility to maintain the tally in the turn.
The drawbacks are numerous:
The bandit is not forced to commit against either fighter;
His commit decision can be delayed until he is deeper in the TC;
He can meet one fighter at high aspect;
The flight's role of EF/SF is delayed until the bandit commits;
If all three maneuver same plane, deconfliction becomes a factor;
Mutual support is difficult to achieve from the end position;
The bandit is on opposite sides of both a/c, making communication harder (my right, or your right?).
All of these maneuvers assumed the bandit was deep six to your
flight at detection. If the bandit is asymmetric (figure 8), the
solutions remain the same, but the identification of the EF is easier
to realize, the most threatened fighter will normally become the EF. If
the bandit disregards this, your BFM problems just became worlds easier
and a kill is soon to come.
Figure 8 - Asymmetric bandit (shown with flight doing a same-side break)
Re-entry
Re-entry to the fight is the responsibility of the SF. As in
the offensive ACM, the SF has maintained the tally on the fight and is
maneuvering all the time for an entry. When defensive, the need to
clear the EF is gone, since he is defensive. As such, the separation
for defensive maneuvering is lowered to about 1NM. Keep an eye on the
fight and see how it develops. If the fight is dragged into a scissors,
be prepared to enter the scissors, but try not to get dragged into the
same slow speed maneuvering. Your goal as the SF is to employ weapons
and/or be the EF's eye to a separation chance. If you see a window open
for the EF, tell him, but do not expect him to take it. He is BFM'ing
and may not be ready, willing or able to do it.
The entry to the fight is either co-flow or counter flow and handled
just as in offensive ACM, since you are basically offensive as the SF.
Your weapon of choice is the AIM-9, but be sure that you can fire it
without involving the EF in any defensive maneuvering.
The role of the SF is basically the same as in offensive ACM:
Keep a tally on the fight;
Employ weapons ASAP;
Maintain SA for the flight;
Keep looking for an exit window for the EF;
Keep the fight area sanitized and don't get jumped yourself!
Conclusion
In this article, I have discussed some real-world Air Combat
maneuvering principles as they can be applied to flight simulations.
Communication, no matter how you do it, is paramount to your survival
in the hostile skies. Some folks wonder why 'flight path deconfliction'
was stressed so heavily. Well, in the real world, it is a major
concern, and in any flight sim worth its salt, it is represented. If
you hit your buddy while maneuvering, the bandit gets two kills and a
great laugh.
There are some ideas presented here that are new to a lot of people,
but I'd ask you to try these things out in the virtual skies with your
buddies. You'll see that with practice, the application becomes easier
and the usefulness becomes evident.
I was asked while this article was in preparation, what about 2
versus 2? Your article deals mostly with 2 v 1? True, but if you think
about it, a 2 v 2 fight will boil itself down to one of two things,
either two 1 v 1 BFM fights or a 2 v 2, where you still need the role
of EF and SF. Chances are the bandits will be in their roles as EF and
SF, but if they are not supporting each other, you have a bright future
ahead, with two kills coming. Remember Top Gun? Maverick disregarded
his wingman to split off the fight and go after the bandit's SF whereon
the bandit converted and split his skull. Trust me, this stuff works,
otherwise the USAF wouldn't teach it and preach it.
Cheers and Check six! See you in the skies, till then, I'm a dot .