
| Falcon 4 Missile Avoidance Part III by Dave Pascoe |
||||
|
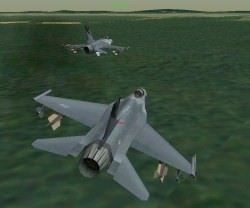
But if you've got a clot of red lettering to the left and the right, with an air defense trap in the middle, well buddy, you've been sent on a suicide mission. It took me a great deal of wailing and gnashing of teeth before I realized that there was absolutely no point in continuing on. Don't be afraid to abort the mission and RTB. 'Tis far better to live and fight another mission. As they say, discretion is the better part of valor. Notice that in early missions the AI will send you out on deep strikes long before the air defenses standing in the way have been dented, yet alone suppressed. Again, under these conditions you cannot win unless a way can be found around them. Considering how poorly wingmen perform, even if you do fly NOE and manage to get through, the likelihood is that you'll lose part of your package, and when you get on target you'll be highly vulnerable and ineffective. We don't want any more of those "The airlines are hiring," or "goat rope," snide remarks, so finding alternatives to flying into the grinder is the thing to do. We are not required to accept suicide missions. We are not kamikaze, the divine wind. Survival: Alternatives There are several options to be considered here. The obvious one is to find a safer, alternative route. This is where the preparation of your own intel maps becomes valuable. Heading out over the water where there are no SAM sites is one good option when logistics and fuel permit. Be sure to figure the distances and adjust fuel rate and speed for these longer routes. Another option is to forget about your assigned targets and start chipping away at the edges of the defenses that stand in your way. In Operation Tiger Spirit, the weakest area of air defense is right up the center of the peninsula. If you can completely clear out this corridor up the middle (and keep it clear), all your succeeding missions can be routed up the middle. In the short run, chipping away at air defenses will hurt you because you'll get mission failures (there's no credit for unassigned targets). But the advantage is that after getting those nasty SAM sites cleared, you'll have established clear flying at least over the ground. Pay now or pay later. Or you can just cross your fingers and hope someone else does it, but I wouldn't bet on that.
 You must also learn to make effective use of your wingmen if you are to be successful. If you don't, you're trying to fight a war single handedly and you will surely fail. In chipping away at an air defense array, it makes sense to skirt the perimeter. Try to check the shape of the array, then attack the farthest corners of it. Make sure you NEVER fly between batteries. Order wingmen to stay in formation and "Close Up". Lock up targets and order the wingmen to attack when in the most advantageous position. Remember that with a 4 man flight, you've got 8 HARM's. You've got to get all of them off to make a dent in a large battery. If six hit, you're doing real good, but one mission alone won't be enough against 24 SAMS. A note on wingmen employment. Many people complain that wingmen don't perform properly. Yes, there are still bugs even after the 1.04 patch. Half my commands still don't work. But many of you are still not up to speed on how wingmen are commanded. In F4 there are two basic formations: a two-ship and a four-ship. If you are flying in a four ship formation, you basically have a wingman and another element. As Lead, you would be the #1 man in the four-ship. A four-ship is divided into two elements. The #1 man leadns the four-ship and is also the lead of the first element. The #3 man leads the second element but must follow the instructions of the #1 man, or flight Lead. F4 breaks down radio calls into wingman, element and flight. Wingman calls affect only a single aircraft. Element calls affect the second element or the other two-ship in the flight. Flight calls affect everybody: your wingman along with the other element. There are important differences been one and two element flights. In a two element flight, we have to use the [W]ingman and [E]lement keys. If you are attempting to direct your second element from [W], it won't work. Both elements, your wingman, and packages are commanded separately. After the mission, you may see that you and your wingie did fine, but the other element did nothing. In that case, reread the Coms section of the manual to be sure you understand how this works.] |
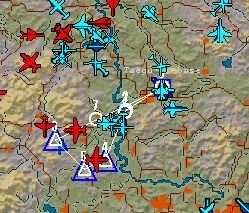 Try ordering all your wingmen to attack before you make an attack. You will be more effective than they are, so YOU be the "clean up" man and take out whatever they have left. It's usually a lot. Pay very close attention to your stand-off distance. You need to be doing a lot of circling. Finally, if you score an effective hit on an emplacement, try to make it a point to come back and clean up with another mission. You'll never get all the SAM's out, but at least get rid of the most deadly. Clearing a corridor for future missions greatly tips the odds in your favor. I will often sacrifice and alter a CAP, load up with HARM's, and clean out the remaining SAMS. Then I take my green marker and mark my safe corridor on the map. This will be the corridor I use for all future missions to this area. It keeps a lot of shrapnel out of my air frame. AAA is fairly easy to deal with. The two main objectives are (1) make yourself a difficult target and, (2) get out of range fast. Triple A most often hold their fire until you are directly overhead. Choose a line of escape (continuing your same direction is usually best), go to AB, then initiate a series of violent turns in that general direction. But not so violent as to bleed off airspeed below 350 kn. A series of thirty degree S turns will usually do the trick with a pinch of luck. If the AAA has got your altitude, you can also make a steep climb if you're 500 kn. or greater. Keep air speed high. Strike Target Assignments In case you haven't already noticed, the AI loves to test your mettle against impossible odds by assigning you to strike heavily defended targets. There are several tricks you can employ to help even things out. If you fly missions scheduled for an hour into the future, you can refly them as many times as you want until the real time limit is reached. Just discard the mission at the end and it will basically re-run the same everytime. Create your own map of the target area, noting the type and relative positions of SAM batteries. In this case, it's helpful to work with Intel and the theater map to fill in all the gaps. Note the range of each type of SAM and draw in your own threat circles. I use a package of those kid's coloring pens to do this.
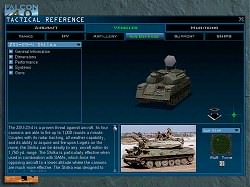 F4 Tactical Reference: ZSU 23 When you've got everything accounted for, now start looking for the weakness in the defense. For example, a manufacturing district of P'yongyang is heavily defended with SA 2's and 3's. It's suicide to attempt a bombing run over the target since these long range missiles won't let you get close. Yet both these missiles provide an opening for you for a good standoff weapon: use the Maverick B. These old missiles were designed to take out high altitude bombers and don't work worth a diddly at low altitude. The Mav won't be much help against factories, but since you're tasked with taking out a fuel tank farm, this 10 mile range little beauty will do just fine as a stand-off weapon. F4 models proximity damage just fine: hit one tank and others will go up with it! The important point to note here is that the AI is often your enemy as much as the DPRK is, leading you into SAM traps and air battles from which you can't escape. We are given a default route and load out without regard for crew safety. Be aware that frequently this is far from the best set of options. The weapons you employ in SAM avoidance are as important as selecting your route. When faced with a suicide mission, 'tis a far, far better thing to settle for partial mission success with a lesser weapon than to entertain certain death and failure. The Maverick is a much under-rated weapon in most sims, but they have some tremendous advantages despite their lack of blast power. High accuracy, easy targeting, abundance and stand-off range make them a great alternative to dying young. They're also very good for hit and run tactics when the air is filled with enemy fighters since they can be gotten off fast. Furthermore, with their medium range, you can resort to terrorist tactics by working the perimeters of well-defended targets. The MAV is the most used missile in the world with over 5,000 having been launched with a reported accuracy of 90%. Go to Part IV
|
|||
|
© 1997 - 2000 COMBATSIM.COM, INC. All Rights Reserved. Last Updated February 16th, 1999 |
||||