
| Falcon 4 Missile Avoidance Part II by Dave Pascoe |
||||
|
Another thing I have been doing by way of learning to defeat the AI is to fly missions as RECONS. One great thing about F4 is that it allows you to discard a mission as you exit from it. Take advantage of this to recon a mission before you get your head handed to you.
Need still more help? Turn on invulnerability, and THEN fly the recon. Make copies of the map, mark the route and then place SAM sites (or enemy fighters) as you find them. If you feel that's cheating, then fly some BDA's where most of the path before you has been cleared and you will be far less threatened. CAP's and naval strikes are other good opportunities to gather intel. However you do it, just make sure you do. There's nothing like having been there before to even up the odds.
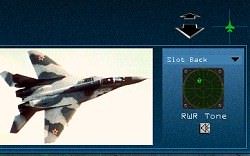
 Use Your RWR The Radar Warning Receiver is an extremely valuable little gizmo and you need to thoroughly learn its use. Be sure to read chapter 17 on this subject occasionally. There's more good advice beginning at p. 27-10 on mission planning. It is not easy to use RWR because the picture it presents is one of merely relative positioning. There are two threat rings, inner and outer. The system prioritizes by identifying the missile via radar signature and then calculating the missile's range to arrive at the priority. Even though an old SA2 missile may be much further away, it may place it within the inner ring, and draw a priority box around it, because of that missile's great range and speed. It doesn't necessarily prioritize the threat merely by how close the missile site is, although that too is possible. Very often, you will find the symbols closely grouped: these are serious traps to avoid, and I'll discuss them in detail in a moment. The RWR also has audible warning sounds. It is EXTREMELY beneficial to train yourself to recognize these sounds. The Tactical Reference section within the sim can play all the radar tones for you. It's a good idea to run through these occasionally and become familiar with all ten radar missiles. (Alternatively, download TWS Tutor here). Know Your Enemy It's an equally good idea to read through the specs and learn the performance and ranges. Some of these are not very big threats, while others have limited ranges. Others, like the SA13, 15 & 7 are very deadly, but only have ranges of 3 to 5 miles. They're a threat only when you fly over them. They're the ones people complain most about not being able to evade. Of course you can't evade when you're that close. Others, like the SA3, 4, & 8, are late model medium range SAMS that give us fits when effectively deployed. This sim employs real world air defense array tactics: amazing! Arrays are large emplacements (actually a group of SAM batteries) that are designed to entrap you within their envelope. The tactic is that different sites alternately light you up, each for just a few seconds. The use of this tactic is an attempt to cause panic and to literally overwhelm your defenses. You see, those site operators on the ground have radar too. They will play very clever tricks on you, trying to make sure that you do not know exactly where they are. They do this by turning their radars on and off in a predetermined sequence that can make flying any kind of mission maddeningly difficult, particularly a SEAD. You get maybe a dozen blips on your RWR but you can't lock onto any of them! Unless you have a strategy for defeating them, there's only one thing to do in this situation: GET THE HELL OUT! Another trick is to go to SETUP and select Invulnerability. Turn on labels and now fly over some of these sites and note how they are placed. Notice that you may see a group of six circles on the ground, with a missile launcher at the center of each. Others may be hidden in a forest. Yet on your RWR, all you see is a single highlighted number for the whole group of six. This is called a "battery." An "array" is a group of batteries set out in such a way as to achieve a specific objective, such as a trap. Normally they're set up to take advantage of expected lanes of approach. |
 It is a no win situation when you fly into a cone of air defenses. This is literally flying into a trap from which there is no escape. Here, the defenses are set up in an inverted V shape, the cone. Once you fly between the two legs of the V, you are surrounded with SAMS and AAA on two or three sides. But a trap doesn't have to be a cone. A straight line of launchers spanning a distance of 15 miles is also deadly effective. Consider what happens when you fly into this line: you may be faced with incoming from both sides. Only a combination of great luck and great skill will get you out. Most of the time you will die. Air defense traps are usually detectable on both your RWR and your HSD, if you are carrying HARM missiles. The HSD is slaved to your radar with the AGM88 selected. Learn to detect these situations before you reach the point of no return. Note that the RWR can be displayed in enlarged view on the MFD, which is useful if you have trouble seeing the small panel instrument. The down side to this is that you have one less MFD to use for another display such as the mission map. (Yes, you can use SHF ] to add another the RWR MFD to your display top right in you are flying in no cockpit view). Triple A and other guns are frequently employed in conjunction with SAM's. By itself, AAA is fairly easy to evade, having down ranges of 1-2 miles and a max burst altitude (straight up) of around angels 20. They will set up these gun sites in what appears to be your obvious escape route, hoping that you will fly into them, which we often do. They are most often employed down-range of SAM sites where you hit the deck to avoid the SAMS, only to be picked off by the guns. Perhaps one of the worst situations to find yourself in is a major air battle that is occurring directly over heavy air defenses. In this case, you've got A2A and G2A to deal with. Many large allied strike packages are faced with this situation, and the losses can be large. The best means for survival is to either abort or move out of the major area of battle, attempting to seek the safer perimeter of the melee. Notice here that until your side begins to establish air superiority, the major portion of your deaths will occur when you are caught in the pincers of both air and ground elements. It is possible to defeat one or the other, but not both.  This discussion of missile avoidance focuses mainly on avoiding getting shot at. This is truly your most effective form of avoidance. Once a missile is launched, your odds are not good, so it's far better not to get launched on from the get-go. It's one thing to encounter a lone battery; something else again to face an entire defensive array. You're dead meat against an array, so that's what we want to avoid. What about maneuver options in a pincer? Let's say you are flying your flight plan and you suddenly notice that the RWR starts to light up with missiles at your 11 and 2 o'clock. Or, first the 2 o'clock lights up, followed a minute or two later by the 11 o'clock. (You'll find many these of situations in all early campaign missions. The fact is that you do not know the exact distance or placement of these sites. If you're carrying HARM's, call them up and the attack display will give a far better indication of positioning, along with a range scale. If you do not have HARM's, it's wise to steer clear of this mess. Pronto). With SAM's at your 11 and 2 o'clock positions, this should alert you to the possibility that you are flying into a trap. So what to do? Two months is not a lot of experience with even a much easier sim than F4, so avoidance is the operative word here. I feel perfectly free to turn on labels and check the skies. The question in my mind is: can I go around these defenses? Heading left around the 11 o'clock battery looks like the shortest distance and seems a good bet. If the air is clear, then do a radar sweep in this direction out to radar max range. If all looks good, make sure you've got enough fuel and that your package is reasonably intact. Go to Part III
|
|||
|
© 1997 - 2000 COMBATSIM.COM, INC. All Rights Reserved. Last Updated February 22nd, 1999 |
||||