
| F/A 18E Super Hornet
by Leonard "Viking1" Hjalmarson |
||||
|
This afternoon I spent another two hours with the Super Hornet beta. My first goal was carrier landing. My second was to try some action in an Air to Ground mission. (For the earlier report, click HERE.) In order to accomplish these goals I had to fire up the PDF manual for a little more information. In the process I had a chance to evaluate the manual, and I think that this could be the most detailed manual since Falcon 4.0! Not only does the manual cover every operation of the Super Hornet in detail, but it provides a good indication that DI's simulation is the most detailed yet. Consider that iMagic's simulation only needed a 140 page manual to cover avionics and operations. What this means is that only experienced virtual pilots should seriously consider this simulation. Although there are some great helps available via the preferences and even a general difficulty slider (which applies to the enemy AI), there is a lot to learn here and only dedicated weekend pilots (who take time to read the manual) are likely to survive the effort. I did indeed read the manual and discovered that the Super Hornet will virtually land itself on the carrier once the pilot positions his aircraft correctly. However, it's a lot more fun to do it yourself! The LSO will talk you down, and the detail in the Frensel Lens system is by far the best ever seen. Using the MPCD and TACAN, I was able to relocate the carrier from ten miles out, and I also contacted Carrier Control for active guidance. This is the first time I heard carrier comms using the MODEX system, which consists of three digits. The first indicates the squadron and the other two are simply numerical id within the squadron. I heard myself call FOUR-OH-ONE, CHECKING IN when I called for guidance. The carrier responded with FOUR-OH-ONE: Carrier Approach, heading THREE-ONE-ZERO, eight miles.  I didn't attempt the ACL system (Auto Carrier Landing) for these attempts. Instead I activated the ILS using my Up Front Display. 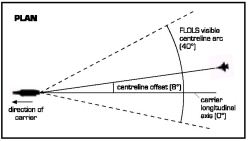 Things went fairly well for me the first time, until I dropped below glide slope about 300 meters out. I hit my burners and raised my gear for another go round.  Fresnel Lens |
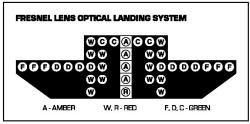 FLOLS On my second attempt I didn't catch the glideslope early enough and went around again. My third attempt found me in good shape, and shortly after I passed the one mile call a window popped up on my display which was a zoom in view of the FLOLS! (Fresnel Lens Optical Landing System.)  Loaded for Bear Believe it or not, I caught the No.2 wire on my third attempt! I was so tickled that I didn't take a screen shot! But I did remember to kill my engines. Feeling lucky, I went next for an air to air mission. As you can see in the shot above, I was loaded to the max, with 14 AMRAAMs and 2 Sidewinders! I discovered that a full fuel load and full weapons load has some disadvantages! My next mission was an air to ground strike, complete with three wingmen.  At the beginning of this mission I found myself on a carrier deck that was literally humming with activity! Luckily, the technology exists to see in the dark.   Interrupted by the realities of life, I was barely off the carrier when I had to scrub the mission. I'll try to get back to it tomorrow! Go to More Screens Join a discussion forum on this article by clicking HERE.
|
|||
|
Copyright © 1997 - 2000 COMBATSIM.COM, INC. All Rights Reserved. Last Updated September 21st, 1999 |
||||