MiG Alley. This latest simulation from the designers at Rowan is
already a classic. Something of a sleeper, there is a powerful and
configurable dynamic campaign system hidden away here. Hidden? Yes,
hidden. If you fly only one of the first four campaigns you might never
discover the power of it, and if you rely on the manual to tell you
about it, you will be disappointed.
Never fear, the campaign spies are here. We've spent some time
collecting information for you and generally digging around in the
fifth campaign. It's time to share a few tips to make your mission
building easier.
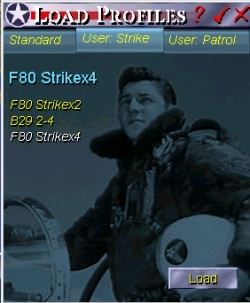
First, I suggest you build some USER PROFILES. I built a profile
for a medium bomber strike with escort, a heavy bomber strike with
escort and flak suppression, and a fighter bomber strike with escort.
Building a profile is a simple matter, but it can be a terrific
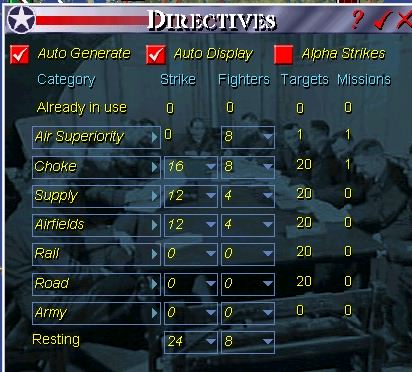
headache if you don't understand THE RULES. Simply put, you can't
build a profile if you can't access the required resources, and you
can't access the resources if the campaign AI has already allocated
them. So it is best to do this at the beginning, after deleting the
campaign generated missions or after accessing the directives interface
and turning OFF auto generate.
Next, you may build all the profiles you like, but if your resources
are all used up they won't appear on the list. This isn't a bug, you
simply have limited resources and this is a good reason to build a
variety of profiles.
It is at the point of working within the campaign that little
flaws crop up that will grate on you. Don't worry. Ignore them. You
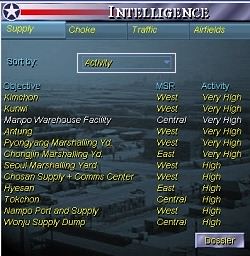
will learn the work-arounds. For example, wouldn't it be nice if the
"Intelligence" target info list would stay on the screen while you
decide which target to select? As it is, the location comes up and you
see it's too far, then you must re-select the Target Intel list icon at
the top of the screen.
Or wouldn't it be nice if you could sort targets by activity
and then choose DISPLAY and see the location on the map of every target
with HIGH activity? Better still, wouldn't it be great if you could
sort by activity AND proximity? No use worrying about it, work with it.
The next frustration you might encounter is expecting to see the
"Directives" screen pop up when you begin a campaign, but.. where is
it? Only the fifth campaign is fully dynamic, allowing you this level
of control. You won't have access to the Directives in any of the other
campaigns.
No matter. The auto generated missions aren't always the best
choice for your limited resources, and it's more fun and more
interesting to design your own anyway. So go ahead and select your
priorities, and then be prepared to scrap any missions that don't
impress you.
Figure 2.
A quick method of building a User Profile is by editting an existing
profile. I'm not sure of the recommended way of doing this, but I
simply created a mission using a default profile, then changed the
composition of the strike force. When completed, I clicked the SAVE
button on the Profile Info dialog box (see right hand column on the
next page) and then named my profile.
Build Your Own
The first mission generated after I selected the priorities in
Figure 1 above took me way up to Yalu to a choke point with low
activity and low capacity. Yet clicking on INTEL at the bottom of the
MISSION FOLDER showed that the Yalu bridge is heavily defended. Hmm.
VERY far away, heavily defended and of little strategic value. I
ordered the officer in charge to scrap the mission.
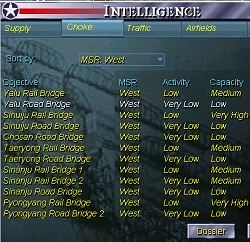
Instead, I elected to choose my own targets and build my own
missions. By the way, as an aside, not all intel information is
available in a single location. It is best to bring up the Target Intel
List (in Figure 2 above) as well as check the target situation by
clicking on the INTELLIGENCE button in the Mission Folder. This latter
button brings up a dedicated target info panel which will give you
current intel and tell you how heavily defended your target is.
Part II
The previous page showed you my selection of targets for the first set
of missions. Yeh, I work my boys pretty hard, but they get the job
done!
One of the very cool features of MiG Alley is that not only do
you get to design this set of missions, you can then fly any one you
choose, in one of five aircraft! While there have been some complaints
that the flight modeling doesn't vary as much as one might expect
between, say, the F84 and F100, there are some differences and
certainly the basic characteristics are there.
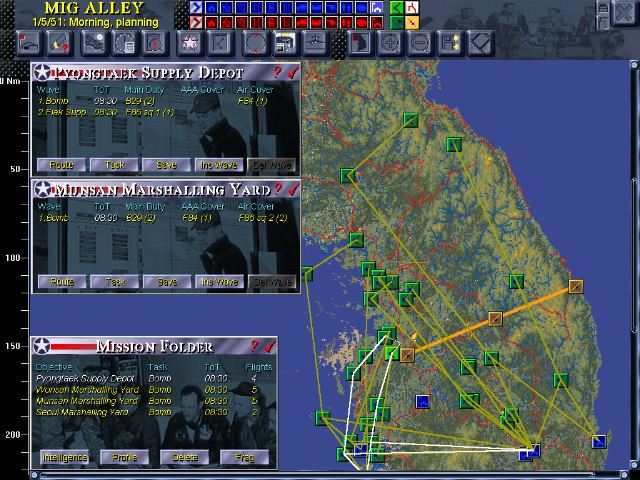
In the shot above you can see that one of the cool features of a
windowed planner is the ability to display a lot of information at the
same time. So, you can select each of your planned missions in turn and
bring up the mission info which shows each flight on the planned
package. No, you can't click a button that says "SHOW ME ALL PACKAGE
INFO," but you can bring these up one at a time for collective display.
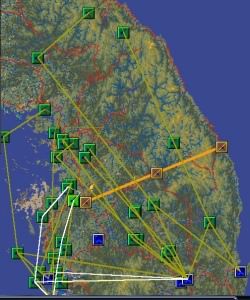
In the same way you can bring select ALL ROUTES as a map filter
from the four clustered icons at the right side of the map icons. If
you click on Figure 3 above you will see the larger image which shows
all the routes for the missions I planned.
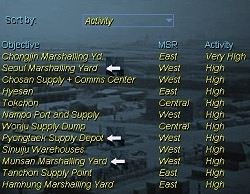
Figure 4
Now notice Figure 4 above. Instead of the usual sorting by area, you
can also choose to sort by ACTIVITY or CAPACITY from the drop down
list. This will save you considerable fussing about, though it would be
nice if the program would remember your choice of sort settings. No
matter, get on with it, we have a war to win.
I chose four targets
that were listed as HIGH activity and HIGH or VERY HIGH capacity. Two
of these targets were a half hour or less from my base, and the other
two were still much closer than the Yalu Road Bridge. Three were supply
dumps and one a choke point.
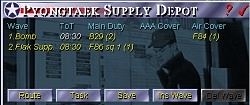
Profile Info Box
Clicking on the Profile Button in the Mission Folder box brings up
the Profile Info Box. Clicking on TASK at the bottom of the Profile
Info box brings up the ROUTE box.
Where the Mission Folder box allows you to delete an entire mission,
the Profile Info box allows you to interact with individual missions.
Clicking in the box on any one of the yellow flight info sections (like
F84 under Air Cover) is a quick shortcut to Tasking and allows you to
manipulate flight parameters.
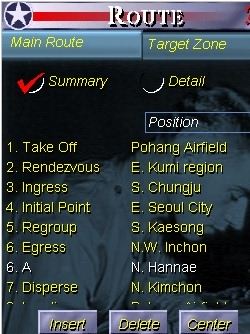
From here you can click on TASK to get down and dirty and add and
delete waypoints or manipulate the route itself. I didn't particularly
like the route to Munsan Marshalling Yard and decided it needed some
work.
The original route brought me back over numerous enemy air fields. I decided my B29s didn't need the aggravation.
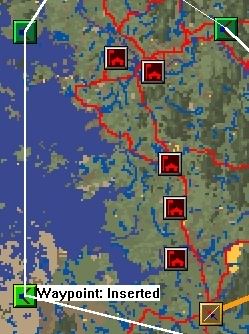
Part III
I clicked on Munsan in my Mission Folder box, then on Profile. Next I
clicked on a southerly egress waypoint, and then clicked on INSERT in
the ROUTE box.
The waypoint popped on to the screen and I then dragged it to a more
comfortable location. You may have a warning pop on screen at this
point about exceeding bingo fuel settings. Make a note to check your
settings and ignore it for now.
After inserting the waypoint I noticed that the waypoint desigation
for "6" was now doubled up. I'm not sure how this will affect the
flight since I didn't actually fly the mission whose waypoints I
altered.
Package Coordination?
Another consideration that struck me later was the need to
coordinate the various flights in the package. No worries, the planner
does this for you. When you insert a new waypoint or change the route,
the entire package is altered.
If you want to check the flight specific waypoints, click on the yellow
letters of the flight ID for the route you want to view in the Mission
Profile box (in this case the box labelled Munsan Marshalling Yard.)
If you have the Package Waypoints icon hilighted at the top of the map, you will see a new batch of waypoints, as below.
Finally, you can also transfer your squadrons according to your
preference via the Base dialog box. Under the name of the base on the
far left side is a small box with a list of the type of aircraft on
that base. Click on the small list box to drag a squadron to another
base in the Base dialog screen. The Base that you drag to has to have
an opening for aircraft, shown by a grayed-out icon to the right of the
base name.
Obviously, there are a host of strategic considerations that I haven't
covered. And sadly, you can do all this planning but you will have to
fly the mission as a solo human pilot unless Rowan releases a later
update to allow coop LAN play.
In spite of that, you can begin to get a feel for the depth of
this campaign. I haven't covered debriefs, target RECON and fatigue and
resource considerations. The manual won't be much help to you, though
the online help can be. Good hunting!


