
|
Wingman Mastery in Falcon 4.0
by Dave Pascoe |
||||
|
One method of exercising precise control is by standing off the target yourself and circling at a distance somewhere just beyond the IP. In other words, you play the Forward Air Controller while the wingmen do the shooting. In circling, you will alternately come into, and go out of target range. The idea is to choose a formation that will allow you to keep your wingmen in a good position to strike. For example, at the IP, I can order a close spread formation. As I come within range of the target, I designate it and order the second element, which is on my left, to strike. Once he acknowledges, I turn away to the right, keeping my wingman with me for cover. Switching radar to AA, I circle around and keep an eye out for interceptors. If there are any, I may have my wingman engage them.
 By the time I complete my circle, my second element should be about done with the first attack. They are out ahead of me so they can be seen as I come back on target heading. When finished, making sure that they do not extend too far, I order them to rejoin, or RTB. Why RTB? Because if you're going to make an attack, you don't want them coming along with you needlessly. When the attack is completed, then they can be called back from the RTB command. The objective here is to know where they are at ALL times. If my timing is good, I designate another target out ahead, order my own wingman (#2) to attack that one as the 2nd element is returning. As soon as he has dropped his load, I order him to rejoin. Thus, at all times I know where my wingmen are. Now, if there aren't swarms of AAA, SAMs and interceptors coming at me (which there usually isn't because I have already flown a dedicated recon and have prepped the target on a SEAD mission that will be discussed in Part Two), this process can be repeated all over again until all weapons are expended. Keeping an Eagle Eye All the while this is being done, I am keeping a close eye out for interceptors and SAMs. If the wingies are being threatened, they are called off immediately with "rejoin." One must be very careful that they are not going to extend or circle over a nearby air defense site. If the mission has to be aborted, there is always the option of hitting a second target, usually one which was planned at the outset. Barring that, one can always keep the flight with you to attack any target of opportunity on the way home, such as a couple of stray bombers or transports. Notice here that nothing has yet been said about the flight lead attacking the target himself. Employing this standoff method, the lead acts as a FAC (forward air controller), and control is what he does. If there is anything left to hit, the lead can then be the clean up man and go in himself. But if you need to do clean up, be sure that you are not dragging your flight with you to get shot at. Send them RTB and then recall them when finished; they will still return to the flight. |
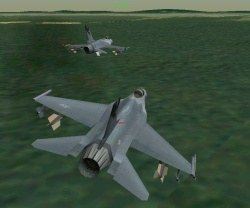
 Choosing targets. Notice the radar coverage circles. Targeting This is another critical element of success where you have to understand the limitation of your weapons: target spacing. Mavericks will work well on a stationary group of tanks, but when those very same tanks are rolling down a dusty road throwing up clouds of dust, the Maverick won't acquire! This sim is sufficiently well designed that it takes these seemingly minor details into account. Another example is that the Maverick will only lock on the sunny side of some buildings or other objeccts. If you order an attack on the shaded side, forget it. No joy. You'll find similar problems with laser guided weapons. The point is, don't underestimate the realism here. If your wingmen aren't performing well, it's probably your fault and you need to adjust your tactics. Alternate Methods The best method of attack is largely dependent on the target. For very hot targets, the FAC approach is not a good one. For hot targets, you need to get in and out fast. However, there is a problem with four aircraft hitting the same target. When you designate with a weapon, there's a big chance that they're all going to hit the same target. Or, if it's an electro/optical weapon, after the first explosion, the others aren't going to be able to lock on. It's best to avoid this situation and try to pick target groupings that are about 20 - 30 degrees apart so that all you have to do is swing your nose a short distance to get a lock-on. Close enough that you don't have to waste time turning from one to the other, but far enough that there is good target separation to prevent incindiary interference. Send the second element to one, taking the other yourself. In other words, you swing right, designate, and call the attack for the second element. Then you swing left, and call the attack by your #1 wingman. If you've got time, then pick yet another target for yourself. This is a good option when you want to extend beyond the target on your egress, rather than turning back 360, losing energy and exiting the way you came. It's very good for when you've snuck through a MiGCAP, and perhaps want to hit yet another target beyond the first. As soon as you have passed over the target, call your flight to rejoin and close up, then you can decide whether you want to try that again. Once the basics have been mastered, then you can become creative and test the limits of the sim. Sound mission planning is equally critical, and so is having good intel on the target. Just flying head-on into a heavily defended target is as suicidal in this sim as it is in real life, so don't do it. Fly a target recon, SEAD strike, or both to get a handle on what to expect in the way of defenses and reduce them. Go to Part IV
|
|||
|
Copyright © 1997 - 2000 COMBATSIM.COM, INC. All Rights Reserved. Last Updated September 27th, 1999 |
||||