
| Air to Air Refueling in Falcon 4
by Major Mark "Slarti" Collins, 187th VFW Avengers |
||||
|
In Close The tanker is set to give you instructions for corrections along all three axes: pitch (Vertical), roll (horizontal), and power (forward and backwards). You want to shoot for only having to make corrections for one axis (i.e. forward/backwards, IOW Speed.) if you can. If you have lined up properly during your ingress to the tanker you should be pretty much on target and just need to match speed. You may also have to make some minor corrections for roll, but if you find yourself having to do all three you're in for a rough ride. Once Im in close, believe it or not, I dont try and adjust my flight based on the lights underneath the tanker. I simply listen to the instructions from the "Boom Boss". As long as you're going just a little faster (1 to 3 kts) than the tanker, when the boom can reach you it should hook up (you'll know you have hooked up because the boom boss will say "Contact"). As soon as it hooks up, take your hands off the controls and enjoy the ride. Once you're full, the tanker will break away. Initial Lineup (See Fig 1 below...) This is just after you get into the refueling TE. We have already lined up with the tanker. A couple of things to note here. Notice where the horizon is with relation to the Tanker. Were not pointing our nose AT the tanker, were pointing our nose UNDERNEATH the tanker. Notice the position of the Flight Path Marker, centered under the tanker and parallel with the Horizon Line. If we line up correctly here it makes the job a whole lot easier .at this point were just under a mile away.
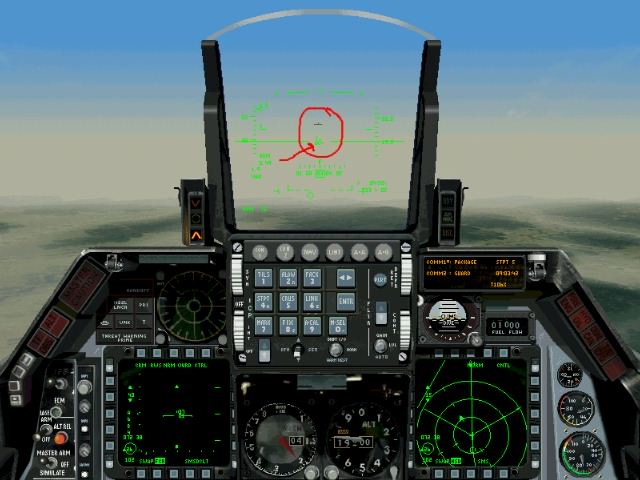 Figure 1. |
Overtaking the Tanker Now you want to overtake the tanker. Make your speed somewhere between 325 and 350. The urge is to close the distance really fast, but that can easily lead to an overshoot. At this point I have bumped the speed up but am cutting it back. Notice the digital display on the speed (circled in red ) and the cockpit view is in the up mode. Note: I am using an edited cockpit view. The stock cockpit view will not show you the Fuel Flow gauge (circled in red ) when looking thru the HUD View (this view is up one click from the normal cockpit view.) This is critical to be able to see this gauge as you overtake the tanker and especially when you close it. I use this gauge when Im close in much more then I use the Analog Air Speed Indicator. Again, note the position of the Flight Path Marker and the Horizon Line.
 Figure 2. Still Closing (See Figure 3) Here we are still closing. Notice again.. Air speed, Position of tanker in HUD, and Flight Path Marker and Horizon Line (All circled in red ). Air speed is still bleeding down. You can tell this by the Fuel Flow Gauge and the Digital Airspeed Indicator if you click to bring up the large image.
 Figure 3. Go to Part III
|
|||
|
Copyright © 1997 - 2000 COMBATSIM.COM, INC. All Rights Reserved. Last Updated August 30th, 1999 |
||||