
| Building Gorillas in Falcon 4.0
by David "Hunter" Proeber |
||||
|
Only after command and control facilities have been neutralized in a sneak attack would jamming commence. Jamming makes a distinct fingerprint on a radar operator's scope. His first response to jamming would be to get on the phone and call command that something's up. If you've cut the phone lines in stage one, he can't report our jamming efforts. Jamming also confuses local SAM batteries. In an effort to counter jamming, local radar operators may attempt to boost their signal to cut through jamming. It's at that point they become very open to SEAD strike. SEAD strike is the third stage of the mission. Typically, SEAD strikers are escorted by F-16s or F-15s. They usually must go across the FLOT to accomplish their mission. That can draw enemy aircraft into battle. The early air campaign in Desert Storm assumed air threats would rise out of certain airfields. Air superiority flights were timed to arrive in a pincer like move about the time Iraqi flights would takeoff to challenge our strikers. Only until these threats had been neutralized would you see F-16s employed in Desert Storm. Stage five Falcon gorillas typically contained up to 32 F-16s (carrying dumb Mk-82s) in the strike role, and an additional local CAP with 4-8 Phantom F-4s as local SEAD escort, 2 EF-111s providing jamming and another 4-8 F-15s providing top cover. (Note, as of today, all the USAF's F-4 Phantoms have been replaced by F-16s in the SEAD role) (Also, LGBs have reduced the number of strikers required to hit fixed targets). Creating a Gorilla in Falcon 4 There are two or three different ways to build packages in Falcon 4.0. A sample five-stage package, Gorilla One, can be downloaded here. To best understand how gorillas are constructed, open the TE mission with the edit button. Go to mission builder and left click on the map to display fighters, bombers, support and helicopters. Now, go to the ATO and click the display box for each unit. Return to the mission builder screen and advance the time in the upper right hand corner by clicking on the minutes and then holding the forward button down. As time advances, you'll see various flights takeoff and navigate their waypoints.
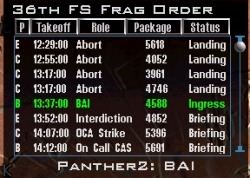 You'll see all five of the stages discussed above played out in Gorilla One. You can return to the TE mission selection screen and fly any of the SEAD, SEAD escort, OCA or deep strike missions. You'll notice that the last Deep Strike mission, (as opposed to the first) is filled with many A2A threats, now that the strikers have lost the element of surprise. |
 Building Your Custom Gorilla First off, ask yourself what you're trying to learn in flying a custom mission. Most often, I'm interested in evaluating how a particular target can be neutralized in the face of particular threats. No target worth destroying will go undefended. Your mission should begin by first creating the enemy's air defense system. If you're attacking across a FLOT, that may mean only putting in a few MANPADS and local AAA. If you're going downtown, you'll see coordinated use of SAMS, A2A and AAA. In Gorilla One, you are tasked with taking out two bridges in downtown P'Yongyang, similar to some of our missions over Serbia last summer. Turn on just Ground Units (battalion and air defense) in the mission builder and you'll see how SAM and AAA were placed to defend the bridges. You'll notice that I have placed some SA-2 and SA-3 units over the map's fixed DPRK SAM sites. This tends to make them a little more realistic and nasty, as well. AAA is used as point defense at the bridge itself. Strategic enemy airfields are next populated with squadrons of Su-27s, MiG-29s and MiG-21s. In Gorilla One you will see that some flights are always on BARCAP guarding the skies around the capitol on an hour by hour schedule. (And you thought Falcon's campaigns were tough!) 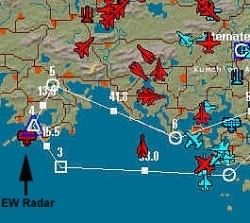 Next, evaluate your threats. This information is typically gathered by E-3s, JSTARS, EC-130 Compass Call and satellite. You can look at the map. But how do you go about defeating a target within a ring of seven SA2 sites? Again, that's where our five stages of the ATO come to play. It's unreasonable to expect any one aspect of the plan to defeat an entire defensive array. You'll have to schedule multiple flights and time those flights to arrive at the correct moment. Go to Part III
|
|||
|
Copyright © 1997 - 2000 COMBATSIM.COM, INC. All Rights Reserved. Last Updated September 22nd, 1999 |
||||