Falcon 4.0: Force on Force
By Tom "Saint" LaunderPage 1
When I first started beta testing Falcon 4.0 in the latter part of 1998, I remember having a dream of being more than just a pilot in the war. I wanted the ability to control my squadron's flights and even the ability to control the flights of other squadrons throughout the war. While that ability never materialized in the campaign module, it did appear in the tactical engagement (TE) module.My goal with this article is to introduce you to a different way of playing Falcon 4.0. Perhaps you have heard of the term "force on force" before, but many probably have not. For this article, I'm going to borrow some terminology that I learned from my testing with the I-beta team. I first learned of this concept through my association with Glenn "Sleepdoc" Kletzky. There were three terms we used to describe the different ways to play using the TE module.
- 1. Force on Force AI (a minimum of two teams whose missions were all previously scripted before playing)
- 2. Force on Force Prescripted (a minimum of two teams but only one side's missions were previously scripted)
- 3. Force on Force Chess (a minimum of two teams but neither team has previously scripted missions)
These names were helpful in giving us a way to refer to the type of play possible and in working on reporting bugs. What most of you who play F4 are familiar with is number one above. Force on Force AI refers to your standard TE mission where you have missions previously set for both the US and DPRK forces. When you load the TE mission, you'll see these missions in the mission schedule and you pick which one you want to fly. While this is a great way to enjoy F4, there is yet another.
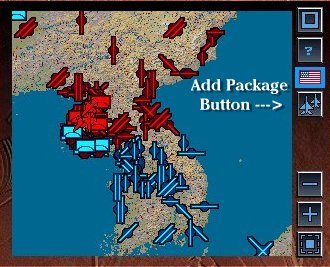
With types two and three, a human player is required to make missions while theTE mission is loaded and running. This is where the fun really begins! There is a little known feature in the TE module that makes this all possible. This all happens through the "add package" button that appears next to your map.
With this feature, you are given the ability to make missions from whatever squadrons that are previously set in the mission world. Imagine starting up a TE mission and then seeing a blank mission schedule. Imagine then that you are going to determine all the flights for your side. Not only this, but then you can choose which F-16 mission from the ones you made that you will enter into the sim with and fly. You can then come back out and make another set of missions to continue further in accomplishing your goal.
The BasicsIf this sounds exciting to you, then you will need to learn some of the basics as to how this is done. What follows from here is a description on how to go about actually doing what was described above. We'll look at the basics of how this is done, how to fly it online, some tips for template making and various strategies for better play.
Minimum RequirementsIn order for you to begin to play in the manner described above, you first have to have a TE mission that is set up as a template. If you don't know how to make a basic TE mission please refer to page 11-5 in the F4 manual.
- 1. Two teams (defaults in TE are DPRK "Red" and USA "Blue)
- 2. One F-16 squadron (you'll need one on DPRK and one on USA if you plan on flying Force on Force Chess)
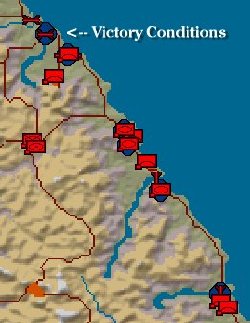
- 3. Victory conditions (points awarded for each target objective)
- 4. Victory points (overall points needed to win the scenario)
What you have done with these basics is set up a template. From this point you are free to add other elements like ground forces, but what is listed above serves as the minimum requirements. The placing of an F-16 squadron(s) gives you the ability to make flights that you the player will fly. If you go on to add other squadrons (F-15, F-14, B-1B, etc.) to the template then these squadrons will also be available for you to task for additional missions in the sim world.
One other decision you will make during template design is whether you plan on making this a Force on Force Prescripted or a Force on Force Chess type mission. Because there are limitations with online play (which will be described later) I prefer to make and to fly the prescripted type missions. What is different about the prescripted mission is that I prescript all of the DPRK missions in the template for the time period covered and the objectives, but I leave the USA team empty which then allows for making the missions while playing. I have at times prescripted some missions for the USA team as well, but I normally relegate USA team prescripting to atmosphere type flights (Refuellers, AWACS, Cargo). If you were to design a Force on Force Chess type template, you would place the squadrons for both sides, but not script any missions. The limitation to chess play is that it cannot be flown offline by the player. Since both sides need mission making, this has to be done while online.
Now that the template has been made, it's time to load the TE mission and begin to make missions. For this example, I'm going to assume you are flying a Force on Force Prescripted mission (though the steps are the same for each). The DPRK side has already been scripted to cover the time and objectives and now you have loaded the mission and are looking at a blank mission schedule. At first, staring at a blank mission schedule might seem overwhelming, but it's not. Here is what you need to do. I'm going to use an example of making on OCA strike mission on an airbase.
1. Turn on the map icons. First step is to get your map to display the icons you need. When playing any type of Force on Force mission, you will want to make sure that all the types of aircraft icons will appear, that the target icons will appear (depending on what is listed in the victory conditions), and that ground force icons will appear. You should also display victory conditions which will then put a blue or reddish brown circle around all victory condition objects
One problem with the victory condition circles is that they can interfere with your clicking on the object which they surround. This will then cause a different target to show up then the one you selected. I suggest you turn them off before proceeding with the following steps. Turn them on to see the target, then turn them off to continue on. To be able to target the airbase, you should highlight "airfields."
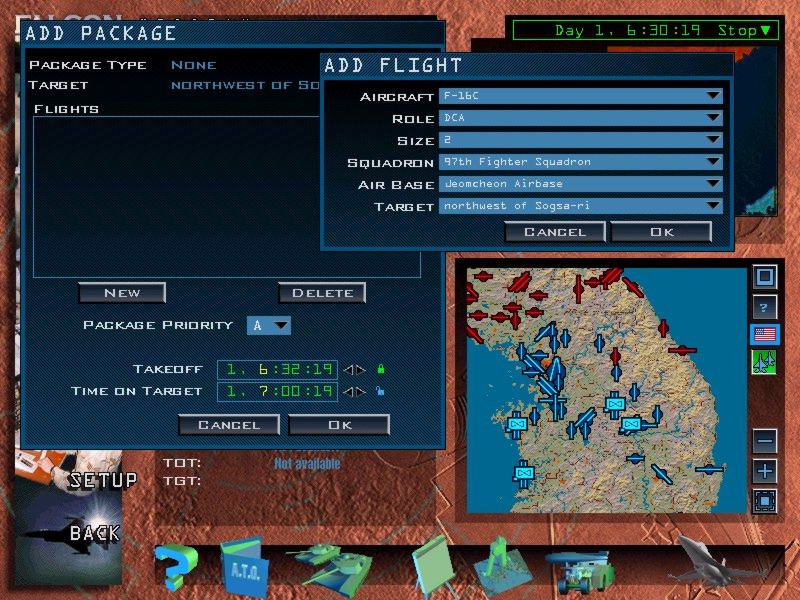
2. Click on the "Add Package" icon on the right of the map. It will depress and turn green when highlighted.
3. Left click on the map the airbase you are going to strike. This will bring up the "Add Package" user interface (UI).
4. Lock "Takeoff." This is an important step. The way to lock the takeoff time is to click on the little padlock next to the time display. When you click on it, it will go from blue "unlocked" to green "locked." You want to set and lock your time of takeoff otherwise you can run into a few problems. The first problem is that a mission with a 9:30 time on target might then have a 9:18 takeoff time. This means that if you are online, you will have to wait eighteen minutes to get into that flight. You want flights leaving ASAP from the time the scenario begins. The second problem is that people can cheat. If the time of takeoff is not locked and set for a time after the scenario begins, you can set a time on target to one minute after the scenario start time and thus have jets appear in the air over you the target.
© 1997 - 2000 COMBATSIM.COM, Inc. All Rights Reserved.