| |
As I read on into chapter eighteen, I had to concede that Bonanni's discussion of air to air engagement, proceeding from a discussion of the Weapon Engagement Zone (WEZ) and the control position, was excellent and would benefit any novice as well as some more experienced virtual pilots. For the curious, this section proceeds as follows: (pages 217-239)
ATTACK GEOMETRY
- The Pursuit Course
- Attack Geometry In-Plane with the Bandit
- Attack Geometry Out of Plane with the Bandit
- Reasons for a Pursuit Course
- Weapons Engagement Zone
OFFENSIVE BFM
- The Classical Control Position
- Offensive BFM Overview
- Lag BFM
- Turn Circle Entry
- Offset Turn Circles
- RATE BFM
- Offensive BFM Mechanics
- Turning Room
- Horizontal Turning Room
- Vertical Turning Room
- Assessing the Bandit's Performance
- Nailing the Coffin Shut
- Offensive BFM Summary
The next section, Defensive BFM, continues from pages 240-256. This discussion is also excellent! Chapter nineteen then continues with ten pages of discussion on the Intercept.
This introduction sounds promising:
What happens when you are winchester AMRAAMs (after you've fired all of your AIM-120x) and there's another MiG between you and the border? You must rely on your basic intercept skills to get your AIM-9 Sidewinders and 20mm cannon to the fight. Or what about when you need to intercept and rejoin on the tanker to fuel up? Even today, basic intercept skills must become second nature for the fighter pilot. Every aspect of the mission requires understanding the concept of intercept basics.

RWS Situation Awareness Mode
The previous chapter covered the building blocks of aerial combat - basic fighter maneuvers. This chapter describes the maneuvers you'll need to get yourself to the fight - the intercept. To be a successful (and lethal) Falcon pilot, you must understand concepts like aspect angle (AA), antenna train angle (ATA), collision antenna train angle (CATA), offset, turning room (TR), and conversion turns.
Hmm. CATA and conversion turns. This sounds interesting. It doesn't get us the info I was hoping to find on the transition from a BVR engagement to ACM, but I don't recall reading anything on CATA in the F4 manual. In fact, a quick look at the glossary of the manual supplied with the game will confirm that there is no mention of such.
Click to continue
|
|

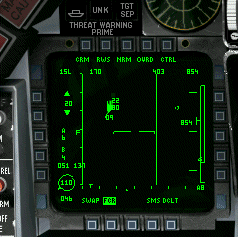
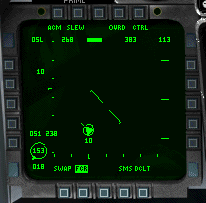
Falcon 4 ACM. Note NCTR bar.
So just what is CATA and why is it so important? Here is Pete Bonanni :
What heading will put you on a collision course with the target? By flying this course you will offset the bandit at a certain angle from your nose at a specific angle of attack, called the Collision antenna train angle, or CATA. This will be your direct path to merge with the bandit...
How do you find this angle? As you might guess, the F16 finds it for you. Whenever you lock a bandit on radar a "steering cross" is displayed on the radar MFD which represents the F16s calculation for a CATA, taking into account the target's current airspeed and heading. Turning to center the cross in the middle of the MFD will put the target "on the CATA."
Helpful, isn't it? The particular question I had in mind was not addressed, but many a pilot will take the lessons and information presented in this Guide and begin to learn or improve their knowledge of the dynamics of fighter maneuvers.
Another area that is better handled by Bonanni than by the manual supplied with the sim is NCTR. Basically, when you lock a target in Single target track a small green bar will appear in the center of the top of the RADAR MFD. It originates in the center and extends out to either the left or right. The more it extends to the left, the more likely that you have an enemy contact. The more it extends to the right, the more likely your contact is a friendly.
This is extremely useful in dog fighting when you are in BORESIGHT mode and lock up a target within 5 miles. At short ranges the NCTR has a high degree of certainty and can tell you instantly if your contact is friend or foe. When in padlock, you can see the NCTR bar clearly in the MFD.
My overall impression of the Prima Guide remains the same. This is a well written and well organized guide, containing excellent shots and illustrations, by someone who knows the subject matter intimately. I would recommend it to novices or to anyone who has found the manual supplied with the simulation to be too complex or too scattered in structure.
However, more accomplished virtual pilots may find that the Guide is too repetitive, covering already familiar territory with only a few exceptions. I suggest finding a copy you can peruse for a moment before making your decision.
|
|


