| Environmental Bump Mapping
by Matrox Graphics |
||||
|
Adding Bumps to 3D Objects In its simplest form, bump mapping adds realism to textures and objects by creating the illusion of bumps, or variations in surface depth, on an otherwise flat surface. This means that a flat plane can be transformed into the dimpled surface of a golf ball, the gnarled bark of a tree or the rough surface of a rock. For bump mapping to be convincing, the eye must perceive variations in surface depth even though the surface really is flat. The viewer's perception of depth is influenced by the amount of light reflected into the eyes by the surface being looked at, and the amount of light reflected in any given direction depends on the surface reflecting it. A smooth, level surface will reflect more light than a bumpy one. Likewise, a surface that is perpendicular to the viewer's line of vision will reflect more light than one that is not directly facing the viewer. Consider the situation in figure 2. A flat surface (2a) directly facing the viewer reflects more light back into the viewer's eyes than the bumpy surface does. The viewer perceives all areas of the surface as being of equal brightness and consequently, completely flat. However, the bumpy surface (2b) reflects less light back into the viewer's eyes because all areas of that surface are not directly facing the viewer. The part of the bump that is directly in the viewer's line of vision appears brighter than the parts that are not - meaning that the sides of the bump appear darker, and may also cast shadows.
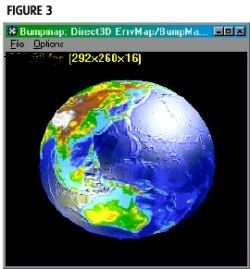
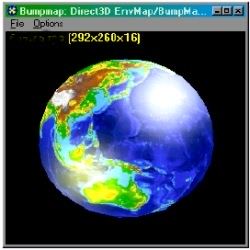
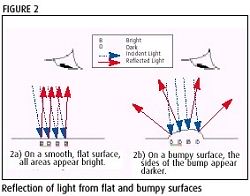 Reflection of light from flat and bumpy surfaces. In 3D graphics, the illusion of bumps relies solely on color, lighting and shading. The lighting/shading effect is easily achieved by modifying the color of each of the texels, or textured pixels, being drawn on the screen. Using a predetermined algorithm, the color of each texel is modified to represent the amount of light that would be reflected from any given point on a bumpy surface. This depends on the angle of the light source relative to the angle of the surface at the point of reflection. In figure 3, the different altitudes of the Earth's surface are made obvious by the variation in lighting. Areas that are brighter are directly facing the light. Other areas are made darker either because they do not face the light source, or because they lie in the shadow of more elevated areas. Either way, the areas that are darker receive less light. Bump mapping uses lighting and shading effects on the texture to create the appearance of surface depth, but the variation in surface depth is really just an optical illusion. Figure 3 is a good example of this. Although the surface of the 3D model on the left appears jagged and in relief, its outer edge is not marked by bumps. To create the illusion of bump mapping, the only thing that has been modified is the color of the texture on the surface of the sphere on the right. |
To create this effect, all areas of the surface must be specified as either elevated or sunken. To do this, a second texture or "bump map" is required to define 2depth or height for every pixel in the conventional texture map. In the simplest case, this bump map would be a monochrome intensity map with brighter shades representing the more elevated areas and the darker shades representing the lower areas. A gradual change in intensities represents a moderate slope, and a sudden change in intensities represents an abrupt change in depth. Alternatively, the bump map could be called a height map. To complete the effect, an "environment map" is required. The environment map represents what should be reflected off the surface. It can be as simple as a bright circle representing a single light source or a complex environment map consisting of multiple light sources and effects due to other environmental factors such as clouds and shadows. Multi-pass Alpha-blending and Its Limitations Some existing 3D hardware can simulate one bump mapping effect known as �embossing� with multiple alpha-blending passes. However, this is a per-polygon technique which produces artifacts, is limited to monochrome lighting and is unable to simulate any of the more interesting environmental effects. Embossing with multiple alpha- blending passes is accomplished when a monochrome version of the conventional texture map is shifted in one direction, subtracted from the original texture, shifted back, and then blended into the original texture map. This gives the illusion of shadow on one side and bright light on the other. The direction and amount of shift is determined by the direction and intensity of the light source. Go to Page Three
|
|||
|
Copyright © 1997 - 2000 COMBATSIM.COM, INC. All Rights Reserved. Last Updated May 26th, 1999 |
||||