|
Programming with Saitek Gaming Extensions: Part Two
Kurt "Froglips" Giesselman |
||||
|
The "0" position might be useful for commands like centering views but remember that the X36 will send the command assigned to this position constantly whenever the hat is centered. This constant input can literally bring a program to a grinding halt. Be careful how you use these "Default" positions. If you set one up and your program begins acting strange, suspect either a default hat position, a rotary, or a 3-way switch is sending a constant string of commands. I have programmed the pinkie shifted "0" position in hat 1 to center my view in one flight simulation but am still not convinced I like the setup. It occasionally resets my view at the most awkward times.
The buttons to the right of the commands provide access to the command editor just like in the button programming mode. You can select "New Command" just as before to add additional commands on the fly. You must press "OK" or "Apply" after completing the new command and before attempting to edit via the command editor or the software reverts to the previous command (bug or feature?).
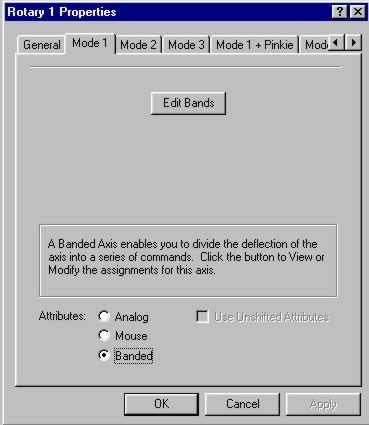
 Fig. 4. Rotary Properties
The rotary is a powerful feature of the new Saitek USB HOTAS and very different from the rotaries in the old Saitek analog X36. The rotary now has three possible configurations, Analog, Mouse, and Banded. The Analog mode makes use of two additional axis available to a USB game controller. These axis can be used to control the twin engines of a jet (such as in Flanker 2.0, DI's Super Hornet, Jane's F/A-18E). This does not work as well as a split throttle like Suncom's but you may want to try it out yourself. The rotaries, like the stick (X and Y axis), throttle, and rudder, may only be assigned to specific axis (5 and 6 for the rotaries), unlike the hats that can be programmed to any axis. I have yet to find any games that can really make use of all six axis. As USB setups become more and more common, I believe that game designers will find uses for more than the standard four axis. Until then it is a feature looking for an application. If you find one please drop me a line.
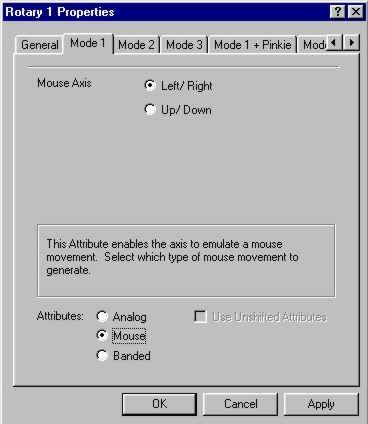 Fig. 5. Rotary Mode: Mouse
The Mouse mode maps the rotaries as the X and Y axis of your mouse. I have tried this mode in clickable cockpits like DI's Super Hornet, Falcon 4.0, and Jane's F/A-18E. It works as advertised but frankly the mouse hat in combination with the mouse button on the throttle is much easier to use that trying to scroll the two rotaries. However, if all 18 modes on your four hats are occupied with other commands then try this as a mouse control that keeps your hands on the HOTAS.
|
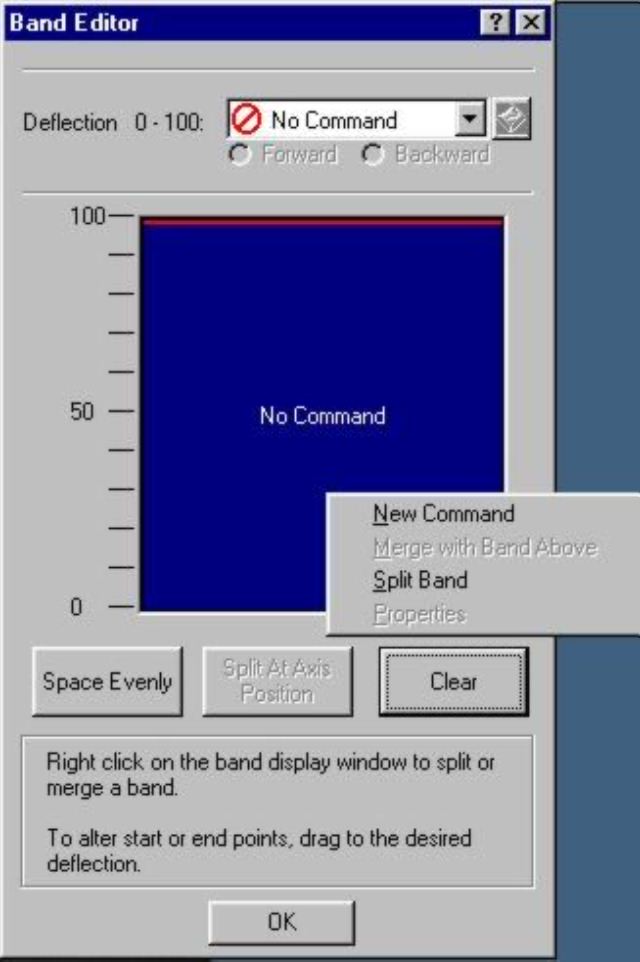
The Banded mode will probably be programmed most often and it is very flexible. For all you Saitek X36 analog users it is important to understand that this mode is very different from the old increment/decrement mode. This mode allows any number of commands to be programmed into discrete bands on the rotary. There is only a one detent centering each rotary so you could have trouble finding a specific command if you program twenty bands. Generally, about five commands, including a mandatory 'No Command' band is the maximum you can find reliably. A very important difference between the analog X36 rotaries and the digital rotaries is the Banded mode senses the position of the rotary at ALL times. The old analog stick only sensed motion in the increment/decrement mode. This was particularly useful for adjusting things like zoom in and out, or radar range. Make no mistake it had several irritating problems (like cycling rapidly between increment and decrement when left on the detent). The new Banded mode sends a command when you move into a programmed band. It will always send the programmed command when in the assigned band. To set up the Banded mode, adjust both rotaries on the throttle to full range.
Click on Edit Bands. Right click on the blank blue section of the Band Editor. Select Split Band. Repeat the right click, Split Bands procedure to separate into an odd number of bands (3, 5, 7, etc.). Then click on Space Evenly to organize the bands into equal sizes. You can manually change the size of the bands if you choose.
|
|||
|
Copyright © 1997 - 2000 COMBATSIM.COM, INC. All Rights Reserved. |
||||