| Air Combat Maneuvering, What, Why and How. Part III of III By Bill "Tasty12" Castello |
||||
|
Part III - Defensive ACMObviously, the best situation is to not be defensive, but these situations will occur. Good preventive measures to avoid the defensive maneuvers are simple:
There are four basic priorities to think about for survival in a defensive situation:
When the flight is defensive the obvious concern is survival, negating the bandit's initial attack. Fractions of a second are critical, the flight must have pre-planned maneuvers that are well understood and thoroughly practiced. These maneuvers, are by nature, defensive BFM (defensive turns). Once the initial attack is negated, the flight must now concern itself with killing the bandit or separating. The engaged fighter must fly his best BFM and be liberal with the chaff/flares. If separation cannot be achieved, the bandit needs to be sandwiched and killed. Here is where mutual support and the role of the SF/EF are critical. Normally the roles are established by the bandit, but if both fighters are tally and blind, lead needs to establish roles and tactics. Flight path deconfliction is achieved by giving references off the bandit, and knowing, through practice, what the flight is going to do. When the bandit is located, it's time to split the element, either laterally or vertically, depending on the bandit. Increase airspeed and perform either a break turn or hard turn into the bandit. Break turn if the bandit is in a WEZ, hard turn otherwise to maintain energy. If you're unsure, call the break turn, better to be safe than sorry and create maximum BFM problems for the bandit. <That's from Lt. Col. Bonanni > The key here is to defend yourself and not give the bandit an easy shot on your buddy. Use your best BFM and know that your buddy is out there, but never count on him to come help you survive. He may be BFM'ing a missile So here goes, the initial maneuvering starts Initial maneuvers when defensive The initial move in defensive ACM is the key to survival. These moves need to be part of the ACM contract that both flight members know by heart. PRACTICE! The goal of the moves should be to keep your cone of vulnerability away from the bandit (i.e., your tail feathers; those hot, blind tail feathers). The main principles here are easy:
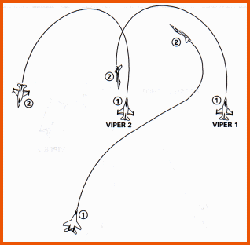
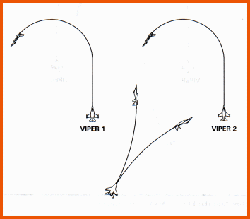
A quick note on defensive maneuvering. Remember to put that switch to dogfight and use a short range ACM mode (Boresight or 10 x 40). Remember you don't need a lock for the AIM-9, get a tone and shoot, especially if the bandit is employing ordnance against your buddy. Defensive Maneuvering for the Flight Depending on where the bandit shows up, there are manuevers you can use to maintain your 2 ship advantage against the bandit. These maneuvers depend on when and where you detect the bandit. There is no hard and fast rule (as in all of air combat) or formula to tell you when to do what. The maneuvers, as presented, should be practiced and used when the time is 'right'. Sandwich If a bandit shows up in your six, and presses his initial attack against the EF, a sandwich may become possible. This is almost always limited to those times when the bandit is unaware of the SF or simply not reacting to him. As the EF does his break turn, the SF can delay his turn a moment to let the bandit commit to his turn also, the SF then turns into the bandit and lets the EF pull the bandit into his WEZ. NOTE: Never, ever do or ask the EF to do something that you wouldn't do. We don't sacrifice the EF for a kill. The EF will be BFM'ing his butt off, and the SF's role here is to react and employ weapons. Early or Late Switching The early or late switch is available when the bandit is aware of both fighters. Switching is communicated as soon as possible so that roles can be established. Both switches accomplish the same thing, but the difference between them is the location of the bandit. If he is in the EF's turn circle (TC) then it is a late switch. If the bandit is outside the TC, then an early switch is possible. See figures 4 and 5. Figure 4 - Early switch (Bandit starts outside the TC) An early switch allows the EF to start a constant rate turn defense or an extension, depending on the bandit's BFM. This allows him to back off the turn to preserve energy and keep a tally on the bandit all while keeping his tail rotated away from the bandit. All the while, the SF is maneuvering for an entry into the fight, or weapon employment opportunities.
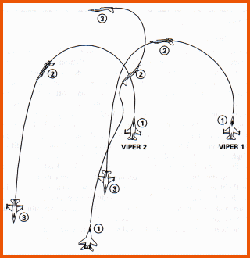
Figure 5 - Late switch (Bandit starts inside the TC) A late switch gives the SF the chance for a high-aspect pass at the bandit and maybe even the flight with an extension opportunity; again, depending on the bandit's BFM. If the extension opportunity is there, the SF needs to communicate that to the EF. As the bandit turns to point his nose at the flight, his ordnance capability needs to be assessed, extension may not be a viable option.
Same side break or Cross turn? When the bandit's cannot be clearly judged, the same-side break or cross turn become options for your flight. The idea behind these two maneuvers is to:
|
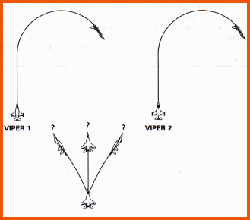
The same-side break is preferred if A) the bandit is detected outside of WEZ or B) has not yet entered into either fighter's TC. Figure 6 shows the same side break. Figure 6 - Same-side break turn The advantages of the same-side break are:
The disadvantages are;
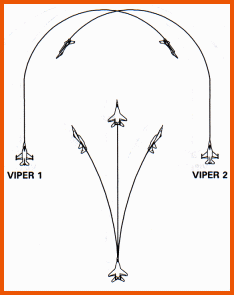
The cross turn is not the best of maneuvers, but is effective if the bandit is detected inside your turn circle where he can maximize his offensive capability on one fighter. This maneuver has many disadvantages, but can be used to 'fluster' the bandit into committing himself to a turning engagement with one fighter. Your flight's abilities here are minimized, but if you have superior equipment (or ROE), it can be used. See figure 7. Figure 7 - Cross turn / Hard to six turn The advantage here is:
The drawbacks are numerous:
All of these maneuvers assumed the bandit was deep six to your flight at detection. If the bandit is asymmetric (figure 8), the solutions remain the same, but the identification of the EF is easier to realize, the most threatened fighter will normally become the EF. If the bandit disregards this, your BFM problems just became worlds easier and a kill is soon to come. Figure 8 - Asymmetric bandit (shown with flight doing a same-side break)
Re-entry Re-entry to the fight is the responsibility of the SF. As in the offensive ACM, the SF has maintained the tally on the fight and is maneuvering all the time for an entry. When defensive, the need to clear the EF is gone, since he is defensive. As such, the separation for defensive maneuvering is lowered to about 1NM. Keep an eye on the fight and see how it develops. If the fight is dragged into a scissors, be prepared to enter the scissors, but try not to get dragged into the same slow speed maneuvering. Your goal as the SF is to employ weapons and/or be the EF's eye to a separation chance. If you see a window open for the EF, tell him, but do not expect him to take it. He is BFM'ing and may not be ready, willing or able to do it. The entry to the fight is either co-flow or counter flow and handled just as in offensive ACM, since you are basically offensive as the SF. Your weapon of choice is the AIM-9, but be sure that you can fire it without involving the EF in any defensive maneuvering. The role of the SF is basically the same as in offensive ACM:
Conclusion In this article, I have discussed some real-world Air Combat maneuvering principles as they can be applied to flight simulations. Communication, no matter how you do it, is paramount to your survival in the hostile skies. Some folks wonder why 'flight path deconfliction' was stressed so heavily. Well, in the real world, it is a major concern, and in any flight sim worth its salt, it is represented. If you hit your buddy while maneuvering, the bandit gets two kills and a great laugh. There are some ideas presented here that are new to a lot of people, but I'd ask you to try these things out in the virtual skies with your buddies. You'll see that with practice, the application becomes easier and the usefulness becomes evident. I was asked while this article was in preparation, what about 2 versus 2? Your article deals mostly with 2 v 1? True, but if you think about it, a 2 v 2 fight will boil itself down to one of two things, either two 1 v 1 BFM fights or a 2 v 2, where you still need the role of EF and SF. Chances are the bandits will be in their roles as EF and SF, but if they are not supporting each other, you have a bright future ahead, with two kills coming. Remember Top Gun? Maverick disregarded his wingman to split off the fight and go after the bandit's SF whereon the bandit converted and split his skull. Trust me, this stuff works, otherwise the USAF wouldn't teach it and preach it. Cheers and Check six! See you in the skies, till then, I'm a dot . E-mail comments to: [email protected]
|
|||
|
© COMBATSIM.COM, INC. All Rights Reserved. Last Updated January 22, 1999 |
||||

