
| Air Combat Maneuvering, What, Why and How. Part II of III By Bill "Tasty12" Castello |
||||
|
Part II - Offensive ACMPart one of this article discussed the basics of ACM, how to communicate, how to determine your role in the fight and what to do if you had to change roles. Now we'll start to focus in a little on the offensive and defensive choices that you have. A great deal of this section will deal with what the supporting fighter (SF) does as opposed to the engaged fighter (EF). Naturally the engaged fighter is going to be BFM'ing his butt off to get the kill or avoid letting the bandit get into a WEZ. The SF has to work in concert with the EF to make the plan work out successfully. We all remember the quote from days gone by: no matter how many kills you got, if you come home without your wingman, you've lost. So, there you are, your wingie is with you and you have a spike on a bandit. You plan the perfect merge and everything works. It's time to end the intercept phase and get into the 'kill the bad guy' phase. How do you know when this happens? Easy, the intercept is over when you start visually maneuvering on the bandit. This obviously assumes that due to ROE or other factors you were unable to BVR kill the bandit. (We'd almost always like to BVR kill the bandit, no BFM required :) So, here we move into the maneuver portion of the wide world of ACM…
Offensive ManeuveringIt is imperative that roles in this fight get established immediately. Flight lead should say his intentions and get the ball rolling right off. "Dusty 1, engaged, nose, 3 miles" <anchors the flight and tells 2 he is the SF for now> or if 2 is in a better position, or as previously briefed (in the soft chairs back at ops…) "Dusty 1, 2 cleared to engage, nose 3 miles, press" <anchors the flight, tells 2 that he is EF> The EF's job now is simple, he BFMs the bandit to his WEZ and gets the kill. If EF's attack is negated, he still needs to keep the bandit defensive. If EF goes neutral or worse, defensive, get on the horn and tell the SF immediately, The SF now has all that work that we talked about in part one to do. He has to do all those things at once now. (Time sharing and task priority comes up big now.) To set up the support for the fight, the SF needs to 'blow through' the fight and extend as quickly as possible. Here is a chance to sanitize the area as soon as you start to extend away.
Things to Remember!
NEVER place yourself, as the SF, in a position where the bandit could get a shot at you, even a snap shot. While this seems obvious, it's more difficult than you might think. Some other areas to avoid as the SF are;
Why? If you're above or below the fight, you have to keep your attention on the fight and you can't clear the area (sanitizing) and do all the other duties you have to do. If you are within 2NM you are in the bandit's snapshot WEZ and may just give him a freebie. Even if he just lobs a missile at you, it forces you to fight the missile and drop your SF role. The bandit effectively negated your support.
BreaksBlowing through the fight at the start of the 'BFM' phase of the fight is usually pretty easy. Depending on what the bandit does, your choices as the SF are cut and dried. If the bandit breaks away from the fight, your options here is simple, check off the fight 30° , blower on to 450 knots and establish your separation from the fight. See figure 1 where Viper 2 is the SF.
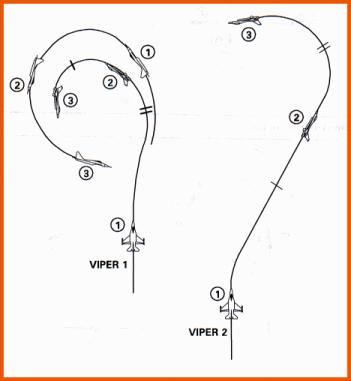 Figure 1 - Bandit breaks away from the fight If the bandit breaks into the fight, you have 3 choices, depending on the situation and the plan. You can do a straight ahead extension, lag the fight or pull the bracket. To do the straight ahead, keep the bandit at very high aspect with BFM, hopefully achieving a head on pass, from which you will simply continue the extension until you establish your position of advantage on the fight. The advantage here is that you can unload and gain knots while the bandit is eating up energy in his defensive BFM against the EF. See figure 2.
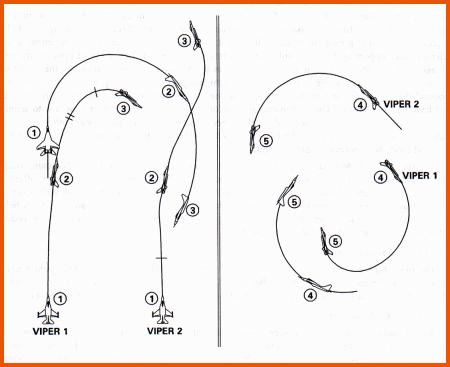 Figure 2 - Straight Ahead Extension Lagging the fight is more difficult but gives you a few advantages. It should only be used against an inferior opponent. You'll need a high airspeed, so use the blower as needed, maintain that 450 knot speed. What you'll do is lag your EF through the first part of his turn to the bandit, and then split plane the fight in the opposite direction. You'll end up turning in the same direction as the fight (ready for a co-flow entry) and you'll clear the EF's six visually as you turn. Resist the temptation to stay with the turn and 'be a part of the fight'. Your job is to get outside the fight and support. To bracket the fight, you'll do basically the same as if the bandit had broken away. You'll check turn away from the fight, but you'll also have to go vertical to get your separation. When done, you'll have the bandit between you and the EF. As the bandit's nose rotates through you (you'll see his apparent turn rate get a lot faster) you are then outside the fight and ready to start the support role. You'll be in a good place for an opportunity shot or an exchange here. You must do the vertical move, because if you stay in plane with the bandit, you will offer him a snapshot and maybe go defensive yourself. Figure 3 shows a bracket maneuver forming.
 Figure 3 - Forming the bracket Keep in mind that these breaks cover only the first 'reaction' moves on your part as the fight begins. Whatever you do, remember YOU are responsible for flight path deconfliction (don't hit the EF). |
How to Support the FightThe best place to put the fight is at your left 10 o'clock or right 2 o'clock, depending on your break in direction. Keep your speed up in the 400-450 knot range and keep the sight. You can do this easily (hopefully) by turning to keep the fight visual, then rolling out wings level a few seconds, then pull back into the fight. Use the blower if needed to keep your energy up and always be looking for the fight entry and the egress route. What you want to do, in the best case, is fly straight lines and check turns, keeping the fight 2-3 miles away and 3-4000 feet above/below you. This range and altitude split will allow you to keep the area sanitized, and gives you maneuvering room (remember that from BFM school?) to give you the shot or role change. If you do this, you'll keep those hot feathers in the back from attracting any of the bandit's heat seekers and turning you defensive. Never let the bandit's extended 3/9 line get past you, it never should since you have the time and the sight to prevent this. If need be, break turn into the fight to keep your advantage in position. All this time, your radar should be in ACM slewable while you are playing with the antennae elevation to sanitize the area around the fight. There may be a time when the bandit, because of lack of SA or desperation may stop defending against the EF, stop his fight and turn to you. Watch his nose, it will telegraph his intentions. If you have to, use the dist/alt split you maintained to negate any shot he makes. Your position and energy advantage should guarantee your success. At this point, you must BFM to deny him his WEZ. His extension toward you should provide the EF with a shot opportunity.
Fight EntriesOk, life is good, the EF is BFMing the bandit and you're in a great support position. The fight's going as briefed. Then you hear on the radio that EF is neutral, he can't convert the fight into a kill, or worse, EF just went defensive. Time to go into the fight and help out the EF. There are two types of entries into a fight, either a move in the vertical or a move from outside the turn circle (TC) of the bandit. The outside moves are defined by whether your turn will be with the turn of the fight (Co-Flow) or against the turn of the fight (Counter Flow). Keep in mind that the entry you pick also determines the BFM you will be doing, so be ready to accept your choices. Vertical entries are easy, simply pull yourself into the bandit and maneuver for the shot (If cleared by the EF) or simply be ready to become the EF. Be ready to take the opportunity shot if cleared and necessary. Your energy should be better than the bandits, but don't squander that advantage. Entries from below are difficult, the fight is probably already going downhill and that's denying you turning room. All vertical entries are fleeting and have to be very accurately timed to work. Depending on the Co or Counter flow position you are in, you will have several choices to make on entry to the fight on the same plane. When it's time to enter the fight, you'll be able to keep behind the bandit's 3/9 line and keep the fight on your 10/2 o'clock. If you are Counter-flow to the fight, remember that the bandit will cross through your position (and hopefully in your WEZ) more quickly and often than if you are co-flow. If you are co-flow on the entry, remember you have the energy advantage over the bandit (or should) so getting to WEZ should be easier. As you look at your entry opportunities, remember to NEVER put your nose on the fight unless you are taking a shot. You are not the EF yet, your just maneuvering to either become the EF or take the Opportunity Shot As you look for entries, remember to keep sanitizing and checking your own 6. Until you are called in and cleared in, you are still the SF. Keep an eye on your position and WEZ, but let the EF have the fight until he clears you in. When you are cleared in for the shot, or because EF has gone defensive, convert this entry into a BFM fight using all the methods you already know. Keep in mind that a Counter flow entry is a lot like a two circle fight in BFM, you'll need a lot of energy to turn it into a kill. As you are working a Counter Flow entry, you have more opportunities to employ weapons than in a Co-Flow entry (the bandit is crossing through your WEZ twice per full turn), don't waste those opportunities.
Opportunity ShootingThere are two reasons for an opportunity shot, first if the EF requests it from you and second if survival requires it. Survival could mean that either the EF has gone defensive, or if a situation outside the fight requires it (e.g., A flight of 4 bandits is 10 miles out, heading for you. As the SF you can't engage these offensively so it's time to drop the bandit and bug out…)
Three things are required for your opportunity shot as the SF
<Did I say three things??? Hmmmm>
Only two things remain to remember about opportunity shooting;
EgressWhen the bandit is destroyed, the fighter who has the highest SA should direct the egress. This is normally the SF but it could be the EF if the SF took the kill shot. Get the flight moving in the same direction out of the area and get low to isolate all threats to the area above you. Start building back element SA with a new picture from GCI or AWACS. The fighter with more speed will be responsible for dressing up the formation, but this is secondary to gaining visual and egressing the area. Both fighters should get a good check 6 and start sanitizing their areas of responsibility. It's advisable to have one fighter be in ACM slewable to sanitize the area and the other in RWS to start clearing the exit path and regaining area SA. Do your formation re-join as soon as possible and re-establish the original mission. At this point in the maneuvering, Lead starts to reassert tactical control of the flight and modifies the original mission or presses on, as the situation warrants. Notice I didn't talk about what happens if the bandit isn't dead. In a 2v1 fight, the bandit should be dead by the time egress happens, but there are other concerns. Fuel state, prioritized items, etc., that might lead you to extend and leave the fight. If this happens, the EF is the guy who drives through the escape window first, then the SF goes. If the bandit pursues the EF, the SF should be presented an easy kill. If the bandit bugs out, the threat is over, not a factor. If the bandit turns on the SF, well, we're back where we started, except the SF is now the EF and BFMing while the former EF (now SF) maneuvers as SF to Opp Shoot the bandit, or return to normal SF roles. You cannot disengage from a determined bandit, especially if the EF is defensive <that's pretty obvious>. What you can do as the SF is maintain your energy state while the EF bleeds the bandit of energy, leaving the SF with a sure Opp shot kill.
Summarizing Offensive ACM
Go to Part III, Defensive ACM . . .
|
|||
|
© COMBATSIM.COM, INC. All Rights Reserved.
Last Updated January 20, 1999 |
||||